|
Forums36
Topics40,963
Posts557,976
Members18,503
| |
Most Online3,612
Jan 10th, 2023
|
|
|
|
Joined: Oct 2005
Posts: 6,934 Likes: 2
Ambassador
Field Correspondent Lunker
|
OP

Ambassador
Field Correspondent Lunker
Joined: Oct 2005
Posts: 6,934 Likes: 2 |
As we continue to develop our pondsite from scratch, I thought it might be the better decision to split out the launch and dock construction under a separate thread. This way, anyone looking for information for the specific category won't get lost in the pond construction stuff. I have transferred the beginning presentation of the subject from the Principal Spillway Logic thread to this thread and will follow it's development here. If there is a chance that I can pay back the PB forum support crew by helping just one other brethren, then this thread will have served a good purpose. - - Well, on to the next project; the concrete work for 2 docks and a boat launch. Jeesh, another reflection on the work that concrete guys do...truly more new-found respect! We have formed up the first pour of the launch. The rebar is laid within the forms, but not yet tied and put up on the bar chairs. 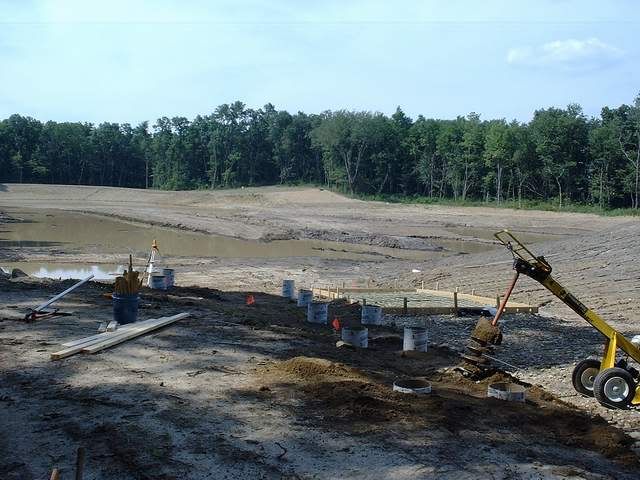 We have drilled ten 12" dia holes for the concrete piers that will support the dock that borders the launch for 44 feet with a 14' x 16' covered deck at the end. We have also installed small rebar cages within the concrete pier forms for added stability.  There another 8 more of these holes at the beach area for a smaller 20' x 12' "L" shaped dock. The 20' section runs along the edge of the sand beach (recommended by Ewest), and the 12' "L" section turns away at 90 degrees into a quick drop-off that will put it into 6-7 ft of water...a great place to temporarily tie up the Liberty Ferry. Oh yeah...we aren't hurtin' for rain, either. The banks are runnin' little erosion channels and the rye is just startin' to sprout. Nothing too severe and we really got a gully washer a couple of days ago. The 1 acre area in front of the dam has about 4-5 feet of water. We gotta hustle up this concrete work and shift to the tire pyramids and PVC tree structures. The race with Mother Nature is on. - - (OK...now on to the new stuff...)
|
|
|
|
|
Joined: Oct 2005
Posts: 6,934 Likes: 2
Ambassador
Field Correspondent Lunker
|
|
OP
Ambassador
Field Correspondent Lunker
Joined: Oct 2005
Posts: 6,934 Likes: 2 |
Before I continue, allow me to throw out some specifications and logistics.
The pondsite is at the end of a 2000 ft entry drive that was blazed last year. The last leg of this entry is about 200 ft, straight, and into the east end of the pond at a gradual slope. We knew right away that it would serve well as a boat launch. The launch will be 72' long, 12' wide, and about 6 - 7" thick. At the end of the launch, the normal pool water depth will be 5 feet. The launch is reinforced with #3 epoxy coated rebar (3/8" dia) set at 12" on-center, each way. They are set on bar chairs to elevate them. Rebar is too thick and heavy to reach into the concrete, during the pour, and just pull up from flat on the ground, like wire mesh. We are pouring the launch in sections, the first two will be 31' long. This was selected because we are using 16' long lumber for the forms AND the sides are really not accessible for a concrete truck so the pour must be done from the end. The chutes on the trucks only reach out about 20 feet or so. We used 2 x 6 for the forms. The form at the top of the pour (where the next pour will attach and continue) is drilled out with 2" dia holes at 12" o.c. and 3/4" x 18" epoxy coated dowels are laid in half way into the form zone. They will harden within the concrete, and the larger dia 2" holes should allow us to still remove the 2 x 6 form. These dowels will tie the next pour to the previous.
The round concrete piers are drilled with a 12" dia bit. They all average 48" long from the base of the hole to the top of the tube. The holes within the water are not as deep within the soil since frost heave should not be a problem there. They are, tho, drilled thru the topsoil and into the clay below for a firm bearing surface. Each hole is reinforced with a cage of epoxy coated rebar that is 4 verticals with 4 square ties of #3 rebar. The cages were pre-fab'd in the cool of the basement and the the vertical members were manufactured long. I trimmed these vertical members to length, on site, to be 8" longer the actual depth of each hole as we drilled them. This was done because the hole depths did vary somewhat. Then, each cage was set within the tube/hole and pounded with a 3# sledge until the entire cage was about 2" below the top of the tube. This centralized and stabilized the cage for the concrete pour.
|
|
|
|
|
Joined: May 2004
Posts: 234
Lunker
|
|
Lunker
Joined: May 2004
Posts: 234 |
Nice documentation. More pictures! More Pictures!  Ed
|
|
|
|
|
Joined: Sep 2003
Posts: 13,750 Likes: 295
Moderator Ambassador Field Correspondent Hall of Fame 2014  Lunker
|
Moderator Ambassador Field Correspondent Hall of Fame 2014 Lunker
Joined: Sep 2003
Posts: 13,750 Likes: 295 |
Brettski, I see some water there!
Has the urge to put in a few dozen fatheads overcome you yet???!!!!!!!
Excerpt from Robert Crais' "The Monkey's Raincoat:"
"She took another microscopic bite of her sandwich, then pushed it away. Maybe she absorbed nutrients from her surroundings."
|
|
|
|
|
Joined: Oct 2005
Posts: 6,934 Likes: 2
Ambassador
Field Correspondent Lunker
|
|
OP
Ambassador
Field Correspondent Lunker
Joined: Oct 2005
Posts: 6,934 Likes: 2 |
...Sunil identifies temptation: Brettski, I see some water there!
Has the urge to put in a few dozen fatheads overcome you yet???!!!!!!! ...No, not yet. I have my hands full with these other priority projects....but....a couple more good rains, a few more weeks of construction progress, ....? - - We elected to cut the verts on the rebar cages on-site since I was unsure as to the actual depths of each...no biggie. I went to Menards and purchased their largest bolt cutter; a unit 30" in length. I went home and did a test-run on a pc of rebar on the garage floor. Now remember, this is Grade 60 rebar; the good stuff. It also makes it harder to cut. After leaning, pumping, and re-adjusting the cut, the rebar finally yields with a high-pitched "ping" and shoots across the concrete floor like a bottle rocket. This ain't gonna git it in the dirt at the jobsite. Time for some re-engineering. I took a piece of 2 x 8 x 16" treated pine and milled a slot for the handle grip (radial arm saw). Then I cut slots thru it for 2 larger hose clamps and cranked the whole thing together to create a stabile base. Then I added a piece of chain-link fence post pipe that I had in stock.  Huge improvement. Still a bear to crank it down and cut, but manageable. Still got the high velocity "ping"  . - - The rebar mat was laid out on the ground in their respective positions. I laid the long bars first, then tied the short cross pieces one at a time. I could only do one at a time because they would roll downhill on the long bars like they were rails. Next pour, we go the opposite way :rolleyes: . I ain't no iron-worker, nor do I play one on TV, but I did stay at a Holiday Inn Express last night! We used standard issue 16 ga. annealed tie wire. I tied every junction at the perimeter to stabilize the mass. Then we hop-scotched the entire mat, adding a tie so that no tie was any further than 36" from another. Why not all of 'em?....you try it. We then elevated the mat by placing a rebar chair at about 48" o.c. They are also standard issue 3" bar chairs; a plastic cone (like a volcano) with the sides cut out for concrete permeation and round notches at the top rim to accept the rebar.  We had areas near the edges that went pretty deep. I decided it was easier to fill the gap with concrete over terra-firma as opposed to filling the holes with loose soil and compacting. In these areas, we boosted the chairs with larger rocks. At the last minute, as we rested for a couple of minutes and waited for the concrete truck, I decided that maybe I should put a tie wire thru each of the chairs and tie it to the mat. Whew...good call, Brettski. When the force of the pour hits 'em, another 11th hour decision yields good results. Oh yeah, the 3/4" x 18" smooth dowels....I cut 2" dia holes at 12" on center in the 2 x 6" form, then screwed on the backer blocks you see with 7/8" dia holes. This centralizes the bars within the 2" holes behind them. 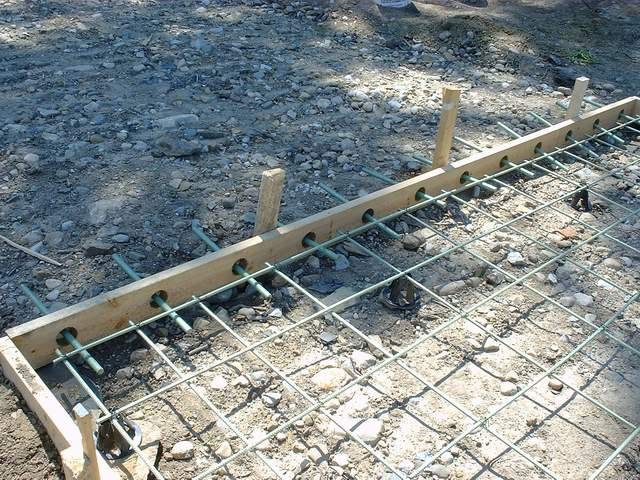 When we go to strip the forms, remove the screw-on blocks and hopefully pop off the 2 x 6 form. The 2" holes in the form should allow room to slip over the dowels, since they are not absolutely square and straight. - - Then, the pour. Boy am I glad that I bought (and brought) those waders! The entire slab took about 9 yards of concrete. 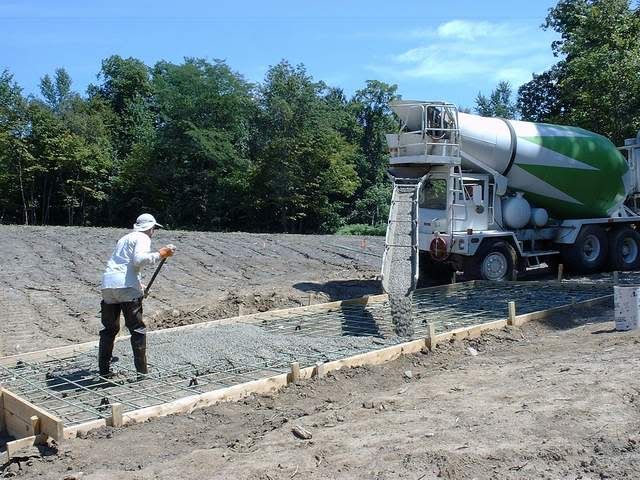 - - Donna-ski and I struck it off with a 2 x 6 x 14', using the standard sawing motion. PLEASE NOTE: Donna-ski is one tough dame. I laugh to think that she could kick most of my buddie's butts. She takes pain pills for some bad knees and still scares me. Anyway, the beauty of finishing a boat launch is that the goal is a non-skid, non-slip surface. That, and most of it is below the water, puts the finishing portion well within our DIY grasp. After we strike it off, that's it...it ain't real pretty, but looks OK for novices. Then I put the finishing touch to it  I took a garden rake and worked from each edge, dropping it in the center and drawing it back out, scraping up the top aggregate and creating the ultimate non-skid surface: 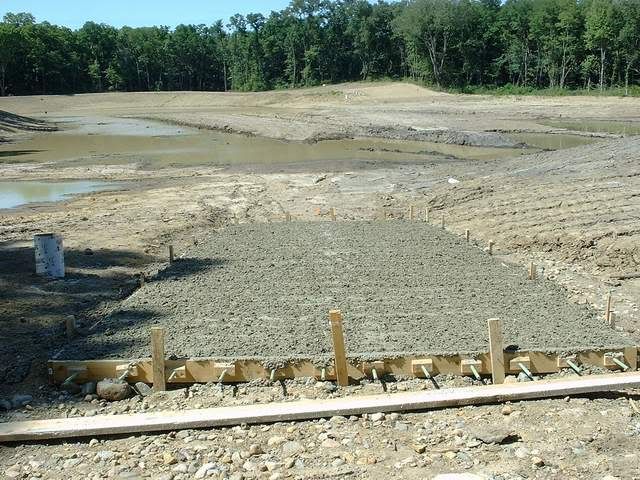 I got your broom finish right here!
|
|
|
|
|
Joined: Sep 2003
Posts: 13,750 Likes: 295
Moderator Ambassador Field Correspondent Hall of Fame 2014 Lunker
|
Moderator Ambassador Field Correspondent Hall of Fame 2014 Lunker
Joined: Sep 2003
Posts: 13,750 Likes: 295 |
Sometime in the future, you're gonna have to let us know how much this all cost you.
I could not help myself but to swing by the local bait store and buy 3 dozen fatheads (assuming they were true fatheads) and throw them into that water.
I know Guvnor Davidson would do the same.
Excerpt from Robert Crais' "The Monkey's Raincoat:"
"She took another microscopic bite of her sandwich, then pushed it away. Maybe she absorbed nutrients from her surroundings."
|
|
|
|
|
Joined: May 2004
Posts: 13,974 Likes: 277
Moderator Lunker
|
|
Moderator Lunker
Joined: May 2004
Posts: 13,974 Likes: 277 |
Originally posted by Sunil:
Sometime in the future, you're gonna have to let us know how much this all cost you.
Be sure and do so only by PM, utilizing encryption. This is one instance where violating the DLYHKHMTPC/DLYWKHMTPC rule, in the open forum, could cost hundreds of lives. Great pics and tutorial, Brettski.
"Live like you'll die tomorrow, but manage your grass like you'll live forever." -S. M. Stirling ![[Linked Image from i.pinimg.com]](https://i.pinimg.com/736x/ed/b5/e7/edb5e7f935843b996cf52be593c9ebd2--smoothie-smooth-collie.jpg)
|
|
|
|
|
Joined: Feb 2005
Posts: 4,025 Likes: 1
Lunker
|
|
Lunker
Joined: Feb 2005
Posts: 4,025 Likes: 1 |
Originally posted by Sunil:
Sometime in the future, you're gonna have to let us know how much this all cost you.
I could not help myself but to swing by the local bait store and buy 3 dozen fatheads (assuming they were true fatheads) and throw them into that water.
I know Guvnor Davidson would do the same. Maybe it cost enough that he cant afford any fatheads. :p ...but, it is one helluva job. Brettski, you're my hero.
|
|
|
|
|
Joined: Oct 2005
Posts: 6,934 Likes: 2
Ambassador
Field Correspondent Lunker
|
|
OP
Ambassador
Field Correspondent Lunker
Joined: Oct 2005
Posts: 6,934 Likes: 2 |
Thanks, guys...now the big faux-pah!
PFF just PM'd me and quizzed me on the drop of the grade vs the length. He noted that a 72' long launch that drops 5' would "put water into the truck doors before the boat floats". First I geeked out, then I remembered that about 20' is exposed on the shore. Without running out to the truck and measuring clearance and then running a buncha calc's, what's the consensus?
(thanx for the bump, PFF)
|
|
|
|
|
Joined: Dec 2005
Posts: 668
Member
|
|
Member
Joined: Dec 2005
Posts: 668 |
Whoops, I was too late to stop the pour, but if it droops 5' in 52' that is much better than 72'!
Please no more rain for a month! :|
|
|
|
|
|
Joined: Feb 2005
Posts: 4,025 Likes: 1
Lunker
|
|
Lunker
Joined: Feb 2005
Posts: 4,025 Likes: 1 |
allowing 20' for boat and tongue, when the hitch is at 2ft of water, the motor will be in 4ft. I assume you want be getting a large boat, though. With the hitch at 1ft. the motor will be in 3ft.
|
|
|
|
|
Joined: Sep 2003
Posts: 13,750 Likes: 295
Moderator Ambassador Field Correspondent Hall of Fame 2014 Lunker
|
Moderator Ambassador Field Correspondent Hall of Fame 2014 Lunker
Joined: Sep 2003
Posts: 13,750 Likes: 295 |
Unless you are planning on water skiing, I would think you would find that some of the best pond boats to use are ones that one or two guys can move around or carry.
Burg, I'll front Brettski the $10 bucks to get a few dozen "verified" fatheads. Afterall, I'm anxious to get some fish onto Sunil's Mound and into Kopecky's Ditch.
Excerpt from Robert Crais' "The Monkey's Raincoat:"
"She took another microscopic bite of her sandwich, then pushed it away. Maybe she absorbed nutrients from her surroundings."
|
|
|
|
|
Joined: Oct 2005
Posts: 6,934 Likes: 2
Ambassador
Field Correspondent Lunker
|
|
OP
Ambassador
Field Correspondent Lunker
Joined: Oct 2005
Posts: 6,934 Likes: 2 |
Burgermeister peeks into the crystal ball... I assume you want be getting a large boat, though. - - ....yeah, nothing too much...it might look outta place on a pond. I'm kinda using this as my model: 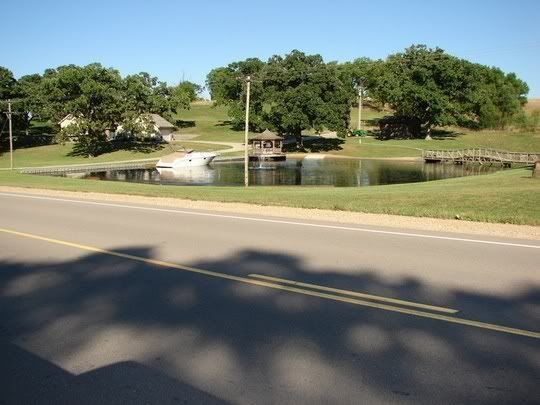
|
|
|
|
|
Joined: Aug 2004
Posts: 8,854 Likes: 1
Moderator Ambassador Field Correspondent Lunker
|
Moderator Ambassador Field Correspondent Lunker
Joined: Aug 2004
Posts: 8,854 Likes: 1 |
Fabulous thread. Brettski, you're a new classification of Pondmesiter. You're more like a "Pondfreakster". You really know how to do it up!
Holding a redear sunfish is like running with scissors.
|
|
|
|
|
Joined: Dec 2005
Posts: 668
Member
|
|
Member
Joined: Dec 2005
Posts: 668 |
Brettski- I don't see any help while you were pouring. Did you run the comealong and jitterbug by yourself? I am with Bruce, you are in a class all by yourself. "Pondfreakster Boss Supreme" 
Please no more rain for a month! :|
|
|
|
|
|
Joined: Mar 2005
Posts: 957
Lunker
|
|
Lunker
Joined: Mar 2005
Posts: 957 |
Don't for get to install the "No Wake" bouys in front of the swim-up bar and position the ski jump to face into the prevailing wind.
You are truly a man with a passion.
Are you keeping a journal with all of this information and pictures? You have the makings for several articles in PB and a great reference for the rest of us.
1/4 & 3/4 acre ponds. A thousand miles from no where and there is no place I want to be...
Dwight Yoakam
|
|
|
|
|
Joined: Oct 2005
Posts: 6,934 Likes: 2
Ambassador
Field Correspondent Lunker
|
|
OP
Ambassador
Field Correspondent Lunker
Joined: Oct 2005
Posts: 6,934 Likes: 2 |
...OK, just a little bit on the concrete piers. We laid out the exact centers of each pier right on the ground and pounded a short pc of #3 rebar into dead-center. The real trick is to transfer this exact location vertically to the top of the poured concrete pier. Remember, the post-hole digger can have a mind of it's own, especially when it hits a substantial rock or root. Also, the hole is rarely perfectly plumb; this is usually the biggest offendor. I have used a measurement transfer method before with accurate success, but did not take pics of it's application during this project. I can expand on it and fudge in a pictorial should someone care to see it. OK, the holes are drilled, the tubes are FIRMLY placed within the holes, and the center locations have been transferred to the tops of the tubes. Time to pour concrete, right? Almost. Cut an extra tube, or a leftover cut-off, in half length-wise. It should be a min of about 24" or so. It will save a bunch of concrete over-spill. 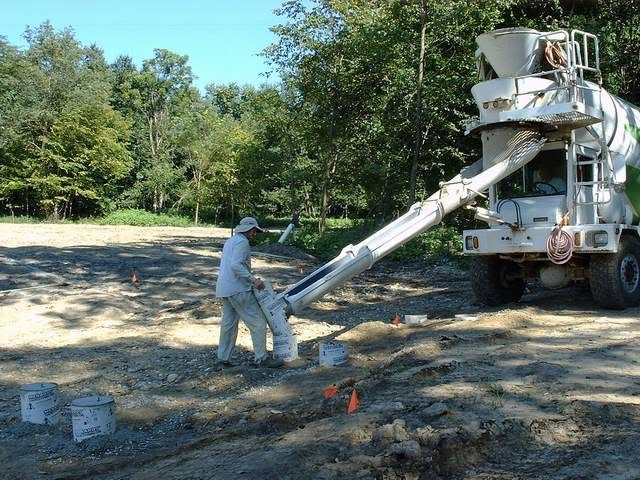 - - As noted above, some of the drilled piers holes wound up with a slant. Instead of leaving the form tubes loose in the hole and propped up perfectly vertical with stakes and supports, I make sure they are tightly jammed in, won't move, and accept the lean. I used my eye to trowel down the surface to "close to level", then used a short bubble level (right on the wet concrete) to finish it. (you will also note that the anchor bolt is off-center. Not really...it is actually dead on WRT the layout) 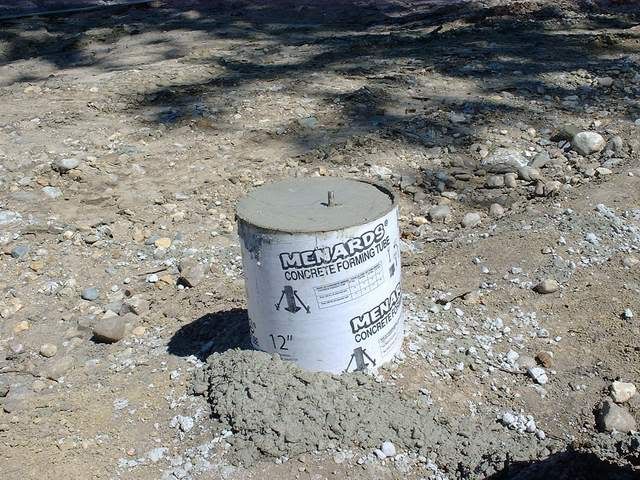 - - We used 1/2" x 12" 18-8 Stainless Steel "L" anchor bolts. I left about 1" exposed to accommodate the post base, a couple of SS washers and a nut. 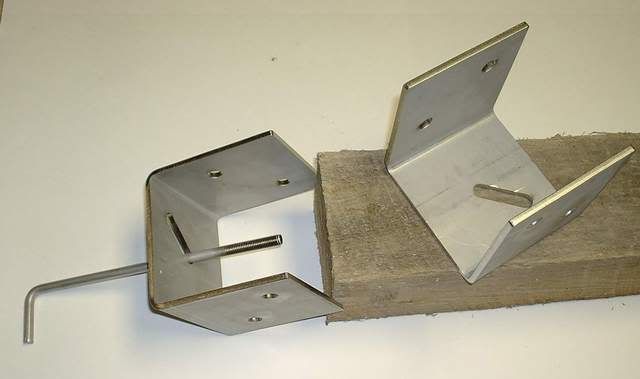 The 1/4" SS post bases will come into play a couple weeks out when we start framing.
|
|
|
|
|
Joined: Oct 2005
Posts: 6,934 Likes: 2
Ambassador
Field Correspondent Lunker
|
|
OP
Ambassador
Field Correspondent Lunker
Joined: Oct 2005
Posts: 6,934 Likes: 2 |
Well, another day in paradise...pass the Ibuprofen, please. When we brought through the concrete truck with 10 yards in the barrel 3 days ago, he found one soft spot in the new driveway constructed last Fall. Today, we summonned 14 tons of "oversize" (rock/clay), quasi-tailgated, adjusted with shovels (dozer and backhoe are long gone...ugh!), and mashed in with the tri-axle running back and forth. This one took about 2 hours of chain-gang misery. - - OK, now back to the subject...the launch. The forms popped off pretty darn easy. The smooth dowels worked out great. Finally, a project phase works as planned! 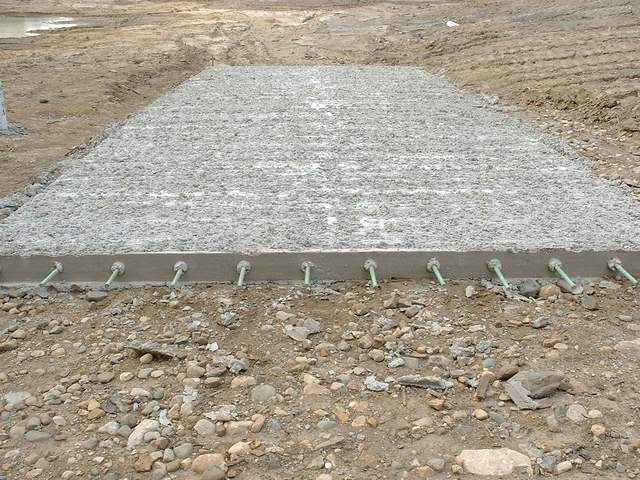 - - As noted in a previous post, we had some areas that deepened well below the 2 x 6 forms. We used additional 2 x 4's and and, in one area, additional 2 x 6's below the primary forms. Now I know where 9 yards of concrete went. 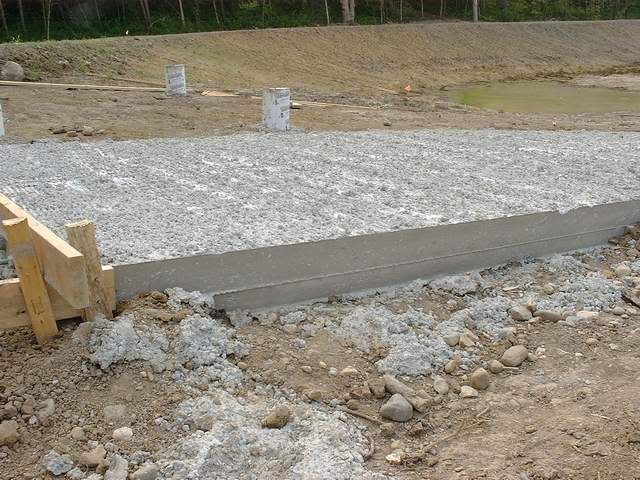 - - We re-used the forms and set 'em up for the next 31' of launch to be poured. We're gonna dowel this pour, also, because there will be one more pour to create an apron to tie back into grade. 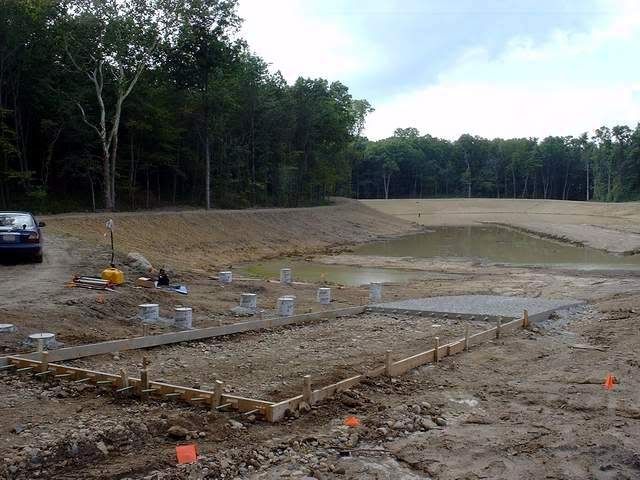 - - Pursuant to some hyper-tension suffered a couple of days ago at the hands of PFF, I took specific elevation readings vs. length of launch run. At normal pool, we will have 56' of the launch underwater and the end will be at 5 ft depth. This, to me, is not ideal by any means but is acceptable for the application. No doubt, any truck will be in the water during a launch, but shouldn't be gurgling . Sedans....this might be a problem.
|
|
|
|
|
Joined: Dec 2005
Posts: 668
Member
|
|
Member
Joined: Dec 2005
Posts: 668 |
Pursuant to some hyper-tension suffered a couple of days ago at the hands of PFF I am glad I had a hand or hands involved in such a wonderful project. :rolleyes: :p
Please no more rain for a month! :|
|
|
|
|
|
Joined: Sep 2003
Posts: 13,750 Likes: 295
Moderator Ambassador Field Correspondent Hall of Fame 2014 Lunker
|
Moderator Ambassador Field Correspondent Hall of Fame 2014 Lunker
Joined: Sep 2003
Posts: 13,750 Likes: 295 |
Those puddles are screaming "fatheads, fatheads, please!!!!" to me, and I can't get it out of my head.
Excerpt from Robert Crais' "The Monkey's Raincoat:"
"She took another microscopic bite of her sandwich, then pushed it away. Maybe she absorbed nutrients from her surroundings."
|
|
|
|
|
Joined: Oct 2005
Posts: 6,934 Likes: 2
Ambassador
Field Correspondent Lunker
|
|
OP
Ambassador
Field Correspondent Lunker
Joined: Oct 2005
Posts: 6,934 Likes: 2 |
...another sweaty day in paradise. Overcast and cloudy is a welcome blessing. We laid in the rebar for pour #2, tied the bars, and propped up the mat on bar chairs. 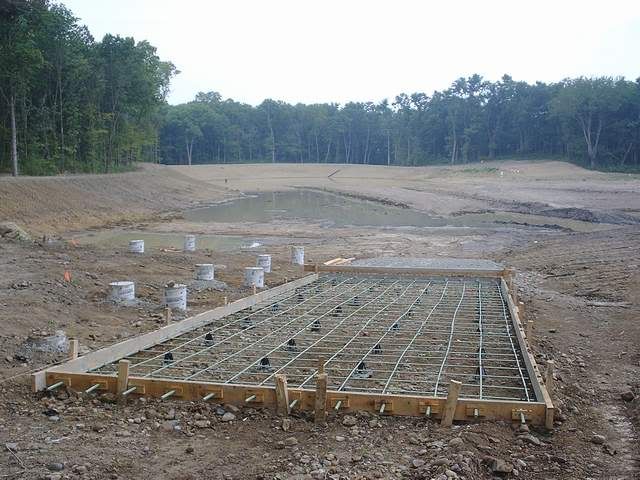 - - Continuous, multiple pours above grade are typically separated at the smooth-dowel seams with expansion joint. I conferred with a trusted friend and concrete contractor and he dismissed expansion joint as unnecessary for such a low-tech, underwater application. He did insist, though, on doweling the slabs together. 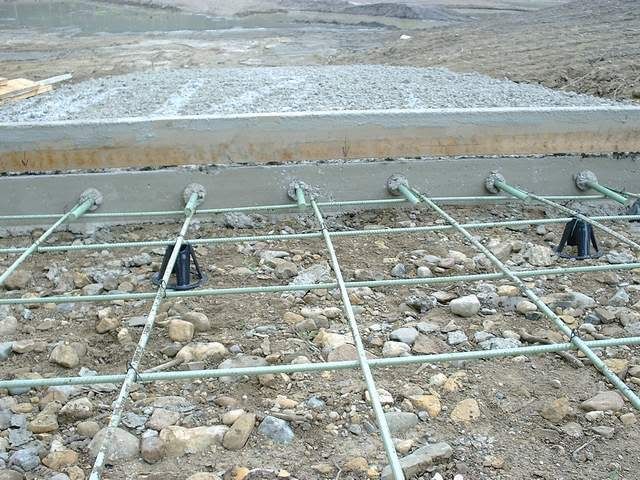 - - This is gonna be another pretty thick pour. Since I don't want to lose too much slope, as it is already lower than ideal, we are keeping the top end of the pour as high as practical. That, and the edges of this pour, like the first, drop off to create thicker edges. I'm guestimating 9 yards on this one.
|
|
|
|
|
Joined: May 2004
Posts: 13,974 Likes: 277
Moderator Lunker
|
|
Moderator Lunker
Joined: May 2004
Posts: 13,974 Likes: 277 |
On close examination, I don't see any backs on your rebar supports. They look more like bar stools than chairs.
"Live like you'll die tomorrow, but manage your grass like you'll live forever." -S. M. Stirling
|
|
|
|
|
Joined: Dec 2005
Posts: 668
Member
|
|
Member
Joined: Dec 2005
Posts: 668 |
In the future we will all try and call them "bar stools", so we can satisfy your aesthetic values! :rolleyes:
Please no more rain for a month! :|
|
|
|
|
|
Joined: Mar 2005
Posts: 821
Lunker
|
|
Lunker
Joined: Mar 2005
Posts: 821 |
Brettski,
I like your style! Great work and thanks for the photos.
gator
- Smoke 'em if you got 'em ![[Linked Image from i4.photobucket.com]](http://i4.photobucket.com/albums/y117/darnold01/Sheriff-Gator-Large.jpg)
|
|
|
|
|
Joined: Jul 2003
Posts: 214
Lunker
|
|
Lunker
Joined: Jul 2003
Posts: 214 |
Really nice work and very detailed. Thanks for sharing your project with us Brettski. I love to watch somebody that enjoys what they're doing.
CR
|
|
|
|
|
Joined: Oct 2005
Posts: 6,934 Likes: 2
Ambassador
Field Correspondent Lunker
|
|
OP
Ambassador
Field Correspondent Lunker
Joined: Oct 2005
Posts: 6,934 Likes: 2 |
We have elected to put the second slab pour on hold. Not only are we waiting for a series of rain-free days, but we need to re-charge the checking account. My in-house bookkeeper has been VERY cooperative in juggling the books to meet my all-consuming pondmeister's disease, but my suggestion to forego eating has been trumped. Somewhat distrought, I immediately hooked up the trailer and initiated a 2 hour therapy session at Menards. There's something magical about quality time spent selecting, pumping, and bench pressing a bunk of green treat lumber. More importantly, my green-treat health plan has been pre-approved and funded  . - The docks have been engineered to consider the lateral force of shifting ice as our strongest foe at the foundation. This is the reason rebar cages were embedded within the concrete piers. The stainless steel post bases (pic in prev post) should provide a stout transition from the concrete pier tops to the 6 x 6 green treat timber vertical supports. 2 x stock will be the connecting structurals. All this will be tied together with stainless steel hardware. After the concrete piers cured, and during our last visit to tie the rebar mat for the upcoming 2nd concrete launch pour, we shot the top elevations of each pier. This allowed me to run the calc's and pre-cut the cumbersome 6 x 6 verticals at home. The 2 x stock is much easier to handle and will be cut to size at the jobsite. The tops of the SS anchor bolts protrude about 1". I want the timbers to bear directly down and upon the supporting post base, so an accommodation hole must be bored. This was done with a 1.750" dia forstner bit on site. 1.750" dia was selected to elimate bearing restriction by the 1.500" dia double washers under the nut on the post base bracket. The accommodation hole was bored on site because it's location varied from pier-to-pier based on fine-tuning the post base bracket location within the overall layout. I had the brackets fabricated with a 2.5" long slot for just this very reason. After the hole is bored, we soaked the entire end of the timber and hole with preservative. 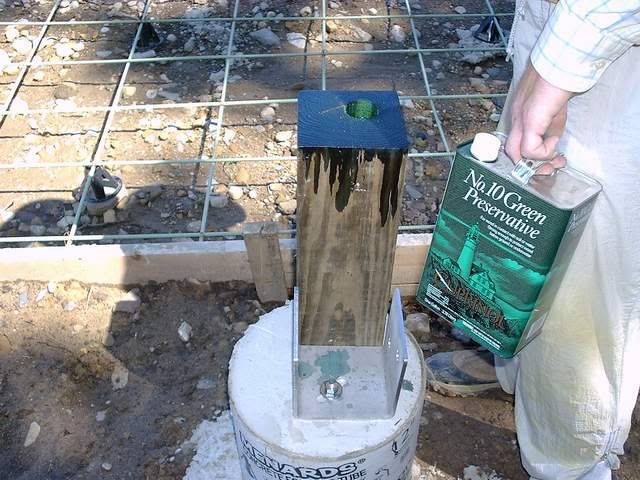 - - The vertical was dropped into the bracket and plumbed for level. 2 pc of 1/2" x 4" stainless lags are then cranked in, one from each side, to complete the vertical support. EDITOR'S NOTE: If you have ever done this kinda stuff and remember the time and effort expended spinning and cranking on a ratchet and socket to drive lag screws, there's a new sheriff in town. He's riding a compressor and slingin' an impact driver. Absolutely, positively, this is the only way to drive those beasts, hands down! (another editor's note: it just hit me like a ton'a'brix...DOH! I have a brand new Bosch hammer drill that I bought 2 years ago, sitting in a box in the basement. Betcha that would'a blown the bolt holes thru the timbers alot easier than the standard 1/2" drill I used. Like I said...DOH!) OK, I'm a little better now...let's continue. 2 x 8's were used as ledger boards. They are attached to the verts with 1/2" x 10" stainless carriage bolts (these are the holes that I was talkin' about during my above "hammer drill" epiphany). This foundation technique is typical and repeated for all the dock supports. 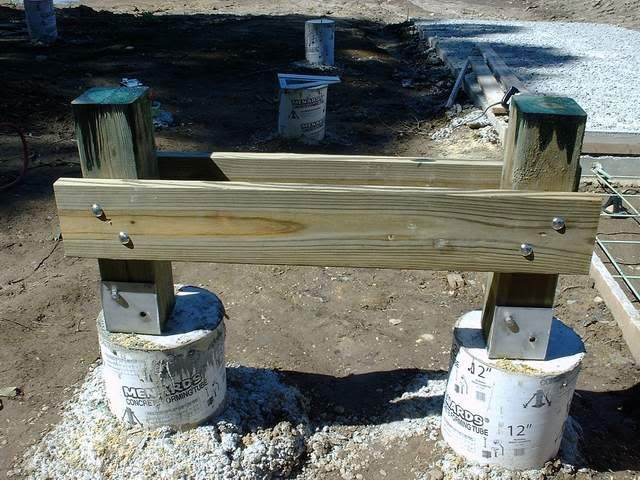 - - The dock at the this launch area has a 14' x 16' covered deck planned. This will be a construction headache unto itself and will be saved for another (soon to come) day. As a result, we are done for today on this dock after we install the 2 x 8 deck stringers. These outside stringer members are lagged into the verts with 5/16" x 4" stainless lags. The center stringer is toe-nailed into the ledgers with #10 x 3" stainless screws. 2 x 8 cross-blocking is planned between the stringers to minimize twist and rack; soon come. The resulting mass is strong. Donna-ski applies liberal coats of preservative to the tops of the verts as I chug Gatorade and take a few file pics. 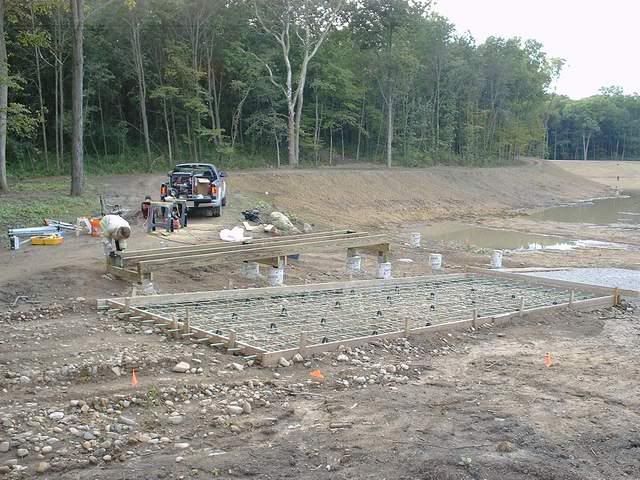 - - We pack up the truck and head on over to the beach area (man, I can't wait for the day when that means a picnic and a dip in the water). Not today, lifeguard boy. Strap on your toolbelt, we got's mo' woik to du. We followed the exact same process at the beach dock, except this project is a somewhat simpler since there is no covered deck planned. The first section of dock is 20 feet long, parallel to the sand beach. The second "L" section is another 12', the last 2 feet cantilevered. We selected this spot to create the beach area because of it's southern exposure, topography, and great view. As planned, there is virtually no shade on the entire knoll. Enter another good decision; the 10' square collapseable shelter. 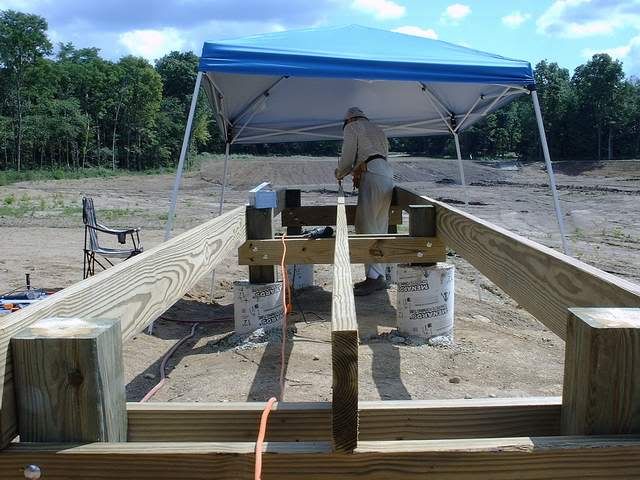 - - The "L" section was attached to the main dock section with stainless steel joist hangers. Instead of using nails, we opted for #10 x 3" screws to increase grip. 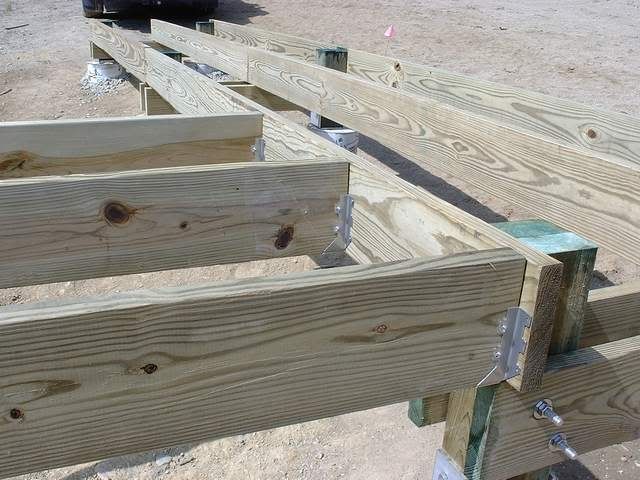 - - ...and then, the final product. This structure will also receive 2 x 8 cross blocks to resist twist and rack, but that will be the final touch before applying decking. 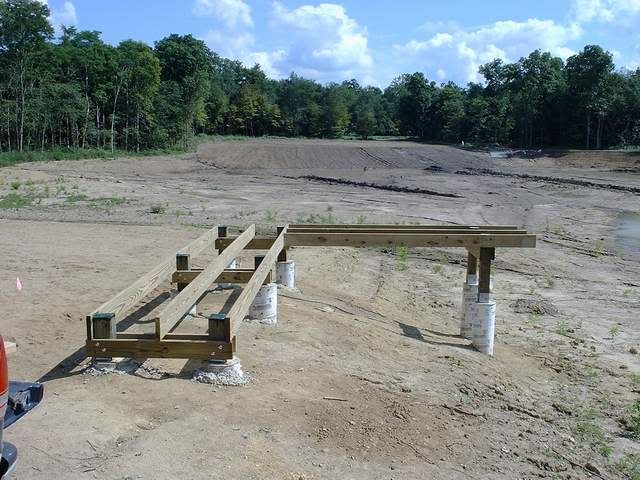 - 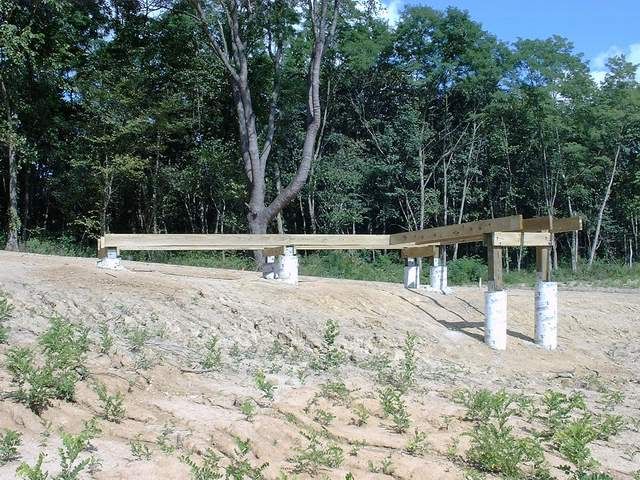
|
|
|
|
|
Joined: May 2004
Posts: 13,974 Likes: 277
Moderator Lunker
|
|
Moderator Lunker
Joined: May 2004
Posts: 13,974 Likes: 277 |
Good looking work, Brettski. I see the water's creeping a little closer to shore.
"Live like you'll die tomorrow, but manage your grass like you'll live forever." -S. M. Stirling
|
|
|
|
|
Joined: Apr 2006
Posts: 3,261
Ambassador Lunker
|
|
Ambassador Lunker
Joined: Apr 2006
Posts: 3,261 |
what kind of thought have you given deck material? since money is no object :rolleyes: i would recommend something requiring no maintenance other than sweeping, (i dont think you want to be re-applying stain or sealants in a couple years, over or near the water).
awesome project thread Brettski, you are truly making me dribble.....where's my bib?
GSF are people too!  
|
|
|
|
|
Joined: Oct 2005
Posts: 6,934 Likes: 2
Ambassador
Field Correspondent Lunker
|
|
OP
Ambassador
Field Correspondent Lunker
Joined: Oct 2005
Posts: 6,934 Likes: 2 |
Ol' Dave is on the right track... what kind of thought have you given deck material? since money is no object i would recommend something requiring no maintenance other than sweeping, (i dont think you want to be re-applying stain or sealants in a couple years, over or near the water). The plan is definitely low/no maintenance. That, and a non-skid type surface. I haven't selected the decking yet, but the final choice must meet the aforementioned criteria. The plan here is to complete the framing for both docks, then "hit the hooks" to allow moving back to structure placement and other various periphery projects that I wanna address BW (before water). This way, I can keep my radar scanning for a good deal on decking. There is a popular auction held in the midwest for construction materials. One of my pals has attended and says that overruns and excess decking is a hi volume item...I gotta try to check out their Fall event. - - We shifted back to the launch zone and focused on the main deck at the end of the dock. This was the one I somewhat feared. You see, we buy pretty much all our lumber at Menards; good price, great selection and stock. I believe they own the pressure treating facility...? Anyway, they move so much of this stuff that the stock is always fresh outta the pressure treating vessel. I mean it weighs tons! The main supports for this 14' x 16' deck is 4 pc of 6 x 6 timbers that vary in length between 10 and 12'. When we "selected" these weighty beasts from the rack at Menards, I knew a special "installation experience" was in my future. I brought ropes, straps, cleats, pusher boards, and about 5 engineering plans for not only elevating them onto the concrete piers, but holding them there while the connecting structures could be applied to keep them vertical. In the end, it was good old fashioned backbone and sinew that got them up there and couple of stakes with wood batter piles that held them plumb. WHEW, what a relief! 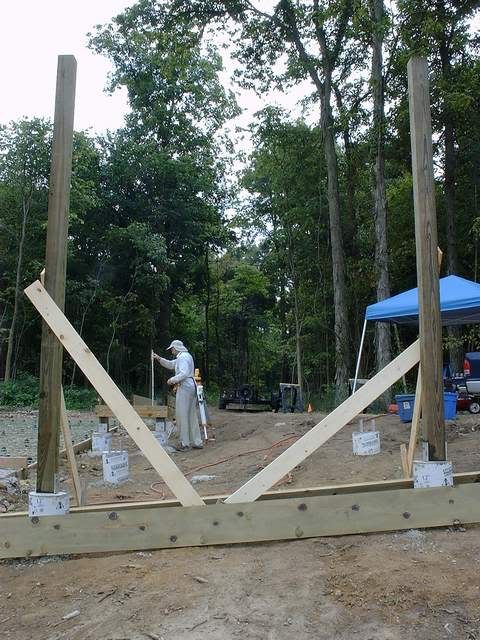 - - The main deck supports are 2 x 12 x 16', doubled up (one each side of the 6 x 6 vert) and thru-bolted with 3 pc 1/2" x 10" Stainless carriage bolts. 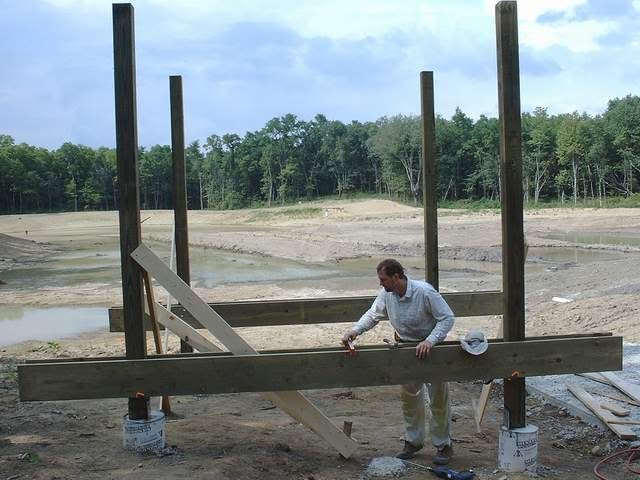 - - The floor joists are 2 x 10 x 14'. We flipped 'em up onto the deck supports to use as a temporary work deck. Next step, install the roof support members. A 2 x 10 cross member was installed to minimize racking and to tie the top of the verts. It also provides a shelf to set the main roof supports on for fastening to the verts (critical engineering foresight for a top-heavy and dangerously awkward construction segment). Identical to the deck support framing, 2 x 12 x 16' roof framing supports are installed. 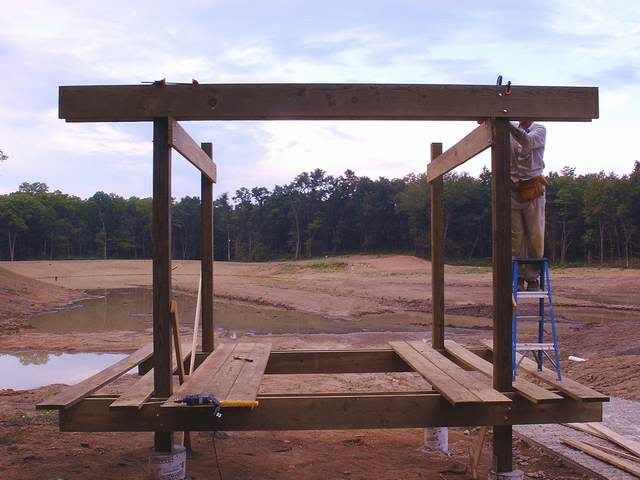 - - After the opposing, second set of 2 x 12 roof framing supports are installed, that's it for the roof for this year. The Spring 2007 plan is to set pre-fab roof trusses at 24" OC attached with hurricane clips. 1 x battens and painted metal roofing will complete the roof structure (inspired by the Jeff Gaines project...thanks, Jeff. A note of thanks also goes out to Ahvatsa who spun off the Gaines design to another great dock/deck project)
|
|
|
|
|
Joined: May 2004
Posts: 13,974 Likes: 277
Moderator Lunker
|
|
Moderator Lunker
Joined: May 2004
Posts: 13,974 Likes: 277 |
Brettski, I have the reputation on both sides of the family for overbuilding projects. "Hell for stout," my late father-in-law often said.
Sir, that dock post-and-frame looks as well built as anything I have put together. My hat is tipped in recognition of your planning, execution, and documentary footage.
Forget going back to college. I hereby grant you an Honorary Doctorate from the Hardly Able School of Construction Engineering.
"Live like you'll die tomorrow, but manage your grass like you'll live forever." -S. M. Stirling
|
|
|
|
|
Joined: Jun 2003
Posts: 107
Lunker
|
|
Lunker
Joined: Jun 2003
Posts: 107 |
Brettski,
It is interesting to watch your progress - great pictures!
Make sure that you install some diagonal bracing to keep the structure square. My metal roof was a bit heavy and shaky until I added diagonals.
I am pleased to report that my dock has handled some intense storms. We got hit hard a month ago and I lost dozens of large oaks, hickory and ash, but the dock stood firm with no damage.
Jeff Gaines
|
|
|
|
|
Joined: Sep 2003
Posts: 13,750 Likes: 295
Moderator Ambassador Field Correspondent Hall of Fame 2014 Lunker
|
Moderator Ambassador Field Correspondent Hall of Fame 2014 Lunker
Joined: Sep 2003
Posts: 13,750 Likes: 295 |
It is quite impressive.
By the way, Brettski,....don't be too surprised if you see swarms of fathead minnows in those mini-ponds. I was there last weekend.
On a less desireable side note, 'Ole Mudcat Joe was there too, although he'll testify that he didn't stock any bullies.
Excerpt from Robert Crais' "The Monkey's Raincoat:"
"She took another microscopic bite of her sandwich, then pushed it away. Maybe she absorbed nutrients from her surroundings."
|
|
|
|
|
Joined: Nov 2005
Posts: 773 Likes: 1
Lunker
|
|
Lunker
Joined: Nov 2005
Posts: 773 Likes: 1 |
Brettski,
Holey Moley!!! You've done it again. You started another must read thread that I'll have to come back to several times a day to see if you've updated it.
Your dock sounds like it will be large enough to be very roomy and allow you to spend allot of time there with lots and lots of friends. In my next life, that's just what I want to do.
Thanks for sharing the pics and keeping us updated.
Eddie
|
|
|
|
|
Joined: Oct 2005
Posts: 6,934 Likes: 2
Ambassador
Field Correspondent Lunker
|
|
OP
Ambassador
Field Correspondent Lunker
Joined: Oct 2005
Posts: 6,934 Likes: 2 |
Professor Gallus delivers a coveted award for achievement: Forget going back to college. I hereby grant you an Honorary Doctorate from the Hardly Able School of Construction Engineering.
...this should help offset my high school graduating class vote of "most likely to party". - - Jeff, my trusted PB dock motivational speaker, offers sound engineering advice... Make sure that you install some diagonal bracing to keep the structure square. My metal roof was a bit heavy and shaky until I added diagonals.
I am pleased to report that my dock has handled some intense storms. We got hit hard a month ago and I lost dozens of large oaks, hickory and ash, but the dock stood firm with no damage.
I am glad that you mentioned this, Jeff. It was already on the drawing board, but I needed to hear it from "the man who owns one". You see, about 6 years ago I built an octagonal gazebo off our back deck, using very similar construction technique except the verts are 4 x 4. After attaching the roof, it was shaky and spindly...like a big, drunk spider in the wind. I added 4 x 4 diagonals, mitred and thru-bolted into an "X", between each vert. The spider sobered up, stout and tight as a drum, and went on to become the model for the War of the Worlds. :rolleyes: If you go back to my last post, where I describe attaching the double 2 x 12 x 16' support members to the tops of the verts, you will remember and see the 2 x 10 cross member that I installed just below them to tie the verts together and minimize some of the rack. The plan would be to add another 2 x 10 just the other side of the existing and thru-bolt the entire mass...just like the perpendicular 2 x 12's they support. Then, I can cut 6 x 6 diagonals about 3 or 4 feet long, mitre the ends at 45 degrees (like one section of a picture frame). They can be thru-bolted, sandwiched between the 2 x stock running horizontal, and the other end can be either lagged or thru-bolted to the 6 x 6 vert. It will be OTT for structural integrity, but look very cool. The drawback will be the head-room obstruction potential. I s'pose if one kept them closer to 3 ft long overall, the chance of head bumps is minimized. I truly mourn the loss of your beautiful trees. They are not so easily replaced... - - ...Sunil is relentless (and appreciated): By the way, Brettski,....don't be too surprised if you see swarms of fathead minnows in those mini-ponds. I was there last weekend.
How and where do I find "certified" fathead minnows? I have read enough on this forum to fear introduction of unwanted guests. (oh yeah, and for the record, Norm's Ditch has about 3-4" of water and Sunil's Mound stands another 2 feet higher, surrounded by water ). - - Mr Walker chimes in support: Your dock sounds like it will be large enough to be very roomy and allow you to spend allot of time there with lots and lots of friends. In my next life, that's just what I want to do.
...Eddie, with your boundless DIY talent, I foresee you cutting down a redwood and carving the same deck, as one piece, with a stone sharpened grouser bar as a blade. Don't forget to wrap one end with a roll of ductape...I think that's how Henckels does it...? Oh yeah...and remember...all your hobbies have to wait 'til AFTER the dishes are cleaned and dried. No lip, Mister, or it's straight to the dozer without diesel! - - (thanks, guys....your support means alot)
|
|
|
|
|
Joined: Jan 2005
Posts: 1,239
Lunker
|
|
Lunker
Joined: Jan 2005
Posts: 1,239 |
Brettski remember those house plans I sent you, in rereference you stated you were wanting to build a small retreat cabin. Looks to me like you are already well on your way with that monster dock, just add a few more piers and some walls and wa-la a cabin on the water. Then you can quite worring about the slopes to the house pad etc and you'll save a bundle too. Looks great like all the rest or your work thus far.
Eddie he's correct you'll have to schedule dozer time now.
 The road goes on forever and the party nevers end...............................................
|
|
|
|
|
Joined: Oct 2005
Posts: 6,934 Likes: 2
Ambassador
Field Correspondent Lunker
|
|
OP
Ambassador
Field Correspondent Lunker
Joined: Oct 2005
Posts: 6,934 Likes: 2 |
...it seems the inventor in Rockytopper never takes a day off: ...just add a few more piers and some walls and wa-la a cabin on the water. C'mon RockyT...I promised the boss we would take a break after we finished framing it out. Besides, I'm thinkin a small houseboat might look nice tied up to it AND meet all the immediate camping requirements...once we see a bunch more water . - - Well, 9 more yards of concrete and pad number 2 is poured and completed. This gives us 12' x 62' of launch. I figger the apron at the top will come in around 8 more ft of length. 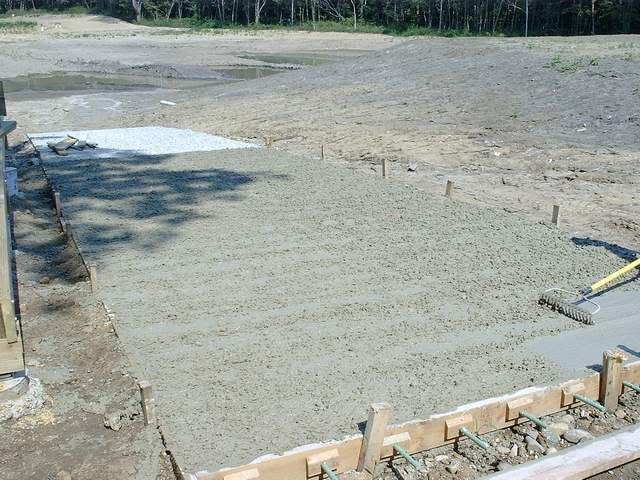 We stole a couple of 5 gal buckets-worth of concrete out of the end of the pour to set the strainer support rod on the intake end of the dry hydrant line. I'll post pics on that with the balance of the dry hydrant installation pics. Oh yeah, and talk about a close guesstimate of required concrete. I wrestled with ordering what calc'd out to exactly 9 yards, or order 10 and not sweat it. Well, I went with 9 :rolleyes: . We had about 4 more feet of the pour to go to get to the top and the driver gets out and climbs up to look into the barrel...this can't be good. He shakes his head and says it's gonna be close. Well, we finish the slab pour (barely) and he swings the chute over to my 2 five gal buckets staged off to the side. We got exactly both of them filled by me using the shovel to scrape out the chute. Not another pebble more. Poifect...I used the buckets to fill the hole for the dry hydrant support rod; end of story! - - A little lunch break, and back to the green treat. We put up the last 2 pc of 2 x 12 x 16' for the roof supports. Then we set the 2 x 10 x 14' floor joists by toe-nailing them into the 2 x 12 x 16' supports with #10 x 3" stainless screws. Then, we set blocks between the floor joists and screwed them thru the joists with the same screws. The resulting floor framework is solid. 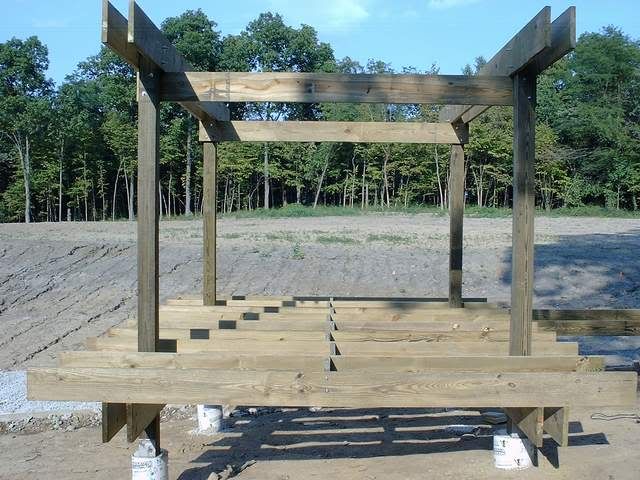 - - OK, time to go back to the dock and tie the whole shootin' match together. We laid in the last 2 x 8 x 10' stringers. They span from the 3rd concrete dock support to the deck we just completed framing. The attachment to the deck is with the same size/type stainless steel joist hangers we used on the beach pier with the same type #10 x 3" stainless screws for fasteners. There will be a small step up from the dock to the deck...it was an engineering issue I had to accept...not a real biggie. Anyway, it came together well.  - - We'll see how the boss feels about spending her last day of vacation. She's probably thinking R & R and maybe dinner or lunch at a nice restaurant. I'm thinkin' "stackin' tire pyramids and settin' PVC trees". There must be a reasonable compromise....? - (edit; a day later, the reasonable compromise was a nice picnic at the pondsite AFTER wrestling with old truck/tractor tires and assembling PVC trees. I gotta think I got the better end of the deal :rolleyes: . For details, spin off to the PVC trees thread and head to the bottom of the page for installation.)
|
|
|
|
|
Joined: Oct 2005
Posts: 6,934 Likes: 2
Ambassador
Field Correspondent Lunker
|
|
OP
Ambassador
Field Correspondent Lunker
Joined: Oct 2005
Posts: 6,934 Likes: 2 |
Originally posted by Gainesjs:
Make sure that you install some diagonal bracing to keep the structure square. My metal roof was a bit heavy and shaky until I added diagonals.
I am pleased to report that my dock has handled some intense storms. We got hit hard a month ago and I lost dozens of large oaks, hickory and ash, but the dock stood firm with no damage. OK Jeff...done. I picked up 4 pc of green treat 6 x 6 x 8ft and pre-fab'd 'em at home. I cut each 8 footer dead center with a 45 degree cut. Then, I pre-drilled the 1/2" hole for the mounting bolt at each 45, adding a 1.500" dia countersunk hole to accept and recess the washer and nut. The other end of ea timber brace, the square end, is the easy one and will be drilled on site during installation. I picked up 16 more 1/2" x 10" SS carriage bolts and matching washers and nuts. Load up the generator and we're back off to the project. It took a couple of hours but turned out great. 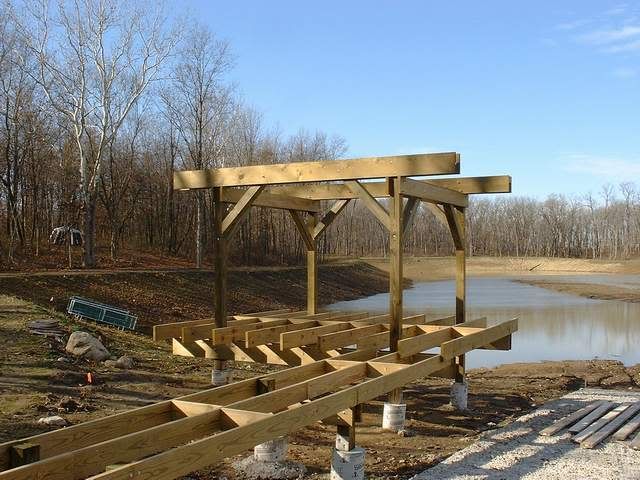 - - Before we installed the diagonal timbers, I had to add one more 2 x 10 ledger opposite the existing ledger....cake. Then the top end of each diagonal (the square end)is sandwiched between the 2 x stock and thru-bolted with the 1/2" SS carriage bolts. The 45 degree cuts mated with the verts absolutely dead on and bolted on like they belonged there all along. 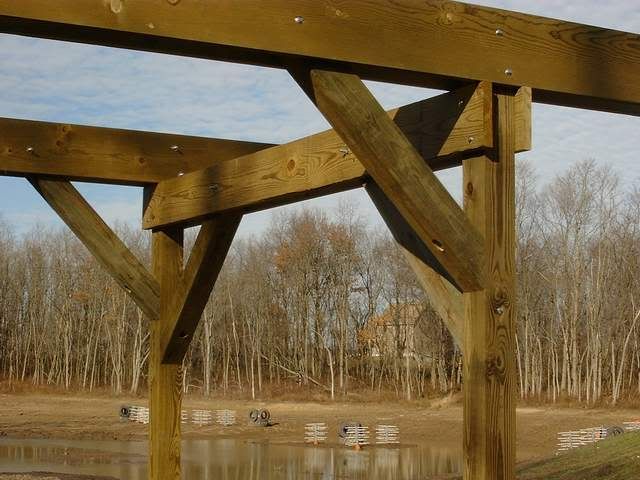 - - Now I have to keep my eyes and ears open to find a good deal on manufactured decking. After that, load up the trailer with pre-fab roof trusses and metal roofing. - QUESTION: I have very little exposure to metal roofing installation. I know that on a house a plywood or OSB roof deck should be installed. Should I do the same here or just use firring strips perpendicular to the trusses? I sure like the simplicity of firring strips AND the weight reduction.
|
|
|
|
|
Joined: May 2004
Posts: 13,974 Likes: 277
Moderator Lunker
|
|
Moderator Lunker
Joined: May 2004
Posts: 13,974 Likes: 277 |
Good work, Grasshopper. On metal roofing: Normal protocol is to use 2"x4"s (called purlins, today's $2 word that I didn't learn until my 4th barn), going perpendicularly across the trusses/rafter boards, to hold up the metal roofing, which itself is perpendicular to the purlins. Typical purlins spacing would be 2' apart, perhaps wider in areas with a lower expected snow load or for steeper roofs. The 2"x4"s are of course stronger in this role if oriented vertically (the 4" going up and down, the 2" contacting the rafters and the roofing). Concerned amateurs nail or screw the roofing through the raised ridges onto the purlins, barn #4's "professionals" (  :rolleyes: ) screwed it through the flats (we were a little unhappy about that - it may be OK since it's screwed, if nailed it would be a nightmare). Here's the best digital picture I could find of installed purlins and roofing (a ltttle blurry because the building was not the main subject). You can see the siding on the wall better and it is put on completely analogously to the roofing, other than the orientation of the 2"x4"s. I hop this helps. 
"Live like you'll die tomorrow, but manage your grass like you'll live forever." -S. M. Stirling
|
|
|
|
|
Joined: Oct 2005
Posts: 6,934 Likes: 2
Ambassador
Field Correspondent Lunker
|
|
OP
Ambassador
Field Correspondent Lunker
Joined: Oct 2005
Posts: 6,934 Likes: 2 |
I want to go with 4/12 prefab roof trusses, 24" o/c. I have to imagine that 2 x 4 purlins at 24" o/c should be plenty stout. A 4/12 pitched metal roof should shed snow fairly well...? This being true, laying them flat should be reasonable practice...? Besides, what type/length of fastener would be used to go thru 3.5" of inverted 2 x 4, plus seat/bond with the support member?
|
|
|
|
|
Joined: Nov 2005
Posts: 773 Likes: 1
Lunker
|
|
Lunker
Joined: Nov 2005
Posts: 773 Likes: 1 |
Brettski, I have some experience with metal roofs on wooden buildings. The attached picture is of my wife as we put the roof on our home. The metal is attached to the purlins. It's always screwed on. NEVER nailed. The screws have rubber gaskets on them that you tighten until it starts to bulge. Too tight and you will break the seal. The screws go through the low part of the metal directly into the purlins. You NEVER attach a metal roof through the ridges. Metal comes in three foot widths, but it's easy to overlap sections in one foot widths. Your supplier will pre-cut it to you in any length you want. Spacing of your truss's can vary from four feet to 16 feet or more. I like 4 foot centers on my truss's. Your purlins need to span the width of each truss. I like 12 foot pulins and I stagger there ends. Each one up starts on a different truss to tie everything together. My purlins are on 4 foot centers. Without snow, you can put them further, but snow load and pitch need to be engineered if you do that. I wouldn't. You can put them closer if you like, it's just extra lumber. With your truss's on 4 ft centers, you can use 2x4's on there flat sides. Further spacing of the trusses will require 2x4's on there edges. It's real easy to attach them on there flats, so that's the way I do it. This also gives you a large surface to attach your metal panels. I buy my stuff at www.muellerinc.com here in Texas. I know they are not in your area, but they have a good website with prices that should give you some ideas. Home Depot and Lowes don't sell good metal. If you want to do it once, buy from a metal building supply house. The main failure point on metal roofs is the screws. Mostly it's from overtightenign them, but cheap screws will fail. They either have inferior rubber gaskets or the metal is crap. Buy quality screws!!! To keep it simple, build a gable roof. A hip roof might look nicer, but it's more work and the framining is allot more involved. Have fun, Eddie 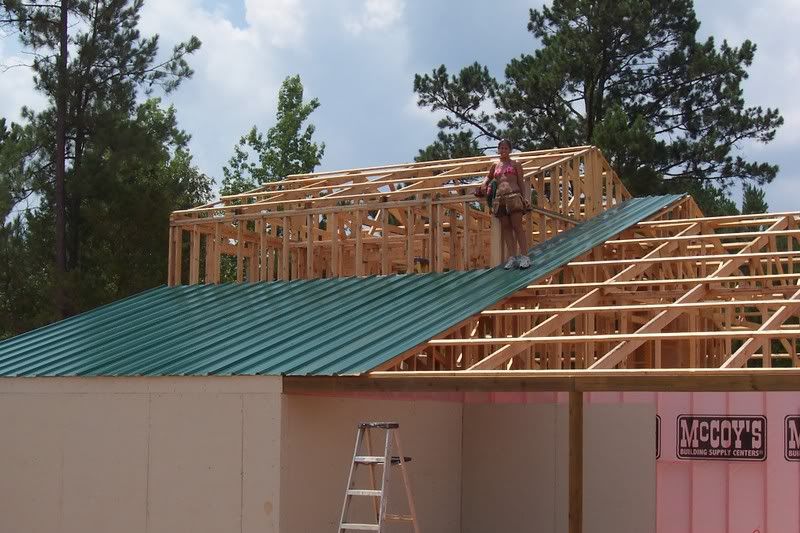
|
|
|
|
|
Joined: May 2004
Posts: 13,974 Likes: 277
Moderator Lunker
|
|
Moderator Lunker
Joined: May 2004
Posts: 13,974 Likes: 277 |
If the 2"x4"s are attached upright, you put two nails in at an angle from opposite sides. They only go through the bottom 1/2 to 1/3 of the purlin.
The barn pictured above has purlins every (IIRC) 28" or so, with a 5 foot span between the trusses (center section) or rafters (side sections). Given your purlins will only have to span 2' between trusses, laying them flat should be no problem at all.
I think 4/12 pitch trusses should be fine for your snow load, even if you're in the Lake Michigan snow belt, unless you're putting on gutters. A steel roof sheds snow a lot easier than shingles. 4/12 is not too bad to work on after it ages; roof sheets IME are shipped dripping with a silicon spray-like preservative that is really slippery until it drips/weathers off (it tastes lousy, too). Even if there's no preservative to speak of, they roughen up a little after the galvanized starts to oxidize. The roof above I worked from a roofing ladder suspending by rope from the opposite side of the barn, passed over the crown. But it has a lot bigger span and a lot higher drop (20+' for the center section) than your dock.
Use screws to hold the sheeting down. I used to make good money renailing steel roofs on pole barns after they'd aged a few years.
Are you going to seal off the under side of the trusses with sheeting like the classier dock roofs we've seen pictured here? It'd be nice to have it bird-, bug-, and varmint-proofed. Although the challenge of shooting a raccoon out of ones trusses without holing the roof can be fun.
"Live like you'll die tomorrow, but manage your grass like you'll live forever." -S. M. Stirling
|
|
|
|
|
Joined: Jan 2005
Posts: 1,239
Lunker
|
|
Lunker
Joined: Jan 2005
Posts: 1,239 |
Just to clarify what Eddie stated qoute " You NEVER attach a metal roof through the ridges."
His statements are true, however they do make lap joint screws that are designed to be screwed thru the ridges to connect each sheet to each other. They also make a seal tape that is applied between the sheets under this ridge joint. For steeper roofs like 6-12 pitch the seal is not really necessary but it is recomended for flatter slopes like 2-12.
The road goes on forever and the party nevers end...............................................
|
|
|
|
|
Joined: Nov 2005
Posts: 773 Likes: 1
Lunker
|
|
Lunker
Joined: Nov 2005
Posts: 773 Likes: 1 |
Rockytopper,
Thanks. There are two different types of screws. One that will drill through the metal and fasten to wood and anthere that is for metal to metal.
Eddie
|
|
|
|
|
Joined: Oct 2005
Posts: 6,934 Likes: 2
Ambassador
Field Correspondent Lunker
|
|
OP
Ambassador
Field Correspondent Lunker
Joined: Oct 2005
Posts: 6,934 Likes: 2 |
...Theo means well, but somehow it turns into more work and expense: Are you going to seal off the under side of the trusses with sheeting like the classier dock roofs we've seen pictured here? It'd be nice to have it bird-, bug-, and varmint-proofed. I considered it, but nothing more than a passing thought. Give me some ideas on SOP.
|
|
|
|
|
Joined: Mar 2005
Posts: 21,499 Likes: 267
Moderator Hall of Fame 2014 Lunker
|
Moderator Hall of Fame 2014 Lunker
Joined: Mar 2005
Posts: 21,499 Likes: 267 |
Be sure to look into the quality of the screws and rubber gaskets. One of my partners has a country house about 8 years old with a metal roof (life time guaranty on the roof but not the screws). The roof is in great shape but he found a leak. When he got it checked he found out that the gaskets have all deteriorated and every one must be replaced.
|
|
|
|
|
Joined: May 2004
Posts: 13,974 Likes: 277
Moderator Lunker
|
|
Moderator Lunker
Joined: May 2004
Posts: 13,974 Likes: 277 |
Originally posted by Brettski: ...Theo means well, but somehow it turns into more work and expense:
Are you going to seal off the under side of the trusses with sheeting like the classier dock roofs we've seen pictured here? It'd be nice to have it bird-, bug-, and varmint-proofed. I haven't done it myself, Bski, but I believe there have been 2 or 3 nice docks pictured here with the bottom of the trusses covered. The walkway from the house to the garage/apartment at Lusk Lodge II is done this way - pics in one of the last 2 issues of PB Mag.
"Live like you'll die tomorrow, but manage your grass like you'll live forever." -S. M. Stirling
|
|
|
|
|
Joined: Jan 2005
Posts: 1,239
Lunker
|
|
Lunker
Joined: Jan 2005
Posts: 1,239 |
Brettski it is also a good idea to pre drill the sheets with a hole bigger than the screw dia but still small enough to be sealed by the washer. The reason is to allow the sheets room to expand and contract with temperature changes.
The road goes on forever and the party nevers end...............................................
|
|
|
|
|
Joined: Oct 2005
Posts: 6,934 Likes: 2
Ambassador
Field Correspondent Lunker
|
|
OP
Ambassador
Field Correspondent Lunker
Joined: Oct 2005
Posts: 6,934 Likes: 2 |
So, I�m in the midst of planning completion of the launch dock/deck and the dock at the beach area. The launch dock/deck will require decking, roof trusses with purlins, and the metal roofing. The beach dock is considerably simpler, requiring only decking. The next step for both is obvious; installing the decking. I have installed numerous square feet of decks in my lifetime. All of it has been treated lumber, both the frame and the decking. Whenever I completed a deck, I would always admire its beauty. About 2 or 3 years later, I would swear that next deck would be a composite type decking to eliminate maintenance and prolong aesthetic appeal. I haven�t forgotten this self-imposed promise for these upcoming projects. I still firmly believe in treated lumber for the framing, but I have strongly voiced my belief to spend the money for a better decking product. Well, here I am�.it�s time to pull the trigger. I have been doing my due diligence on decking material and, as usual, now know enough to be dangerous. The way I see it, there are three basic material compositions to consider. A) Treated lumber B) composite decking C) Hi density polyethylene (HDPE). The treated lumber is easy to understand since it is the most commonly used product for these type structures. The composite decking is a bit more complicated because it is a blend of plastics and wood fibre. There are different blends and percentages of content. They do eventually break down, mostly because of the wood fibre content. The warranties vary, mostly from 10 � 25 years. The price corresponds. Then I researched HDPE. I was sure I found my new hero. It is a 100% solid plastic product, UV protected, and the warranties are in the 50-year range. They mold the stuff with the color throughout the plastic, so any scratches or gouges reveal the exact same color. Also, the finish is molded with faux wood grains for �looks� and traction. I will admit that, based on on-line product pics, the close-up aesthetic appeal is, well, plasticky. But this is a boat dock. Sure, I want it to look good, but more importantly I want it to wear and last forever�.zip maintenance. I think this stuff gets me there. No matter what product I select, I definitely plan to use hidden fasteners. I did a very small stair-step project last year and tried the under deck galvanized rails. These are the 4� long continuous strips that you screw to the top edge of the framing joists. They have pre-punched holes every 1� that will accommodate a deck screw that is run upward and into the bottom of the decking board above it, drawing it down to the galvanized strip and (theoretically) snug against the framing joist. It is awkward work and I was not impressed with the results. I am sold (until further notice) on the Eb Ty hidden fastener system. This is the plan for fastening whatever I finally do select. So, I am now searching and hoping to find an HDPE product that I can afford. This is my first forbidding barrier. All the name brands that are true HDPE are mega-expensive. The only one I found locally to inspect was an extruded product that looked really great on a display at one of the local lumberyards. It�s called Eco. A piece that is 5.5� wide x 16� long costs $41. Yikes! Then I found what I hoped to be my answer to the HDPE affordability equation. A factory that actually makes the stuff and will sell retail direct. EPS Plastic Lumber . They have a plant in the Chicago area�perfect! This stuff is absolutely killer. A true 2 x 6 (1.5� x 5.5�) dimensional lumber�err�plastic. They have some closeout product that will work perfectly for my launch dock/deck; the 16� pc is $38 each. And this is a good deal�? Here�s how I calculate this. I am going to focus only on the launch dock/deck for completion (the beach dock is far away from the living zone of the pondsite, so it is not as important for looks�.the launch area is). Anyway, to deck the entire launch dock/deck with this HDPE deal that I found, it will cost $2200 in materials and hidden fasteners. I think Curly Howard said it best: Nyaah, aah, aah! Now, for the flip side, to do the same area in 2 x 6 treated lumber for the decking, including Eb Ty hidden fasteners, the total cost would be $700. Another factor: the plastic lumber will weigh 1100# for just the 14� x 16� deck. That�s a lot of weight, ain�t it? Oh yeah, and get this. Dski is with me and has approved funding of the big bux product if I am 100% sure of the quality and longevity. I really only have one big problem: I can�t do it. I can�t bring myself to spend that kind of dough for this project. So, I analyze it the best I can and this is where I wind up. If I use the Eb Ty hidden fasteners and do a nice job of securing the treated 2 x 6 decking, it will last forever (or at least my lifetime). Accept the fact that it will weather and turn a dull gray and many of the boards with split and crack here and there. At least there won�t be that snappy look of a gazillion screw-head craters. With the money left over (2200 � 700 = $1500), buy the roof materials and finish it off for the same amount of dough as just the plastic magic-deck. Heck, if I do the beach dock with treated, I might be able to use the savings to buy a power washer for lazy cleaning maintenance and a couple gallons of good transparent stain to fake myself out. �.or, do you pull the trigger and buy the killer plastic lumber? - - (a nice product summary by This Old House)
|
|
|
|
|
Joined: Mar 2004
Posts: 229
Lunker
|
|
Lunker
Joined: Mar 2004
Posts: 229 |
Of all your living areas how much time will you spend at the dock/deck?
Where will be the first place you take guests?
We don't live on our pond, the dock is crude, yet it is the center of action in the summer. And after we build a house I would guess the dock will still be the center of a lot of action.
Of course when the treated lumber decking fades, if it doesn't bother you, I would bet it wouldn't bother anyone else.
Faded wood might even be a good look around the pond.
|
|
|
|
|
Joined: Nov 2005
Posts: 773 Likes: 1
Lunker
|
|
Lunker
Joined: Nov 2005
Posts: 773 Likes: 1 |
I've had just a little bit of exposure to the new decking materials and haven't seen one yet that I like over PT Wood. In addition to there upfront price, you really need to have your joists on 12 inch centers. Even then, some will begin to sag over the years.
I screw down the decking on my projects. I like to snap a chalk line to get them all lined up too. Then I screw them down until the heads disapear into the wood. Two screws per joist for the length of the board.
If you do go with PT wood decking, buy it a month or two before you install it. The shrinkage in that first few weeks will be severe. Then it will stabalize and you can get your spacings pretty accurate.
Don't spread them out, just stack them outside so they will keep from warping while drying out. Home Depot and Lowes will take warped ones back, so don't mess around with any of them. No point in it. I ususally buy a dozen extra with the plans to return what's not used.
I like the look of weathered wood, but Thompsons has there water seals in colors now. You just spray it on every year and it looks great.
Eddie
|
|
|
|
|
Joined: Oct 2005
Posts: 6,934 Likes: 2
Ambassador
Field Correspondent Lunker
|
|
OP
Ambassador
Field Correspondent Lunker
Joined: Oct 2005
Posts: 6,934 Likes: 2 |
Home Depot and Lowes will take warped ones back, so don't mess around with any of them. ...ever use this thing? If you're unsure, read the reviews on Amazon. I just ordered my Bowrench .
|
|
|
|
|
Joined: Jan 2005
Posts: 469
Lunker
|
|
Lunker
Joined: Jan 2005
Posts: 469 |
Brettski, If you hadn't signed your post, I would have thought I wrote it myself. I was not even going to consider PT wood for my dock, until I saw the price. It's 4X the price! So I am going to use PT as well. There is a wood protection product sold at Sherwin Williams called Deckscapes. It has been highly recommended to me by several painters. It is water based, and it's not cheap, but the money saved not buying plastic justifies the cost, especially if it is as good as I have heard. Look HERE
Hey Moe, I'm trying to think but nuthin's happening!
|
|
|
|
|
Joined: May 2004
Posts: 13,974 Likes: 277
Moderator Lunker
|
|
Moderator Lunker
Joined: May 2004
Posts: 13,974 Likes: 277 |
After 17 years, we are finally figuring on putting the deck on the back of our house this year. Currently we are contemplating using TimberTech , which is a wood-fiber-and-plastic composite. IIRC SOP is to install this material as decking over a regular treated lumber frame. One of their alleged benefits we are after is the ability to water-proof (and bug-proof) the top deck of a two-story structure. The owner of the local lumber yard carrying the stuff is one of the neighbors that we actually get along with (lumber yard owners seem less upset by logging) and we will have to go next door and check out the Timber Tech deck on his house - it's been up a few years now. Their "Docksider" planks are designed for 24" center-to-center supports.
"Live like you'll die tomorrow, but manage your grass like you'll live forever." -S. M. Stirling
|
|
|
|
|
Joined: May 2004
Posts: 234
Lunker
|
|
Lunker
Joined: May 2004
Posts: 234 |
" The owner of the local lumber yard carrying the stuff is one of the neighbors that we actually get along with (lumber yard owners seem less upset by logging)" Theo, Do your other neighbors use plastic toilet paper? I personally support sound logging practices of a renewable and sustainable resource. Ed
|
|
|
|
|
Joined: May 2004
Posts: 13,974 Likes: 277
Moderator Lunker
|
|
Moderator Lunker
Joined: May 2004
Posts: 13,974 Likes: 277 |
They probably use a bidet. ("It's for washing off your backside!") Ed, we had a couple of them complain that when they bought their property, there were woods next door, and then we had them logged.  We replied that when we bought our place, there was another farm next door, then they put in a subdivision. :p
"Live like you'll die tomorrow, but manage your grass like you'll live forever." -S. M. Stirling
|
|
|
|
|
Joined: Oct 2005
Posts: 6,934 Likes: 2
Ambassador
Field Correspondent Lunker
|
|
OP
Ambassador
Field Correspondent Lunker
Joined: Oct 2005
Posts: 6,934 Likes: 2 |
DONE DEAL 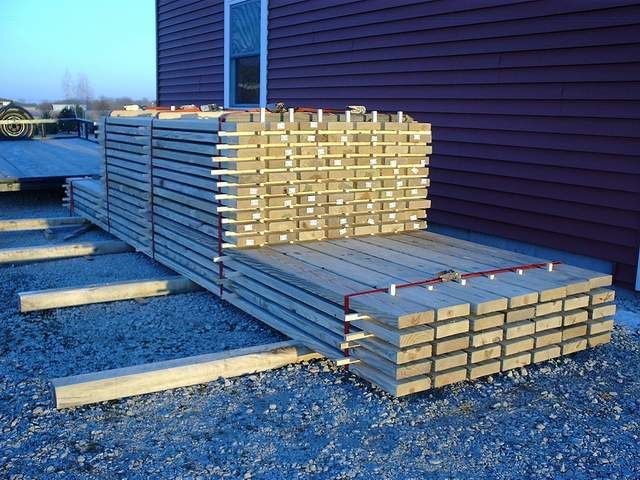 Green treated 2 x 6 x 8' and 16'. I'll plan for installation over Memorial Day...I hope. That'll give 'em some time to dry out a bit. In the meantime, they will stay packed up tight to see if that helps to alleviate twist and bow while they cure.
|
|
|
|
|
Joined: Sep 2003
Posts: 13,750 Likes: 295
Moderator Ambassador Field Correspondent Hall of Fame 2014 Lunker
|
Moderator Ambassador Field Correspondent Hall of Fame 2014 Lunker
Joined: Sep 2003
Posts: 13,750 Likes: 295 |
Memorial Day??? That's like over two months away.
Brettski, please try and bear down to get your project done. No need to idle around wasting time.
Excerpt from Robert Crais' "The Monkey's Raincoat:"
"She took another microscopic bite of her sandwich, then pushed it away. Maybe she absorbed nutrients from her surroundings."
|
|
|
|
|
Joined: Mar 2005
Posts: 957
Lunker
|
|
Lunker
Joined: Mar 2005
Posts: 957 |
Classic Sunil, just classic.
1/4 & 3/4 acre ponds. A thousand miles from no where and there is no place I want to be...
Dwight Yoakam
|
|
|
|
|
Joined: Nov 2005
Posts: 773 Likes: 1
Lunker
|
|
Lunker
Joined: Nov 2005
Posts: 773 Likes: 1 |
At first glance, I thought the stack of wood had been delivered by a fork lift as it came off the truck. Then I noticed that you have it stacked with spacers between the boards to allow air circulation. Very nicely done!!!
I bet you got yourself a nice workout moving all the lumber around!!! And in a few months you get to load it up and move it again!!!!!
Keep us updated as I'm really interested in the results of your air drying/stacking method.
Thanks,
Eddie
|
|
|
|
|
Joined: May 2004
Posts: 13,974 Likes: 277
Moderator Lunker
|
|
Moderator Lunker
Joined: May 2004
Posts: 13,974 Likes: 277 |
Nothing says Love like Lumber. Keeping it strapped together should help cut down on warping.
I thought it was "as delivered" too, Eddie - I had to go back to see the shipping bands had been replaced with nylon strapping.
"Live like you'll die tomorrow, but manage your grass like you'll live forever." -S. M. Stirling
|
|
|
|
|
Joined: Apr 2003
Posts: 823
Lunker
|
|
Lunker
Joined: Apr 2003
Posts: 823 |
Theo:
I installed TimberTech (tongue and groove version) on our front porch 5 years. It was WAY expensive and terribly heavy...however, it was one of the best decisions I made in our remodel project. I'm kind of a slob and tend to track lots of "stuff" around. Spring and fall...2 gallons of bleach in a hand sprayer, soak it well, wait 20 minutes or so and hose it off. VOILA...brand new looking, all over again. It's also absolutely arrow straight, and stays that way.
It does fade, to a very light gray/brown color, but it works incredibly for us. ABSOLUTELY no sag, give or anything on 16" treated 2x8 joists. I also considered it on my floating dock, but the price and weight were a bit much.
BTW..for anyone considering using EBTys on treated 2x6 decking, better reconsider. Without a fastener in the middle, the boards will tend to warp upwards (cup) in the middle. I'd at least use one (SS) screw in the middle of each board at each joist. Been doing construction long enough to know that this will be necessary.
In a lifetime, the average driver will honk 15,250 times. My wife figures I'm due to die any day now... 
|
|
|
|
|
Joined: May 2004
Posts: 13,974 Likes: 277
Moderator Lunker
|
|
Moderator Lunker
Joined: May 2004
Posts: 13,974 Likes: 277 |
Originally posted by Matt Clark:
It does fade, to a very light gray/brown color, but it works incredibly for us. What color did you install?
"Live like you'll die tomorrow, but manage your grass like you'll live forever." -S. M. Stirling
|
|
|
|
|
Joined: Apr 2003
Posts: 823
Lunker
|
|
Lunker
Joined: Apr 2003
Posts: 823 |
Theo...5 years ago, it was only available in 1 color, a light brown/tan. Maybe it's in more colors now, but as it's plastic, it WILL fade, regardles of what they tell you. Eventually, most any color (other than pure white, as titanium dioxide negates nearly all UV light fading) will end up it's natural shade of light gray, nearly white.
I can take some photos if you'd like to see what it looks like now, 5 (hard) years down the road...
In a lifetime, the average driver will honk 15,250 times. My wife figures I'm due to die any day now...
|
|
|
|
|
Joined: May 2004
Posts: 13,974 Likes: 277
Moderator Lunker
|
|
Moderator Lunker
Joined: May 2004
Posts: 13,974 Likes: 277 |
IIRC it comes in red, brown or grey now. I'm hoping for low maintenance, as I hate fixing anything except dinner for fish and fish for dinner.
"Live like you'll die tomorrow, but manage your grass like you'll live forever." -S. M. Stirling
|
|
|
|
|
Joined: Oct 2005
Posts: 6,934 Likes: 2
Ambassador
Field Correspondent Lunker
|
|
OP
Ambassador
Field Correspondent Lunker
Joined: Oct 2005
Posts: 6,934 Likes: 2 |
4-07 Update We are well into spring and the pond is quickly creeping up the shoreline as it stretches for the spillway pipe. My laundry list of improvements for the project is still long and alot of the jobs need to be completed before the water arrives. This includes the last pour of the launch. We are thankful that this one is small compared to the other two 31' long pours. This slab is only 8 ft long x the 12 ft width. 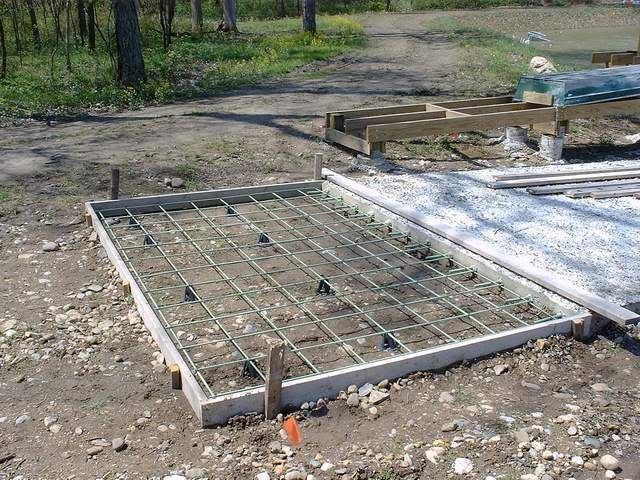 - - We just unloaded the fish delivery and moved right into tying rebar. 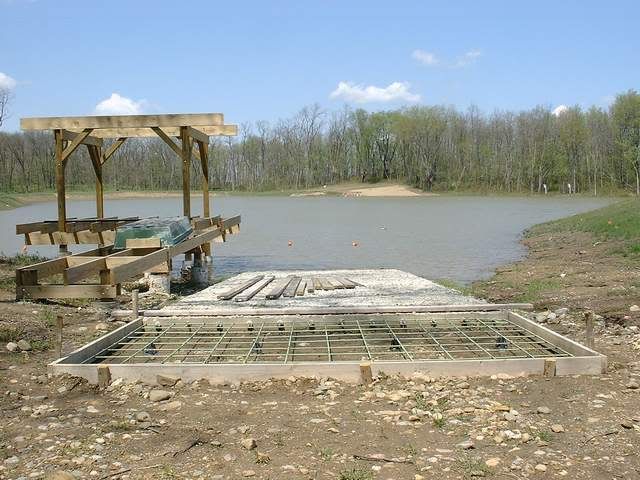 This last pour will require barely 2 yards. The concrete company del's 3 yards min for no dely charge. Less than that, add $75 dely. Heck, a yard costs 80 some odd bux. I gotta come up with another use for another yard of concrete....or more. Is it time to start the 16' x 24' shed???
|
|
|
|
|
Joined: Apr 2003
Posts: 823
Lunker
|
|
Lunker
Joined: Apr 2003
Posts: 823 |
Yeak Brettski, you gotta find someplace to pour that last yard...can't pay something for nothing. I've even laid out ladder-type forms and just poured blocks to toss in the pond for structure...but a yard would make a helluva lot of them... Any place you might want to set a bench or something out there, in the future?
In a lifetime, the average driver will honk 15,250 times. My wife figures I'm due to die any day now...
|
|
|
|
|
Joined: May 2004
Posts: 13,974 Likes: 277
Moderator Lunker
|
|
Moderator Lunker
Joined: May 2004
Posts: 13,974 Likes: 277 |
You could always put in a sidewalk to where the dock begins.
"Live like you'll die tomorrow, but manage your grass like you'll live forever." -S. M. Stirling
|
|
|
|
|
Joined: Apr 2003
Posts: 823
Lunker
|
|
Lunker
Joined: Apr 2003
Posts: 823 |
Right now, I'm considering putting a "sidewalk" sort of pad down near the bridge. Got several older folks that love to fish, but can't stand for long. Even though the slope seems relative minor to me (maybe 5:1) it's hard for Al to sit in a lawn chair there...42"x10 foot pad would be ideal for him and wifey's gramma...we drive right to it, anyway, and it's be nice for them.
Just another thougt...
In a lifetime, the average driver will honk 15,250 times. My wife figures I'm due to die any day now...
|
|
|
|
|
Joined: May 2004
Posts: 13,974 Likes: 277
Moderator Lunker
|
|
Moderator Lunker
Joined: May 2004
Posts: 13,974 Likes: 277 |
A good thought, Matt. Flat, no erosion spots for lawn chairs can seem like a God send.
"Live like you'll die tomorrow, but manage your grass like you'll live forever." -S. M. Stirling
|
|
|
|
|
Joined: Apr 2003
Posts: 823
Lunker
|
|
Lunker
Joined: Apr 2003
Posts: 823 |
It never really crossed my mind until this past Saturday...older folks deserve the absolute best. Al and Geneva have earned it, along with others who may show up over time.
In a lifetime, the average driver will honk 15,250 times. My wife figures I'm due to die any day now...
|
|
|
|
|
Joined: Jan 2006
Posts: 16,055 Likes: 277
Moderator Lunker
|
|
Moderator Lunker
Joined: Jan 2006
Posts: 16,055 Likes: 277 |
I like Theos idea. Old folks really don't like muddy walkways to the dock.
It's not about the fish. It's about the pond. Take care of the pond and the fish will be fine. PB subscriber since before it was in color.
Without a sense of urgency, Nothing ever gets done.
Boy, if I say "sic em", you'd better look for something to bite. Sam Shelley Rancher and Farmer Muleshoe Texas 1892-1985 RIP
|
|
|
|
|
Joined: Nov 2005
Posts: 773 Likes: 1
Lunker
|
|
Lunker
Joined: Nov 2005
Posts: 773 Likes: 1 |
Brettski,
Anything new with the boathouse? I remember you bought a load of lumber, and I'm trying to be patient, but it must be nice weather there now!!!
Eddie
|
|
|
|
|
Joined: Oct 2005
Posts: 6,934 Likes: 2
Ambassador
Field Correspondent Lunker
|
|
OP
Ambassador
Field Correspondent Lunker
Joined: Oct 2005
Posts: 6,934 Likes: 2 |
Ed-man...so glad ya asked. The plan was to get into decking the piers and deck over Memorial day. So far, this remains the plan. I have been monitoring the "air-dry bunk". The top pieces have shown some twist and camber, but I expected that since they have minimal top support to hold 'em back. I had hoped the bands would loosen some as the lumber shrunk. I have had to tighten the bands a little, but it wasn't like losing 15# and having to pull your belt over 1 more notch. The balance of the bunk still looks good. I wonder what's gonna happen when I pop 'er open. Might be time to open that Alpine ski shop. I wrestled and researched the markets for the method I want to employ for securing them to the joists. The goal continues to be invisible fasteners. I thought I was sold on the Eb-Ty fasteners, then I found Lumber loc . They were cheaper and appear to be similar in composition and application. In fact, I called the home office and they sent me a couple of samples. I just can't see a plastic composition fastener as long term and secure for treated lumber. So, just as I was about to start preparing for some commitment, Menards sends me a big ol' sales flyer with a decking section. Whoa...there it is! Tiger Claw, type TC2 . I did some quick due diligence, price shopping, and Tiger Claw from Menards wins. Oh yeah, and they have all their SS fasteners on sale, too. Bingo; 700 pc of TC2 fasteners + screws, ready for installation. Oooo boy.
|
|
|
|
|
Joined: May 2005
Posts: 844
Lunker
|
|
Lunker
Joined: May 2005
Posts: 844 |
Where do you Brettski get the time for all these projects. You must only work one day a week! That pond is shaping up pretty good. Great to see it filled and taking shape.
Gotta get back to fishin!
|
|
|
|
|
Joined: Oct 2005
Posts: 6,934 Likes: 2
Ambassador
Field Correspondent Lunker
|
|
OP
Ambassador
Field Correspondent Lunker
Joined: Oct 2005
Posts: 6,934 Likes: 2 |
Originally posted by Sunil:
Memorial Day??? That's like over two months away.
Brettski, please try and bear down to get your project done. No need to idle around wasting time. ...bz, would you please talk to Sunil for me? Thanks in advance. - ps; I should warn you that he can bench press some unGodly amount of beer, or something like that. Also, he has a big, mean friend name Fatay.
|
|
|
|
|
Joined: Mar 2005
Posts: 21,499 Likes: 267
Moderator Hall of Fame 2014 Lunker
|
Moderator Hall of Fame 2014 Lunker
Joined: Mar 2005
Posts: 21,499 Likes: 267 |
B'ski , Sunil has a point. He is just trying to save you from the anguish. Once the fish get some size and summer gets hear you will find the fish, the Liberty Ferry and beach calling you. At that point those projects will get way behind. :p
|
|
|
|
|
Joined: Sep 2003
Posts: 13,750 Likes: 295
Moderator Ambassador Field Correspondent Hall of Fame 2014 Lunker
|
Moderator Ambassador Field Correspondent Hall of Fame 2014 Lunker
Joined: Sep 2003
Posts: 13,750 Likes: 295 |
Brettski, you dinnerware-hoarding slacker!!!
If you would stop wasting time here on the forum, you would already be done with your project!!!!!!!!!!!!!
BTW, ewest is right on.
Excerpt from Robert Crais' "The Monkey's Raincoat:"
"She took another microscopic bite of her sandwich, then pushed it away. Maybe she absorbed nutrients from her surroundings."
|
|
|
|
|
Joined: May 2004
Posts: 13,974 Likes: 277
Moderator Lunker
|
|
Moderator Lunker
Joined: May 2004
Posts: 13,974 Likes: 277 |
Originally posted by bz:
Where do you Brettski get the time for all these projects. You must only work one day a week! You're confused, bz, that's Bruce. Brettski has simply utilized modern 5S, 5Y, 3P, JIT, and Lean manufacturing techniques to get 500% efficiency out of a minimally sized workforce (himself and Donna-ski).
"Live like you'll die tomorrow, but manage your grass like you'll live forever." -S. M. Stirling
|
|
|
|
|
Joined: Oct 2005
Posts: 6,934 Likes: 2
Ambassador
Field Correspondent Lunker
|
|
OP
Ambassador
Field Correspondent Lunker
Joined: Oct 2005
Posts: 6,934 Likes: 2 |
...Ewest; no need to try to cover for Sunil's inability to tell one beer from another because he peeled off all the labels. I know he means well. If not, I have a Nesco roaster with his name on it.
...Theo; thank you for recognizing breakthrough levels of efficiency. I'll never forget Dski in the 95 degree heat of summer while we are striking off the concrete for the boat launch. It was music to my ears as she screamed over at me "I am NEVER doing this again; this sucks worse than drywall". I gave her a raise.
|
|
|
|
|
Joined: May 2005
Posts: 844
Lunker
|
|
Lunker
Joined: May 2005
Posts: 844 |
That's it! I discovered his secret. I just need to get Mrs. BZ to work like that Dski. Then my projects will get done. I must not pay enough. She's got all the credit cards and the check book. What more can I do Brettski? Maybe I'll buy her something nice, like a fish feeder. Will that work?
Gotta get back to fishin!
|
|
|
|
|
Joined: Oct 2005
Posts: 6,934 Likes: 2
Ambassador
Field Correspondent Lunker
|
|
OP
Ambassador
Field Correspondent Lunker
Joined: Oct 2005
Posts: 6,934 Likes: 2 |
I just need to get Mrs. BZ to work like that Dski. Then my projects will get done. bz, man...you've done enough of these things to know that projects are never really done. The key is letting her be the boss. Ooowee, did she tear into me a few times when I would mess up the finish while striking off the pad. - The concrete driver dumped a couple yards into the forms for us to work on. He got out of the truck, and walked over to Dski as she was bustin' hump sawing the 2 x 6 across the 12' pad (uphill, no less). He walked right up to her and said "here, let me help" as she ignored him and kept on sawing. He leaned over, hand out to grab the 2 x 6 and says "really, let me do this". Remember Gort on The Day the Earth Stood Still? She turned her head and shot 2 evil-eye laser beams straight at his face. She gritted her teeth like Dirty Harry, squinted her eyes and delivered "I can do it myself!" He stepped back and looked at me like it was MY pit-bull that got out of the cage. I just shrugged and kept my hands on the 2 x 6 as it suddenly surged into double time. Wait 'til he looks in the mirror tomorrow morning and sees Klaatu barada nikto laser etched into his forehead.
|
|
|
|
|
Joined: Oct 2005
Posts: 6,934 Likes: 2
Ambassador
Field Correspondent Lunker
|
|
OP
Ambassador
Field Correspondent Lunker
Joined: Oct 2005
Posts: 6,934 Likes: 2 |
Originally posted by Brettski: DONE DEAL
Green treated 2 x 6 x 8' and 16'. I'll plan for installation over Memorial Day...I hope. That'll give 'em some time to dry out a bit. In the meantime, they will stay packed up tight to see if that helps to alleviate twist and bow while they cure. - - Time's up! It's been about 2-1/2 months since I banded up the bunk to begin the cure experiment . I popped the bands today. 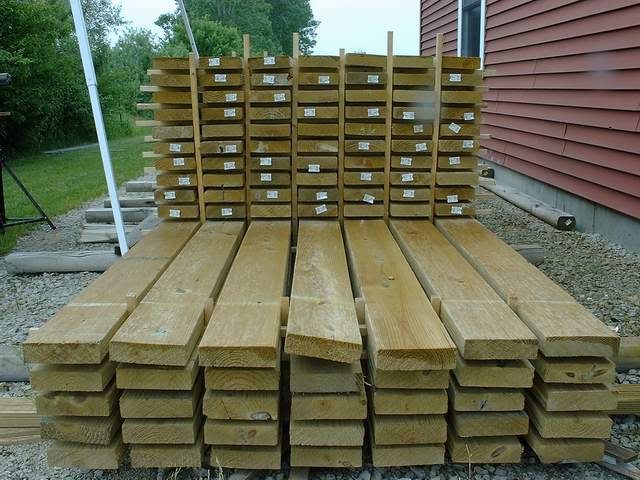 Out of 70 pc of 2 x 6 x 8', I rejected 19. Out of 35 pc of 2 x 6 x 16', I rejected 9. Here's how it shakes out. The 8 footers are all cut in half at 48" long for the piers (a little long for the application; will be trimmed to length after installation). I sighted each of the 8' and tossed bad stuff to the side, cut the keepers in half, and loaded them onto the trailer. It seemed that the top row had the most rejects. I worked with boards that show reasonable bow (rainbow when they are flat), but rejected twist or excessive camber (banana). Total reject for 8' stock is 27%. (about 5 were unbelieveable!) The 16 footers are used full length. I am a bit more tolerant of twist and camber because there is enough mass for me to "push it around". An unusual flaw that was prominent with 16' was an up/down waviness of the flatness over the length. This can also be tolerated a little since I can "bull" them a little, but there were a couple that looked like a kiddie roller coaster. Total reject for 16' stock is 26%. I have enough short pc to complete the launch dock and do about 1/2 the beach dock. I am 3 pc short of the 16' stock required to do the deck at the end of the launch dock; will try to work with 3 of the best rejects to finish. Bottom line: I am confident of completing the launch dock and deck and putting a dent in the beach dock. The launch dock/deck is far more important at this point of development. - - Before I summarize my experiment, I should explain my motives. I plan to use hidden decking fasteners to hold the decking down. I want to avoid surface fasteners like screws and nails. I am using Tiger Claw TC2 stainless steel fasteners . I wanted to not only allow the wet PT lumber to shrink before installation, but also identify "twisters and benders" BEFORE I install them. I don't hold alot of hope that these fasteners will hold back a twisting 2 x 6. So, for those of you DIY deck builders, here is my opinion of anal retentive air cure preparation of P-T lumber before installation. Would I do it that way again? Yes, but I believe that laying them out on a flat surface to cure would likely do as well. Holding them in a tight bundle does not, IMHO, affect them if they are planning to move. In essence, my cure experiment worked in that it allowed them to dry out some, but had little effect of "forcing" them to remain straight. I would not just pack them up in a tight bundle without spacers and expect decent, consistent drying. The reject rate is about 25%. If you need 75 arrows, buy 100 and save the receipt.
|
|
|
|
|
Joined: May 2004
Posts: 13,974 Likes: 277
Moderator Lunker
|
|
Moderator Lunker
Joined: May 2004
Posts: 13,974 Likes: 277 |
That's a horrible yield, Brettski. Package all those rejects up and ship them to me. :rolleyes: I will dispose of them for you at no charge, since you're a friend and all. Looking at that "after" pile picture - that looks real good. I would be extremely happy with that amount and level of curvature.
"Live like you'll die tomorrow, but manage your grass like you'll live forever." -S. M. Stirling
|
|
|
|
|
Joined: Nov 2005
Posts: 773 Likes: 1
Lunker
|
|
Lunker
Joined: Nov 2005
Posts: 773 Likes: 1 |
Sounds like pretty normal results. I have a client that I'm building a house for with almost half the PT 2x's warping beyond usability. We have a stack that's building to return, and I have them keeping me in supply with enough to move forward. We only pick out a few at a time and look for the lightest/dryest ones in the stack.
Once installed, they hold there shape pretty good, but I'm not doing any of those hidden fasteners. I like to use 3 inch screws right thought the boards. The screw countersinks itself and are rock solid.
Eddie
|
|
|
|
|
Joined: Oct 2005
Posts: 6,934 Likes: 2
Ambassador
Field Correspondent Lunker
|
|
OP
Ambassador
Field Correspondent Lunker
Joined: Oct 2005
Posts: 6,934 Likes: 2 |
Alright, round 1 of the Tiger Claw hidden decking fasteners challenge is in the history books. Great results, lotsa extra labor. - - We hoofed our bunk of 2x6 lumber to the project and started with 30' of dock at the launch. It came together very well, but took about 3 times as long as if we had just buzzed the screws in from the top. Granted, a good portion of this additional time is me doing my standard overkill of trying to make it perfect, but the Tiger Claw installation is pretty labor intensive. Nothing really muscle-challenging...just alot of steps to get a bond. - - The Tiger Claw clips seem whimpy to hold one in your hand. They're 16 Ga stamped stainless steel. I have never used these types of fasteners before, so I didn't know what to expect. 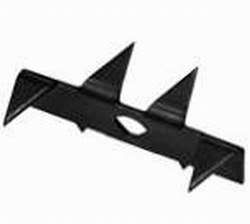 - - They come with a plastic installation block. The prongs on one side of the clip slips inside slots in the face of the block. The opposing prongs are now set at the correct height and ready to be rapped into the leading edge of the last deck board fastened.  I had real reservations on this plastic setting block. It performed flawlessly, taking every hammer blow, both square and glancing. In fact, each 100 pc box of the fasteners has one of these blocks in with it, so D-ski kept 2 of them active, rotating with a fresh clip charge. - - A #8 x 2" stainless steel screw is then buzzed in at an approx 45 degree angle. 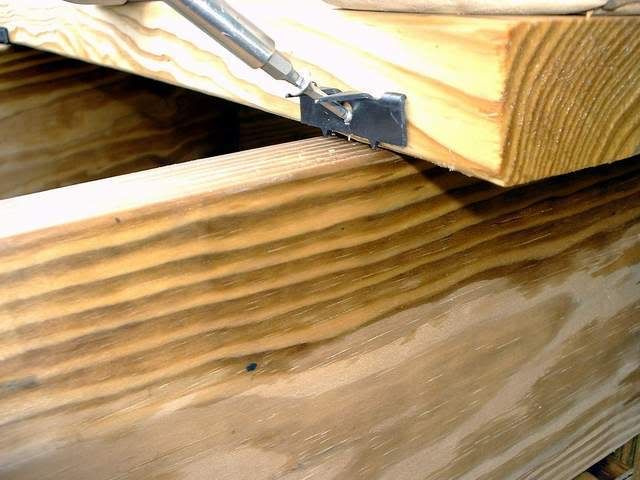 - - 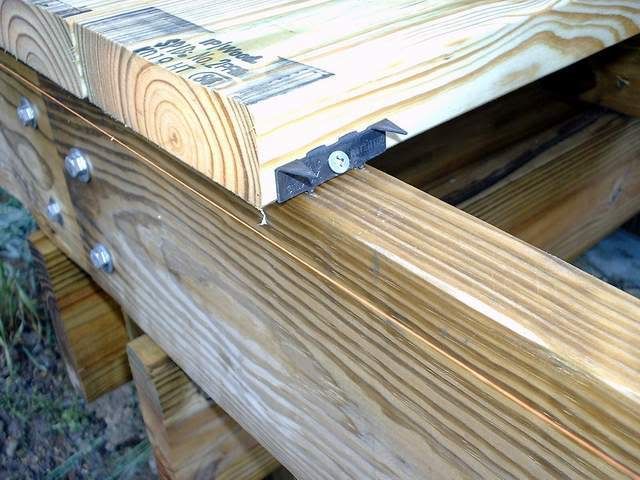 - - We have 3 stringers running the length of this dock section, so one clip per stringer. 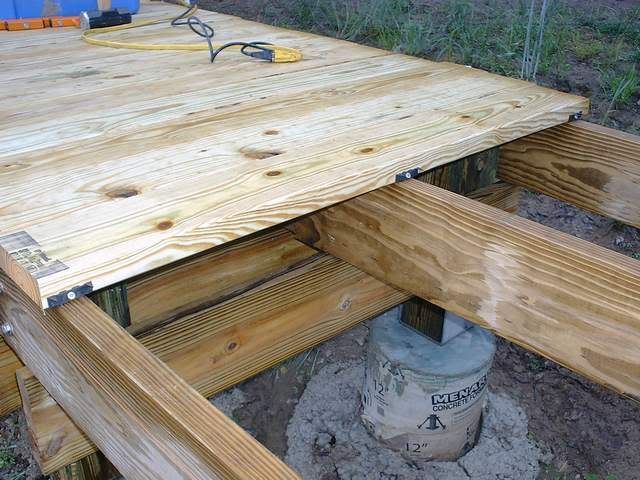 - - There is some bull work required, and it is another one of the major time consumers. The next board is set by slamming it onto the prongs by use of an 8 lb sledge hammer. A shorter section of sacrificial 2-by stock is used to buffer the blows without damage to the deck board. Naturally, it is very important to have the bonding edge of this next board tight to the stringers as the prongs enter, so standing on this next deck board as the sledge swings helps to mitigate small amounts of bow and twist.- - Overall opinion I have built a fair amount of PT decks in my time. All have been screwed from the top with SS screws. They have all fared well, but the riddled surface detracts a point or two from the overall appearance. These clips leave no trace...nada. They take alot of extra time to install; this is the price you pay. Past that, though, when those prongs are set, it is one study little pc of hardware. The screw really does tighten it up like a banjo string. At the end of the installation, it looks fantastic. All the bonds between the deck boards and the stringers is tight and the seams are tight. I was worried that the protruding screw head might hinder a tight seam between deck boards. Enter Mr 8# sledge; good night. Oh yeah, I bought that Bo-Wrench gadget. Dang, it works good. I was a great help in squeezing out a little bit of the camber (the banana) I did have to deal with. Granted, it's next to impossible to remove camber on a 2 x 6 that's only 4' long, but it made that little bit of difference a perfectionist seeks. Yep, and the subsequent installation of the Tiger Claw clip and screw cranked it down and held it back. The real test will be down the road as the summer sun further dries the deck boards. I expect the width to shrink; this is normal. Based on what I saw of the strength of these clips, I don't expect any problems with the installation as the cracks between the boards widen. The real question will be if the thickness shrinks (and I expect it probably will to some degree). How much of that tight, square bond will yield? If it does and the boards twist...hmmm. TBD. Finally, another helpful tip for those considering use of these fasteners. I purchased them at Menards for $25 per 100 pc. They did not come with screws. The manufacturer does offer kits that come complete with all the screws. Home Depot lists it, but had make a special order in my area. I priced the complete kit out and found savings by buying the generic SS screws in 5# boxes from Menards, once again on sale. My generic screws worked just fine, but I noted that the heads protruded when seated. I wonder is the Tiger Claw screws have a slightly different head that would seat a little deeper within the clip hole...? Also, the Tiger Claw screw heads are finished in black oxide, as are the clips, to further hide them.
|
|
|
|
|
Joined: Jun 2005
Posts: 2,365
Lunker
|
|
Lunker
Joined: Jun 2005
Posts: 2,365 |
Brettski,
Do the deck boards end up with absolutely no gap between them? Conventional wisdom (Which I usually ignore!) is that you need a space between the deck boards. This is to prevent buckling when the boards get wet and expand.
|
|
|
|
|
Joined: Oct 2005
Posts: 6,934 Likes: 2
Ambassador
Field Correspondent Lunker
|
|
OP
Ambassador
Field Correspondent Lunker
Joined: Oct 2005
Posts: 6,934 Likes: 2 |
Although I seasoned the wood in my aerated bundle, it still has a good amount of moisture and cure remaining. I learned a number of decks ago that when working with PT decking that is fairly fresh, install the boards as tight together as possible. When they cure and dry out, the gap will be perfect. I remember one of my rookie decks where I used the standard 10d - 16d nail spacing technique. By the end of the summer, the gap was too wide by 1 nail's width.
-
The Tiger claw clip does provide for a very small gap since the body of the clip is 1/16" thick. This, and some of the boards were not perfectly straight, thus inducing some gaps.
I pushed these suckers as close together as I could. This is one of the very few blessings of working with PT wood; no time spent trying to create a perfect spacing.
|
|
|
|
|
Joined: Nov 2005
Posts: 773 Likes: 1
Lunker
|
|
Lunker
Joined: Nov 2005
Posts: 773 Likes: 1 |
Brettski,
Thanks for all the information on the install of your decking. I've never used hidden fasteners, so it was very interesting to read your comments on them. I look forward to hearing how well they hold up over time.
Don't forget to give us more pictures of the deck!!!!
Eddie
|
|
|
|
|
Joined: Oct 2005
Posts: 6,934 Likes: 2
Ambassador
Field Correspondent Lunker
|
|
OP
Ambassador
Field Correspondent Lunker
Joined: Oct 2005
Posts: 6,934 Likes: 2 |
Originally posted by eddie_walker:
...Don't forget to give us more pictures of the deck!!!!
Eddie ...like I might forget. Here ya go, Mr Walker. - - - Please forgive the stupid blue tarp roof. The sun protection during construction far out-weighs the dorky appearance. 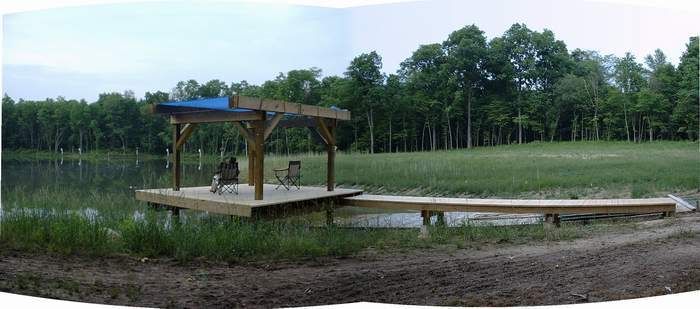 - - The hardest working woman in pond business... 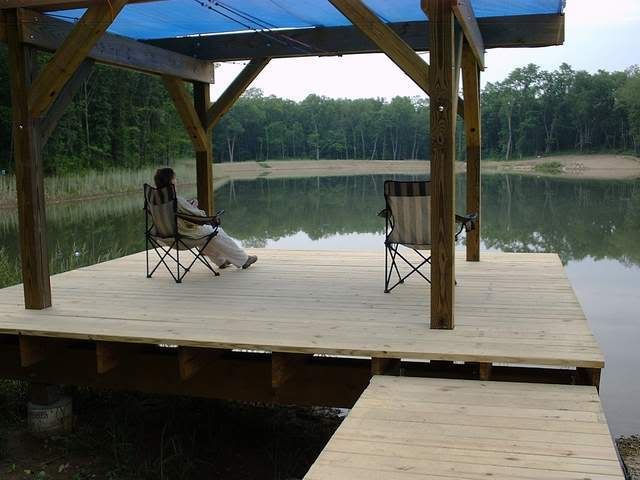 - - Wow, it was a was a real cage match getting everything tight and flat, but the results are rewarding. It tears me up to think that this is probably the best it will ever look. 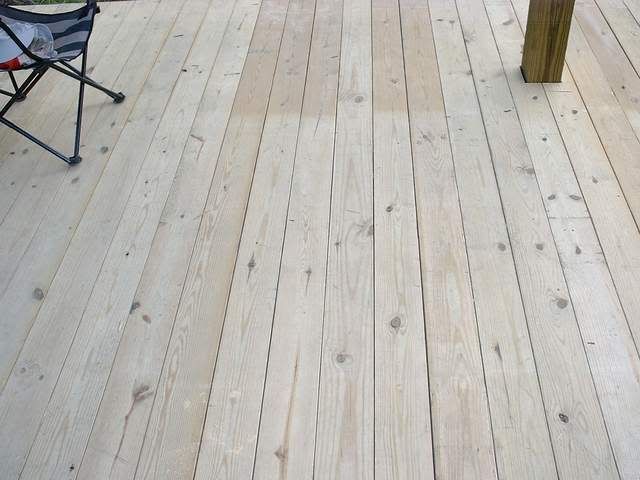 - - I have an opportunity to put a good finish on this thing before it fades to gray. What are the recommendations and durability experiences? In my mind, I'm thinking cleaning it up with a brightener and laying down a good, transparent stain. If I do use the brightener, it's gonna wash into the pond. I gotta think that stuff is eco-friendly....right? What's the finish buzz? - (ps; next time I pick up the hammer, it's trusses and metal roofing)
|
|
|
|
|
Joined: Jun 2005
Posts: 2,365
Lunker
|
|
Lunker
Joined: Jun 2005
Posts: 2,365 |
Originally posted by Brettski:
Please forgive the stupid blue tarp roof.] Sorry Brettski, but that blue tarp is unforgivable. All seriousness aside, that's just lovely! I like the heavy beam look. Can't wait to see the finished product! Thompson't Water Seal will keep the deck looking new for a while, but needs re-doing every year or 2. The only finish I know that would withstand the UV is spar varnish. The down side to varnish is, moisture can get trapped under it. Weathered wood has a charm of its own. If no moisture stands, that treated wood should out last you.
|
|
|
|
|
Joined: May 2004
Posts: 13,974 Likes: 277
Moderator Lunker
|
|
Moderator Lunker
Joined: May 2004
Posts: 13,974 Likes: 277 |
I say go natural. Grey is beautiful - with treated lumber as well as with hair.
"Live like you'll die tomorrow, but manage your grass like you'll live forever." -S. M. Stirling
|
|
|
|
|
Joined: Apr 2004
Posts: 705
Lunker
|
|
Lunker
Joined: Apr 2004
Posts: 705 |
Very nice. What are the dimensions of the main dock? The ramp?
|
|
|
|
|
Joined: Oct 2005
Posts: 6,934 Likes: 2
Ambassador
Field Correspondent Lunker
|
|
OP
Ambassador
Field Correspondent Lunker
Joined: Oct 2005
Posts: 6,934 Likes: 2 |
Thank ya, RobA. We been bustin' hump.
The approach dock is 4' x 30'. The deck is 16' x 14'. It will be under a 20' x 18' roof (2' overhang all the way around). The roof begins after we re-generate a little bit more hump to bust.
(there's also 4' x 32' more dock across the pond at a sand beach area; hopin' for more hump by this fall)
|
|
|
|
|
Joined: Aug 2006
Posts: 14
Lunker
|
|
Lunker
Joined: Aug 2006
Posts: 14 |
Brettski, I love that headless deck look, I am thinking about using the Tigerclaw on my upcomming deck/pier project ...could you tell me how you had to attach the first and last boards???
Thanks
Kevin
|
|
|
|
|
Joined: Oct 2005
Posts: 6,934 Likes: 2
Ambassador
Field Correspondent Lunker
|
|
OP
Ambassador
Field Correspondent Lunker
Joined: Oct 2005
Posts: 6,934 Likes: 2 |
Shep,
You betcha.
It's alot of extra work, but I think it's pretty cool looking; nice and clean.
Per the Tiger Claw instructions (and practical thinking), the first board is attached on the outside edge with SS screws. I used #10 x 3". Then, the inside edge of this same first board is attached with the Claws. The last board is just the reverse. The ends of each of the boards can be handled in couple different ways. If there is an overhang of the deck board at the outside joist of at least 3/4", the Claws will work just fine screwed dead center into this last joist. In my case, the framing was laid out with the joist framework at 16' out-to-out and I used 16' long decking. Hence, the deck boards (which are usually about 1/2" - 3/4" long from the mill) were pretty close to flush with the outside of the joist framing. Instead of using screws along the edge at the ends of these deck boards, I shifted the Claw to be off-center of the joist below; shifted toward the center of the deck but leaving the screw hole about 1/4" short of missing the joist below completely. This tucked the clip in so the outside edge of it was just about even with the outside edge of joist framework. Then, I secured the clip by running the screw in a little tilted to grab the meat of the joist below. It worked good.
-
footnote; I mis-applied a couple of these end clips, installing them with a little more hanging over the outside of the frame than I thought. When it came time to trim the board ends to even 'em up, I knicked a couple of the Claws with the circular saw blade. Good thing it was a cheapie blade cuz it's junk now.
|
|
|
|
|
Joined: Aug 2006
Posts: 14
Lunker
|
|
Lunker
Joined: Aug 2006
Posts: 14 |
Thanks for your help. How far apart are your floor joist?
I am still trying to figure out how my joist will all come together and be attached to my pipe. My pond filled in a weekend while I was out of town so I was unable to do the set in concrete thing. I now have 3" sch 40 galvanized pipe 10' long with 3" augers attached. I have four installed with five remaining. It is truly a family affair to screw a 10' pipe into clay standing in 4' of water
Thanks
Kevin
|
|
|
|
|
Joined: Oct 2005
Posts: 6,934 Likes: 2
Ambassador
Field Correspondent Lunker
|
|
OP
Ambassador
Field Correspondent Lunker
Joined: Oct 2005
Posts: 6,934 Likes: 2 |
I put our joists at 24" o.c. This kind of mandates use of full 2-by stock for the decking, so we used 2 x 6 instead of 5/4 decking stock. Besides, the actual $ upcharge for going to the full 2-by stock was negligiable. For installation details, check out this link . I mentioned it before, but I will say it again...that Bo-Wrench makes a difference. It cost about $45 deld from Amazon.com and I don't regret one penney of it. The thing works. The last thing that I did not have in my tool arsenal, and it would have helped some, is a board tweaker. A breaker bar with "U" shaped grip at the business end to slip over a twisted board and allow flattening it out to remove the propeller twist. This is kinda important if there is any twist in a board as it enters the prongs of a Tiger Claw clip. Why? Because the height at which the clip tip enters the board is the height at which that board will remain for good. If the board is twisted and elevated off of the supporting joist below...well, you know.
|
|
|
|
|
Joined: Aug 2006
Posts: 14
Lunker
|
|
Lunker
Joined: Aug 2006
Posts: 14 |
Great information, thanks again, and thanks for taking the time to post all the photos and your project step by step for the rest of us!!
|
|
|
|
|
Joined: Oct 2005
Posts: 6,934 Likes: 2
Ambassador
Field Correspondent Lunker
|
|
OP
Ambassador
Field Correspondent Lunker
Joined: Oct 2005
Posts: 6,934 Likes: 2 |
Thanks, Russ. You oughta know me by now...A-R to the n'th degree....yessirree. I did see that thread that Dwight is growing. I appreciate the suggestion, but don't see that stuff maintaining the wood ambiance that we seek. Now, if after a few years the entire deck turns to a dingy, twisted, mildewed pile of sticks, I will consider the Durabak to spruce it up. (no offense, Dwight ).
|
|
|
|
|
Joined: Oct 2005
Posts: 6,934 Likes: 2
Ambassador
Field Correspondent Lunker
|
|
OP
Ambassador
Field Correspondent Lunker
Joined: Oct 2005
Posts: 6,934 Likes: 2 |
Alright, I couldn't take it. The dang surface looked so good that I just HAD to do something with it before it faded out. We grabbed a gallon of Wolman deck and fence brightener and scrubbed the entire surface to clean it last weekend. We let it dry all week; no rain. We went back today with the cordless random orbit sander and knocked off the grade stamps. I did some due diligence on finishes. I listened to the forum ideas and looked thru the stuff at Menards and Homey. It starts to get like buying a bed mattress. Before my head exploded, I assured myself that I'm doing it again...making too big a deal and creating more work. I went to Menards and studied the PPG products, utlimately selecting the most expensive finish they had. For about $22 per gal., the Pittsburgh Paints Ultra Advanced Semi-transparent stain looked good. It's a water borne oil (acrylic oil); cleans with soap and water. To be sure, I called the PPG stains cust service and quizzed them on all their products. The said that the solid color is the most durable; I hate solid color stains for decks. OK, then the product I was contemplating would be the next best for durability in a semi-trans. Done. (you bet, Rocky-T...natural cedar) 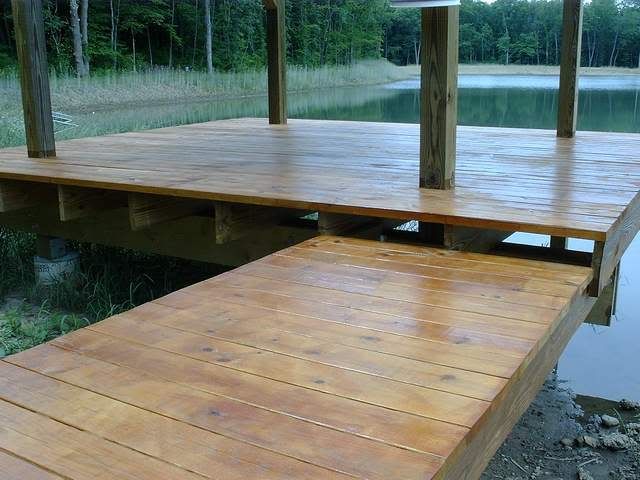 You can see the difference between new PT and older PT. The stringer supporting the decking of the approach dock was installed last summer; we did nothing to prepare it...just slopped on the stain. - - 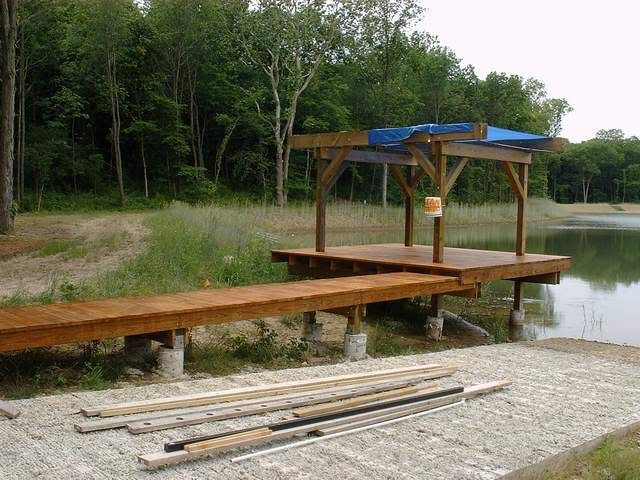 I figgered the dorky blue tarp roof needed some help, so I put's up da no-trespassing bucket. I've been working the neighborhood on garbage day to find a corduroy couch so's I kin take in da view. - - Seriously, I rolled the stuff on and REALLY tried to time the passing of the sun so it wasn't in direct sunlight. Well, let's say that most of it was done in the shade. It's not my best work; kinda blotchy where I re-rolled previous work trying to blend and cover. Tuff! I'll letcha know how it weathers and wears for future deck builders.
|
|
|
|
|
Joined: May 2004
Posts: 13,974 Likes: 277
Moderator Lunker
|
|
Moderator Lunker
Joined: May 2004
Posts: 13,974 Likes: 277 |
Honestly, Brettski - I swear I can smell that stuff drying over the Internet!
"Live like you'll die tomorrow, but manage your grass like you'll live forever." -S. M. Stirling
|
|
|
|
|
Joined: Oct 2005
Posts: 6,934 Likes: 2
Ambassador
Field Correspondent Lunker
|
|
OP
Ambassador
Field Correspondent Lunker
Joined: Oct 2005
Posts: 6,934 Likes: 2 |
Dang...it has been awful dry in the midwest. Because nothing is growing that was planted on the perimeter road, we decided to lug over the balance of the decent 2 x 6's to the dock framing at the sand beach. Yeah, 92 degrees, humid, and one helluva helper. I hope she keeps me. - - 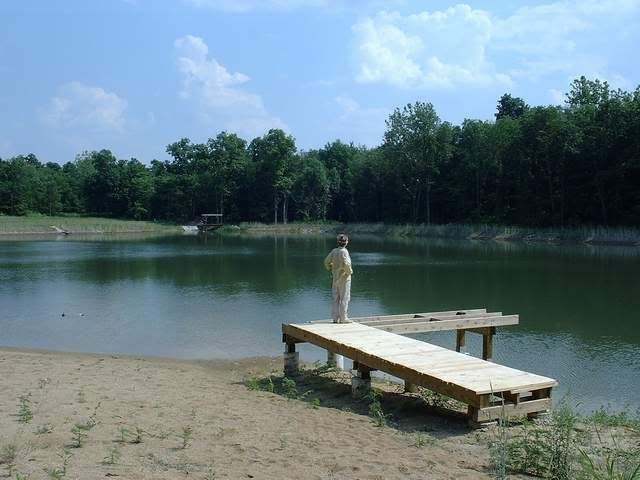 -
|
|
|
|
|
Joined: Apr 2006
Posts: 3,261
Ambassador Lunker
|
|
Ambassador Lunker
Joined: Apr 2006
Posts: 3,261 |
b'ski, yer pond water looks well on its way to being green and fertile......it looks really fantastic.....hope the fishies are doin good.
i dont miss humidity AT ALL.
GSF are people too!
|
|
|
|
|
Joined: Jan 2005
Posts: 1,239
Lunker
|
|
Lunker
Joined: Jan 2005
Posts: 1,239 |
Bski it is looking beautiful, I love the color the trees cast onto the water. Let me know how the clips hold up. How far are you from Pool level now?
The road goes on forever and the party nevers end...............................................
|
|
|
|
|
Joined: Nov 2005
Posts: 773 Likes: 1
Lunker
|
|
Lunker
Joined: Nov 2005
Posts: 773 Likes: 1 |
Brettski,
Great pictures. It looks great with the finish and very, very inviting!!!
I am curious where you stay when you are there? Do you camp out? An RV? Hotel close by? Do you bring your tools with you every time you work on a project?
Sorry for all the questions, I'm just curious.
Eddie
|
|
|
|
|
Joined: Oct 2005
Posts: 6,934 Likes: 2
Ambassador
Field Correspondent Lunker
|
|
OP
Ambassador
Field Correspondent Lunker
Joined: Oct 2005
Posts: 6,934 Likes: 2 |
Thanks, Dave and Rocky-T...it has really gone through some growth in many ways. Unfortunately, tho, the pool level growth hit a brick wall about 6 weeks ago when the water works dried up. The highest measurement I got was 25" short of full pool. This was directly after a significant rain event. Since it is a new pond, whenever we saw those sudden bursts of 6" - 12" of new depth, it always receded a couple/three inches within the next week or two. I attribute that to saturating the soil sponge. I haven't taken an official measurement, but my guess is we are about 33" short of pool (8" down from peak). The interesting thing we are experiencing is the water clarity. The chocolate murkiness is all but gone and I'll bet I have 2' - 3' of clarity easily. We are getting alot of weeds growing in the shallows. True to form the new weeds are comfortable in gradual slopes, but go to the same depth on a 3:1 and find zip. The FA is extremely minimal...for now. The FH population explosion is well under way; schools of hundereds of little 1/2" 'ers. Dski was getting into the fish thing right at the concrete launch. She was in a trance watching the FH fry trying to hide from one of the fingerling RES (this is a VERY good thing; does my heart good). The bullfrogs are singing bari harmony to the jungle yell of the pileated woodpeckers. When we pulled up to the project last weekend to do the beach dock, there was a whitetail standing at the bottom of the sand beach, taking a drink at the water's edge. - Yep, so far this pond stuff suits us fine. - - ooops; Eddie snuck one in while I was daydreaming the above post. Our days are VERY long when we do our work. It is usually a one-day round-tripper, starting very early and coming home later that night. Yeah, we're nutz. The only camping I would do would be in a trailer; I'm too old for tent stuff. A trailer would cost too much, tho, cutting into the thin budget and halting more important development. We carry the tools each way. I have already taken out a permit for a substantial shed (purt near garage), but time and $ probably won't allow that this year. The county we are in is pretty particular about controlling mobile housing units and related. I'm not totally sure on how we're gonna get the larger structures done, but I foresee pre-fab wall panels stacked on the utility trailer leaving the principle home at sun-up.
|
|
|
|
|
Joined: Nov 2005
Posts: 773 Likes: 1
Lunker
|
|
Lunker
Joined: Nov 2005
Posts: 773 Likes: 1 |
Brettski,
Thanks, I sort of remember you mentioning those day trips, but didn't realize you did all that work in a day AND drove there and back!!!
Have you started mowing yet? Do you have a way to mow, or do you trailer something there?
I just upgraded to a used 7 foot finish mower for my tractor and it's the smartest, greatest, easiest and nicest thing I've come across. The four wheels on it follow the ground and all I have to do is steer the tractor. No messing with deck height or scalping the ground with my bush hog.
My concern is that the weeds were getting too tall and crowding out my grass. The more I keep it mowed, the better my grass should do. So far, it seems to be working, as my grass is really starting to take hold in some areas.
Eddie
|
|
|
|
|
Joined: Oct 2005
Posts: 6,934 Likes: 2
Ambassador
Field Correspondent Lunker
|
|
OP
Ambassador
Field Correspondent Lunker
Joined: Oct 2005
Posts: 6,934 Likes: 2 |
Originally posted by eddie_walker:
Have you started mowing yet? Do you have a way to mow, or do you trailer something there?
The only mowing equipment we have is a garden tractor with a 50" deck. It is absolutely perfect for the walking trails thru the woods and the 26 gal pull behind tank sprayer is the icing on the cake. It is, tho, pretty labor intensive for open spaces with anything deeper than a foot or so. If it ever rains again and the 5 some acres of native grasses and wildflowers that we drilled begin to grow, this will have to be maintained. It ain't gonna be garden tractor work. I've mentioned a very good neighbor and friend that farms in the area. He has already warned me to avoid use of a bush hog or any type of rotary mower when the time comes. Rotary mowers create clumps and windrows that can choke the grasses and flowers underneath. He highly recommends use of a flail mower. He can handle either mowing situation for us, but will use the flail for the grasses/forbs. I chalk this stuff up as paid lawn maintenance and gladly accept the invoice. It's a nice break in an already fully loaded development schedule.
|
|
|
|
|
Joined: Apr 2003
Posts: 823
Lunker
|
|
Lunker
Joined: Apr 2003
Posts: 823 |
Brettski:
I mow my prairie grass with my rotary mower...just need to do it often enough that it doesn't "windrow" too bad. Doesn't seem to bother the wildflowers, either...
In a lifetime, the average driver will honk 15,250 times. My wife figures I'm due to die any day now...
|
|
|
|
|
Joined: May 2004
Posts: 13,974 Likes: 277
Moderator Lunker
|
|
Moderator Lunker
Joined: May 2004
Posts: 13,974 Likes: 277 |
Given possible wildlife habitat & preservation aspects, how many times a year are you going to want to mow?
"Live like you'll die tomorrow, but manage your grass like you'll live forever." -S. M. Stirling
|
|
|
|
|
Joined: Oct 2005
Posts: 6,934 Likes: 2
Ambassador
Field Correspondent Lunker
|
|
OP
Ambassador
Field Correspondent Lunker
Joined: Oct 2005
Posts: 6,934 Likes: 2 |
Regarding the 5-some acres of grasses and forbs, the first mowing can't be before something like July (pretty sure it's July; based on making sure all the hatchlings have left the nest). The NRCS guidelines have it defined...I'll double check. Anyway, I doubt that it would be much more than once a year. I don't fully understand all of it, but I rely on trustworthy dialogue with not only my farmer pal (who happens to manage a 400+ acre hunting preserve) but a super relationship with my NRCS agent. All this, and I still get nervous when they talk about the prescribed burn in a couple of years...
|
|
|
|
|
Joined: May 2004
Posts: 13,974 Likes: 277
Moderator Lunker
|
|
Moderator Lunker
Joined: May 2004
Posts: 13,974 Likes: 277 |
Once a year mowing will take heavier gear than weekly; where your 50 inch cut garden tractor could handle 5 acres if you spent the time to get it regularly, IMHO it sure wouldn't handle the growth through July. You might see what kind of an hourly (or better, per acre) rate you could get from locals for mowing it off, IF a once a year mowing will be your only use for the equipment.
OTOH if you will have (and why wouldn't an enterprising guy like you indeed have) other uses for a 24-40 hp tractor, the cost of a mower to put on it wouldn't be too prohibitive. Plus you could use it for mowing around the ponds, paths through the woods, etc., more often.
"Live like you'll die tomorrow, but manage your grass like you'll live forever." -S. M. Stirling
|
|
|
|
|
Joined: Apr 2003
Posts: 823
Lunker
|
|
Lunker
Joined: Apr 2003
Posts: 823 |
Brettski: Here's how it works..... General pasture grasses are "cool season" grasses (brohme, etc.) and grow tall and quickly early in the spring. You have to keep it mowed back to less than 8-10 inches or so. This allows sunlight to penetrate to the soil, as your prairie grasses, forbs, flowers and such NEED sunlight to germinate. Natives are "warm season" grasses... After 2-3 years, if you keep up with it, the natives can outgrow the coolseason grasses, but if you let the brohme go, it chokes out the stuff you planted. After 2-3 seasons, the root system of the natives are established enough to take SEVERE heat (from burning) and if you wait late enough in the spring, fire can help to kill to stuff you don't want, but won't hurt the natives. Timing is critical...around here, the counties burn in mid-late May or early June. One 80 acre patch is burned every year and they put in the local paper beforehand. It's done at night and folks drive a long way to watch - pretty spectacular...wind put the kibosh on that this year. NRCS can really help you with the timing. I'll burn my first patch next spring, probably. Watch for the smoke... 
In a lifetime, the average driver will honk 15,250 times. My wife figures I'm due to die any day now...
|
|
|
|
|
Joined: Oct 2005
Posts: 6,934 Likes: 2
Ambassador
Field Correspondent Lunker
|
|
OP
Ambassador
Field Correspondent Lunker
Joined: Oct 2005
Posts: 6,934 Likes: 2 |
Thanks, Matt... Details of the exact plantings are on this thread at the bottom of the page . The vast majority of this new planting is warms mixed with forbs. There are 3 much smaller pockets of cools that will be overplanted with bird-friendly deciduous bushes next spring. I'm told the warms and the forbs may not be very impressive this year at all, but I will have to cut back to help keep the weeds at bay. My farmer pal is the neighborhood firestarter. When the time comes, I'm workin' with him.
|
|
|
|
|
Joined: Apr 2007
Posts: 2,287
Lunker
|
|
Lunker
Joined: Apr 2007
Posts: 2,287 |
I don't think I've added my compliments yet. That's a very nice pond Bski.
|
|
|
|
|
Joined: Apr 2003
Posts: 823
Lunker
|
|
Lunker
Joined: Apr 2003
Posts: 823 |
Wonderful Brettski. Don't be shocked if they do better than predicted.
Planted mine last spring (early) but I had BILLIONS of wildflowers last summer. Hope they do as well this year...don't know, but we got 5.5" of rain day before yesterday, so hope all's well at home...I'm in Orlando, at a conference since Wednesday, and won't get home til week from tomorrow.
In a lifetime, the average driver will honk 15,250 times. My wife figures I'm due to die any day now...
|
|
|
|
|
Joined: Oct 2005
Posts: 6,934 Likes: 2
Ambassador
Field Correspondent Lunker
|
|
OP
Ambassador
Field Correspondent Lunker
Joined: Oct 2005
Posts: 6,934 Likes: 2 |
OK...enough of the vegetation stuff. Let's talk lumber. This is the first time I have worked with pole barn type stuff; CAKE. Fortunately, the trusses were small, so they were easy to handle. The rest of it is mostly a matter of lining and squaring everything up, then kick it into production mode. You pole barn guys know the story. - 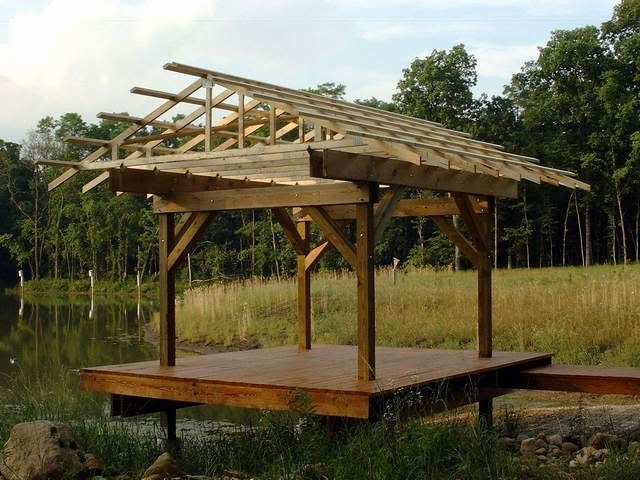 - - The rake and the the eaves will be PT 2 x 6. I was too danged tired to concentrate on that stuff, so it'll have to wait 'til the next trip. Besides, it's gonna be a pain getting to the pond sides; still not sure of my plan. - 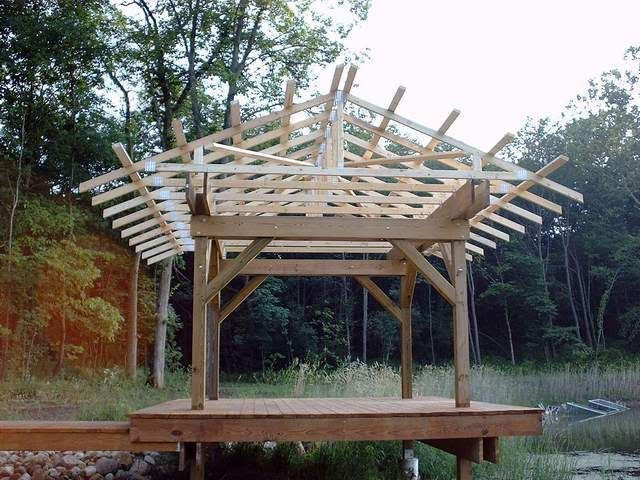 - - As mentioned in a previous post, there will be a 24" overhang around the entire perimeter of the 14' x 16' deck. - I just love that wooden roller coaster look... 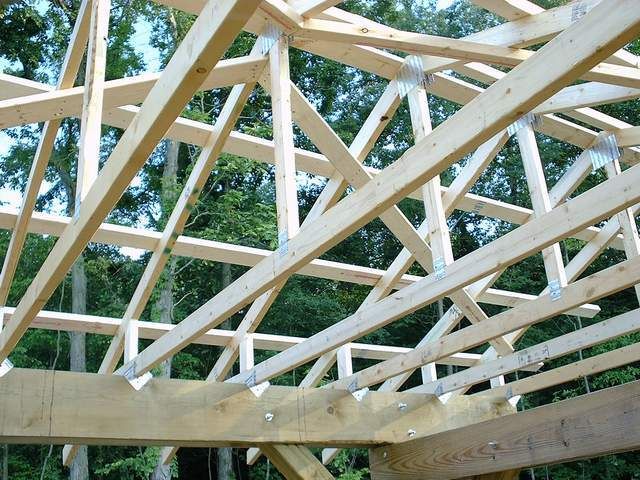 - - The only questionable engineering decision I made was to use a standard galvanized hurricane rafter tie plate to secure each of the trusses to the supporting beams. Those beams are made of that new PT lumber; AC2. I did use 1-5/8" stainless screws instead of nails, but I wonder if the actual plate surface will be negatively affected by the PT lumber? I had a bunch of those rafter tie plates left over from another job, so they now have a new home. I figger if I have to, I can run the SS screws out and replace 'em later, down the line.
|
|
|
|
|
Joined: May 2004
Posts: 13,974 Likes: 277
Moderator Lunker
|
|
Moderator Lunker
Joined: May 2004
Posts: 13,974 Likes: 277 |
BEAUTIFUL diagonal bracing on the bottoms of the tops of the trusses, Brettski. Have you considered adding another set of diagonal braces on the tops of the bottoms?
"Live like you'll die tomorrow, but manage your grass like you'll live forever." -S. M. Stirling
|
|
|
|
|
Joined: Oct 2005
Posts: 1,285 Likes: 1
Lunker
|
|
Lunker
Joined: Oct 2005
Posts: 1,285 Likes: 1 |
Very nice Brettski. I can't wait to see the roof on it.
Is there going to be soffit underneath?
 "The greatest enemy of knowledge is not ignorance, it is the illusion of knowledge." Stephen W. Hawking
|
|
|
|
|
Joined: Nov 2005
Posts: 773 Likes: 1
Lunker
|
|
Lunker
Joined: Nov 2005
Posts: 773 Likes: 1 |
Interesting framing on the roof. Are you putting a metal roof on it? The purlins are for metal roofs, but there's no reason for so many trusses, or them being so close together. Did you do this for the ceiling?
Are you sure about the preasure treating on the beams being the new formula? The last I heard, they only switched over the 2x6's and smaller lumber, but left the larger stuff original.
I'm suprised that you'd put in a flat ceiling. Is that correct?
How are you going to light it? Will there be a ceiling fan?
It's an interesting look with the gable ends on the sides. Will you put gutters on with downspouts to keep the water away from the walkway?
Thanks for the update and pics,
Eddie
|
|
|
|
|
Joined: Oct 2005
Posts: 6,934 Likes: 2
Ambassador
Field Correspondent Lunker
|
|
OP
Ambassador
Field Correspondent Lunker
Joined: Oct 2005
Posts: 6,934 Likes: 2 |
...once again, thanks for the moral support, guys! Theo notes and asks: BEAUTIFUL diagonal bracing on the bottoms of the tops of the trusses, Brettski. Have you considered adding another set of diagonal braces on the tops of the bottoms?
At the risk of potentially biting on a rubber worm made by the Gallus incredible edible machine, I will respond. "Huh?"...Do you mean a diagonal across the tops of the ceiling rafters? - Mr Freeze queried: Is there going to be soffit underneath? It's not part of the immediate plan, but the option remains available. - ...and of course we can always count of the president of the Texas chapter of DIY Intl to buzz a passel of questions ( ) as Eddie asks: Are you putting a metal roof on it? The purlins are for metal roofs, but there's no reason for so many trusses, or them being so close together. Did you do this for the ceiling?
Nope, no ceiling...same as the soffits. Just another mega-structure from the president of the Illinois chapter of Over-engineered LTD. Are you sure about the preasure treating on the beams being the new formula? The last I heard, they only switched over the 2x6's and smaller lumber, but left the larger stuff original.
Yeah, all the Menards PT is AC2. How are you going to light it? Will there be a ceiling fan?
Ah yes, the same issues Franklin and Edison faced. There is no power to the property. I am working on a massive kite as we speak. It's an interesting look with the gable ends on the sides. Will you put gutters on with downspouts to keep the water away from the walkway?
I will probably pass on gutters, or even a short section directly over the entrance dock. I believe it's function will provide less value than the clean look of it's absence.
|
|
|
|
|
Joined: May 2004
Posts: 13,974 Likes: 277
Moderator Lunker
|
|
Moderator Lunker
Joined: May 2004
Posts: 13,974 Likes: 277 |
Do you mean a diagonal across the tops of the ceiling rafters? Yes - diagonal bracing on the tops of the bottom boards in the trusses. You may want to add the ceiling Eddie was talking about after you see what all ends up living in the open truss space. Or maybe birdlime is a favorite encounter for birders. You are building heavy enough to hold it up no problem, IMHO.
"Live like you'll die tomorrow, but manage your grass like you'll live forever." -S. M. Stirling
|
|
|
|
|
Joined: Nov 2005
Posts: 773 Likes: 1
Lunker
|
|
Lunker
Joined: Nov 2005
Posts: 773 Likes: 1 |
Brettski,
I'm going to build a gazebo next to my lake and have the same problem of not having any electricity. I'm optimistic that one day this will change and will build the gazebo with lighting, a fan and electrical outlets for the day it actually happens. I might even use my generator if I can put it far enough away to be quite and still run an extension cord to the gazebo for power.
It's always easier to include the wiring when your roughing in the building then to add it later.
Eddie
|
|
|
|
|
Joined: Oct 2005
Posts: 6,934 Likes: 2
Ambassador
Field Correspondent Lunker
|
|
OP
Ambassador
Field Correspondent Lunker
Joined: Oct 2005
Posts: 6,934 Likes: 2 |
Man, can I lay out a great 4th of July vacation or what! I mean, what could possibly be more fun than framing and covering a roof? Guys like Theo, Eddie, Jeff Gaines, and Ahvatsa know exactly what I mean. Who needs the Polynesian resort when ya gots nails, screws, PT wood, and sheet metal? (more evidence that payback will be a b**ch) - - We opted for the snap lock metal roofing panels from Menards. The cost was about 20% more than their premium screw on roofing. It made more sense since the job is so small. Besides, the panels are 17" wide; cake to handle. They showed up at the store in a killer wooden 2 x 4 crate. Very impressive shipping container. There were 30 of 'em, all pre-cut to length. We spent alot of time keeping the roof framing square. It paid back big dividends. One roof ran perfectly true; the other ran off by .250" at the opposite end. The only fasteners that are exposed are the 2 screws at the eaves in each panel. All the others are covered by the snap seam and the ridge cap (oh yeah, there is a row of screws that run each side of the ridge cap at 16" OC, buzzed thru the snap seams and into the framing below...and a row securing each of 4 rake pcs). Anyway, the snap locks are very cool; very easy. - 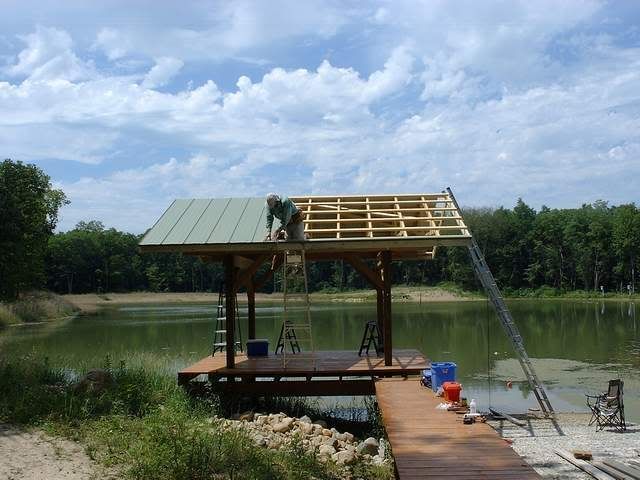 - The gable ends overhang by 24", but I was still concerned for driven rain hitting the outside truss members at each end of the framing. We covered those opposing, outside trusses with 1/2" OSB and sandstone colored vinyl siding. We selected Forest Green for the metal roofing color. It's a few shades lighter than the ever-popular emerald green and D-ski picked it out. Hey, works for me. - 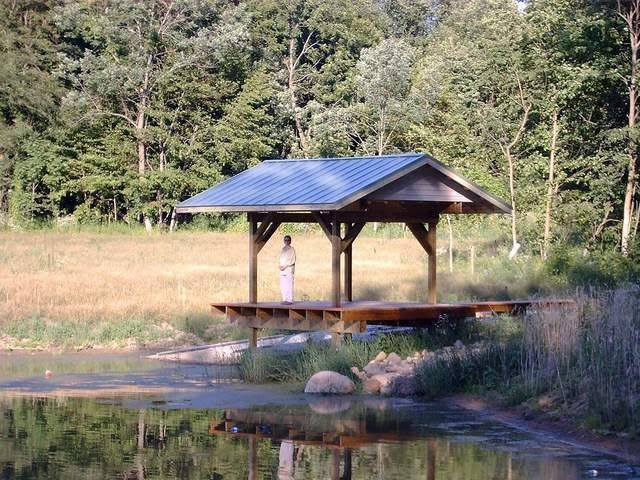 - These pics are at the end of another very long day. The sun is just setting behind the trees, so this pic is almost dramatic. D-ski says it looks computer generated for the blue reflections. I kinda like it. - 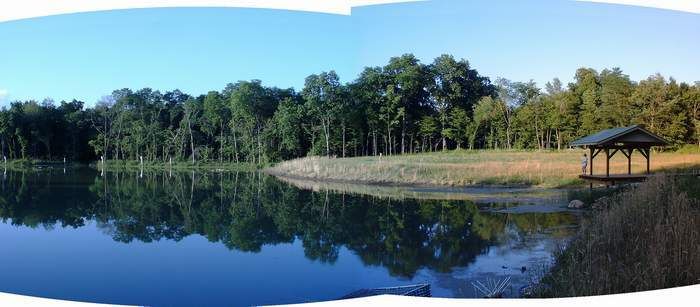 - ...send rain; need about 3 more feet of depth.
|
|
|
|
|
Joined: Apr 2007
Posts: 2,287
Lunker
|
|
Lunker
Joined: Apr 2007
Posts: 2,287 |
Now that's what I'M talkin' about.
|
|
|
|
|
Joined: Apr 2002
Posts: 1,011
Lunker
|
|
Lunker
Joined: Apr 2002
Posts: 1,011 |
Very, very nice B-ski!! That last photo looks like a PB magazine cover candidate.
|
|
|
|
|
Joined: May 2004
Posts: 13,974 Likes: 277
Moderator Lunker
|
|
Moderator Lunker
Joined: May 2004
Posts: 13,974 Likes: 277 |
Lookin' good, Brettski. There were 30 of 'em, all pre-cut to length. That's the way to go. Sawing metal is LOUD!
"Live like you'll die tomorrow, but manage your grass like you'll live forever." -S. M. Stirling
|
|
|
|
|
Joined: Nov 2005
Posts: 773 Likes: 1
Lunker
|
|
Lunker
Joined: Nov 2005
Posts: 773 Likes: 1 |
|
|
|
|
|
Joined: Jul 2006
Posts: 7,615 Likes: 5
Ambassador
Field Correspondent Lunker
|
|
Ambassador
Field Correspondent Lunker
Joined: Jul 2006
Posts: 7,615 Likes: 5 |
All of your hard work is really paying off Bski. Beautiful place!
JHAP
~~~~~~~~~~
"My mind is a raging torrent, flooded with rivulets of thought cascading into a waterfall of creative alternatives."
...Hedley Lamarr (that's Hedley not Hedy)
|
|
|
|
|
Joined: Mar 2005
Posts: 21,499 Likes: 267
Moderator Hall of Fame 2014 Lunker
|
Moderator Hall of Fame 2014 Lunker
Joined: Mar 2005
Posts: 21,499 Likes: 267 |
B'ski all I can say is WOW !! Nice job. Put those folding chairs up there and get out a cold beverage (ice tea of course). In the stretch pic is that a crib and a B'ski log above water ? What gives - I thought you were near full ? Also looks like a little macrophyte formation around the edges.
|
|
|
|
|
Joined: Feb 2005
Posts: 4,025 Likes: 1
Lunker
|
|
Lunker
Joined: Feb 2005
Posts: 4,025 Likes: 1 |
A ll I can do is applaude, mouth agape.
|
|
|
|
|
Joined: Dec 2006
Posts: 41
Lunker
|
|
Lunker
Joined: Dec 2006
Posts: 41 |
Beautiful lake and dock! Congratulations and kudos on the attention you give to everything you've done. 
Psalm 24:1-2
|
|
|
|
|
Joined: Jan 2005
Posts: 1,239
Lunker
|
|
Lunker
Joined: Jan 2005
Posts: 1,239 |
I give you win, I can't take it any more.
The road goes on forever and the party nevers end...............................................
|
|
|
|
|
Joined: Jun 2005
Posts: 2,365
Lunker
|
|
Lunker
Joined: Jun 2005
Posts: 2,365 |
Congratulations Brettski, for making your dream come true. Eddie's sig comes to mind.
|
|
|
|
|
Joined: Oct 2005
Posts: 6,934 Likes: 2
Ambassador
Field Correspondent Lunker
|
|
OP
Ambassador
Field Correspondent Lunker
Joined: Oct 2005
Posts: 6,934 Likes: 2 |
I can always count on the PB community for moral support and motivation. Thanks guys! - Ewest asks: ...In the stretch pic is that a crib and a B'ski log above water ? What gives - I thought you were near full ? Also looks like a little macrophyte formation around the edges.
Yes sir, dems da cribs and logs. I measured the water depth yesterday and got 35" short of pool. We corked the drain last July. Last fall, winter, and spring provided very consistent, heavy doses of precip...then, it shut down about 6 - 8 weeks ago. We have been very dry since. After the last strong rain (some weeks ago), the depth was 25" shy of pool. We have dropped 10" due to saturation of the virgin pond zone soils and evaporation. On the upside, the lower water level allows a little more last minute adjustments of stuff like this: 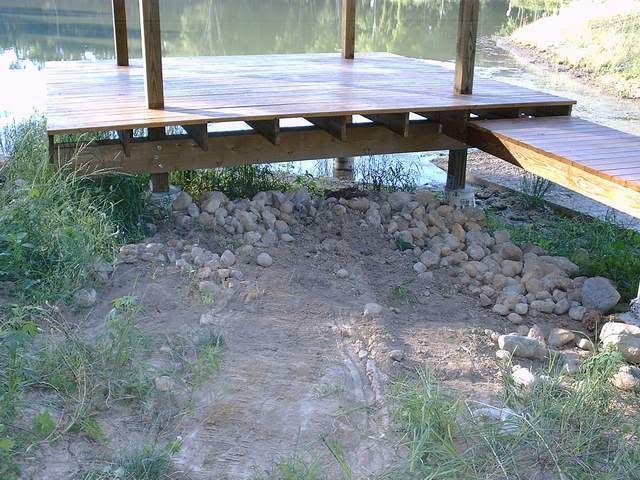 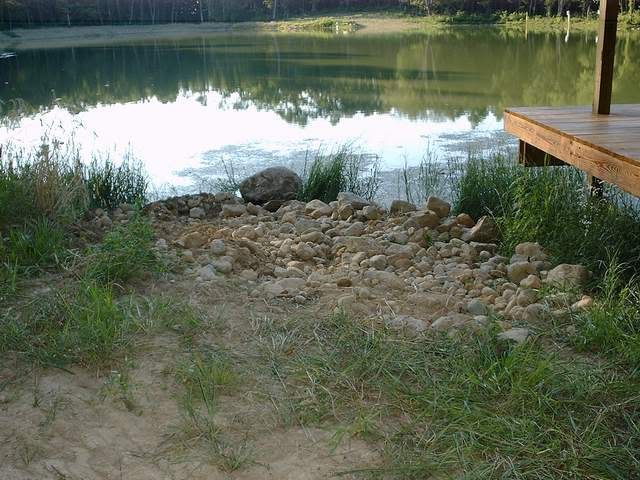 ...my farmin' pal brought back his tractor/frt end loader and gave the rock we trucked in another shove to get it a little deeper and under the shadows of the deck and roof. - WRT the pond vegetation growth, we have a fair collection of american pond weed around the shores at the shallow and gradual slopes. - - Tim Sanders adds: Beautiful lake and dock! Congratulations and kudos on the attention you give to everything you've done.
Thank ya, sir. Seeing your post reminds me that we have not heard (or I have missed) any further news on your project. Fill us in; it sounded like a great plan. - - My pal Rocky T is back from a true R & R vay-cay...you oughta post a couple of pics of your dream pond . RT adds: I give you win, I can't take it any more.
Knock it off, big guy! Crying uncle from a creator like yourself is nothing more than crocodile tears. Bear Witness - Thanks to all. You're inspirational cheers are killing my back, testing D-ski's patience, and pleasing my loan officer.
|
|
|
|
|
Joined: Oct 2005
Posts: 6,934 Likes: 2
Ambassador
Field Correspondent Lunker
|
|
OP
Ambassador
Field Correspondent Lunker
Joined: Oct 2005
Posts: 6,934 Likes: 2 |
Por Fin...the launch, she be done...- 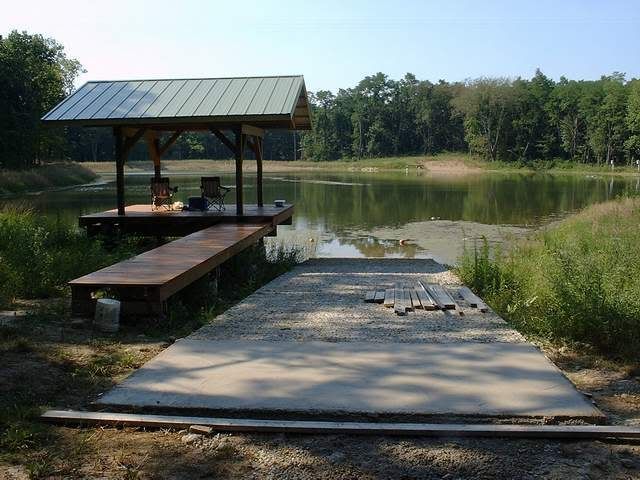 We had 6-1/2 yards of 'crete hauled in for three different projects today. This one is pretty much done...finally. This last pour was cake; 12'w x 8'l. The total launch is 12'w x 70'l. I struck this last pour off with a 16" float and called it good; no rake finish on this one. A nice combo of roughly smooth. At normal pool, it will be completely exposed...and...it will likely be used as a sidewalk to get to the deck/dock from the building pad (someday).
|
|
|
|
|
Joined: Aug 2007
Posts: 50
Lunker
|
|
Lunker
Joined: Aug 2007
Posts: 50 |
Your pond, deck, everything is gorgeous. You guys have done an exceptional job. I can see you enjoying some wonderful lounging in the near future. I must admit that I zipped through just so I could see all of the pictures. I can't wait to go back and 'read' how you did it now! Thanks for sharing with all of us!
GREAT JOB!
|
|
|
|
|
Joined: Sep 2007
Posts: 3
Fingerling
|
|
Fingerling
Joined: Sep 2007
Posts: 3 |
Brettski, I'm new to the Pond Bossing and I really enjoyed reviedwing the work you have been doing on your place. Great job, I look forward to ready more as they come in.
|
|
|
|
|
Joined: Oct 2005
Posts: 6,934 Likes: 2
Ambassador
Field Correspondent Lunker
|
|
OP
Ambassador
Field Correspondent Lunker
Joined: Oct 2005
Posts: 6,934 Likes: 2 |
...just applied a secure, finishing touch. - Since I took the time to thouroughly document our little dock construction project, I would be remiss to not share one of the most important features. A gate. The PB forum has kicked around safety and liability issues on a few different threads. In my mind, none of this pond stuff is worth a lick if you haven't taken a little time to make sure it's safe. Also, covering liability is huge. Therefore, allow me to present The Gate post. - It's all treated lumber; 6 feet wide x 5 feet tall. I knew it was gonna be a heavy bugger, so I used 1-by stock wherever possible. 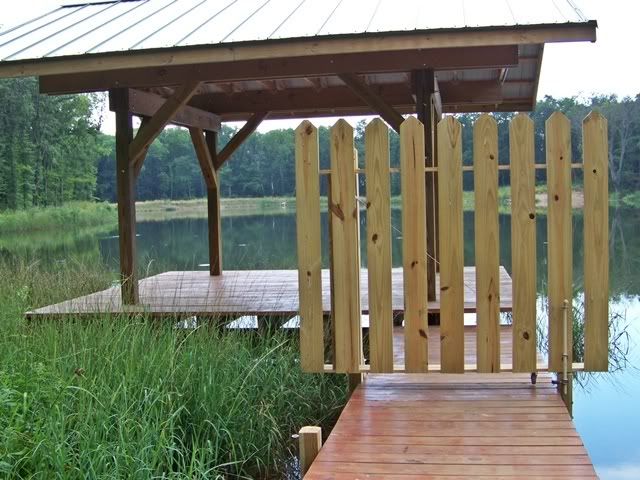 - - It swings on a 4 x 4 vertical post. The weight of the gate, combined with the leverage, caused me to take extra steps to beef up the attachment of this vertical post. Before we started, I removed one of the 2 x 8 horizontal support ledgers from the framing beneath the dock. I replaced it with another of the exact same, except it is about 6" longer. The additional length protrudes out and provides a good place to secure one part of the bottom of the gate post. The second place to secure was directly into the continuous decking joist. The third place is a pc of 24" long 4 x 4 with 45 degree cuts bolted to the same continuous decking joist and the gate post. Between all 3, the entire gate actually hangs and swings freely. 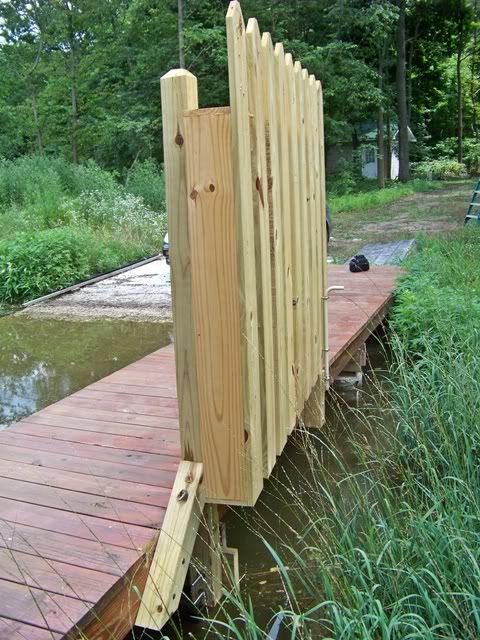 - - Even though the gate hangs OK on the gate post without additional support, I know at some point somebody is going to hang on it. I installed a rubber caster underneath the free end of the gate. It hovers about 1/2" off of the deck surface. Also, the gate has 2 specific positions: open and closed (pretty slick, eh?). I bolted short lengths of 4 x 4 to the continuous decking joists; one at each position of "open and closed" to support the free end of the gate. The tops of the 4 x 4's are chamfered to allow the gate bottom to "bump up and onto" the tops of these gate support blocks as it swings to their position. 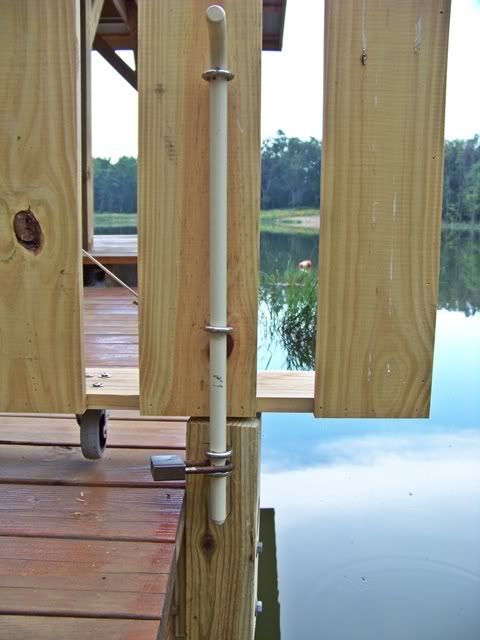 - The locking rod is a pc of 3/4" round steel. I drilled a hole through the rod where the padlock slips thru. The rod guides are large stainless steel screw eyes. In the closed position, the padlock is stuck between 2 of these screw eyes so the rod cannot be moved or removed. - - In the open position, another 4 x 4 support block is bolted to the continuous decking joist (identical to the block used to support the closed position). This support block only needs one screw eye to keep the gate in position. The lock just takes a ride. 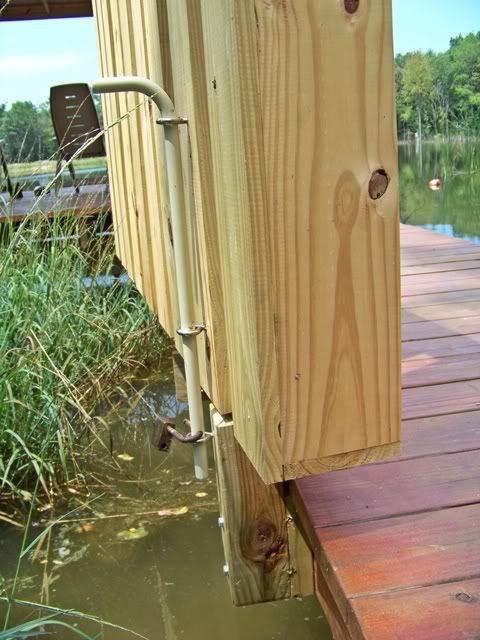 - - C'mon in and grab a chair. 
|
|
|
|
|
Joined: May 2004
Posts: 13,974 Likes: 277
Moderator Lunker
|
|
Moderator Lunker
Joined: May 2004
Posts: 13,974 Likes: 277 |
Very nice, Bski.
How secure is the lock from becoming structure in the open position shown in the next to last pic?
"Live like you'll die tomorrow, but manage your grass like you'll live forever." -S. M. Stirling
|
|
|
|
|
Joined: Oct 2005
Posts: 6,934 Likes: 2
Ambassador
Field Correspondent Lunker
|
|
OP
Ambassador
Field Correspondent Lunker
Joined: Oct 2005
Posts: 6,934 Likes: 2 |
How secure is the lock from becoming structure in the open position shown in the next to last pic?
I considered it. The lock is a long shank and rustier than a scupper, so it doesn't slide easily like the original chrome finish. Also, and this is part of the engineering (  ), the weight of the rod pushes it down and jams it against the screw eye below. It's a calculated risk....thx
|
|
|
|
|
Joined: Feb 2005
Posts: 4,025 Likes: 1
Lunker
|
|
Lunker
Joined: Feb 2005
Posts: 4,025 Likes: 1 |
Good job, man! Thanks for the continuing pics. I think I would have to cable the lock to the eye, though. Good, well used, long shank locks are hard to come by.
Your pond sure looks fishy!
|
|
|
|
|
Joined: Apr 2003
Posts: 1,256
Lunker
|
|
Lunker
Joined: Apr 2003
Posts: 1,256 |
Awesome, Bski! I think you're really onto something with the gate idea...you'll be a pioneer in that area of pond management.
Beautiful place...when can I come fishing?
"Only after sorrow's hand has bowed your head will life become truly real to you; then you will acquire the noble spirituality which intensifies the reality of life. I go to an all-powerful God. Beyond that I have no knowledge--no fear--only faith."
|
|
|
|
|
Joined: Sep 2003
Posts: 13,750 Likes: 295
Moderator Ambassador Field Correspondent Hall of Fame 2014 Lunker
|
Moderator Ambassador Field Correspondent Hall of Fame 2014 Lunker
Joined: Sep 2003
Posts: 13,750 Likes: 295 |
Really nice, Brettski.
For the proper effect, it should be painted neon orange.
Excerpt from Robert Crais' "The Monkey's Raincoat:"
"She took another microscopic bite of her sandwich, then pushed it away. Maybe she absorbed nutrients from her surroundings."
|
|
|
|
|
Joined: Mar 2005
Posts: 21,499 Likes: 267
Moderator Hall of Fame 2014 Lunker
|
Moderator Hall of Fame 2014 Lunker
Joined: Mar 2005
Posts: 21,499 Likes: 267 |
Great job B'ski. Who came up with the idea of a gate that goes a little on each side of the pier in water about 3 ft deep. Nice thoughtful additions to the concept. Now you need to get a life sized blowup of the YMCA mods in plastic to put on the front of the gate.  -
|
|
|
|
|
Joined: Oct 2005
Posts: 6,934 Likes: 2
Ambassador
Field Correspondent Lunker
|
|
OP
Ambassador
Field Correspondent Lunker
Joined: Oct 2005
Posts: 6,934 Likes: 2 |
Who came up with the idea of a gate that goes a little on each side of the pier in water about 3 ft deep ...stolen engineering from my attorney pal in Miss. Hope I haven't infringed on any patents.
|
|
|
|
|
Joined: Nov 2004
Posts: 1,074
Lunker
|
|
Lunker
Joined: Nov 2004
Posts: 1,074 |
Good job. Been in the business for 29 years and learn from you and the rest of the guys on the form all the time.
Looking forward to having a cold drink with you (ice tea of course)
Otto
|
|
|
|
|
Joined: Mar 2005
Posts: 21,499 Likes: 267
Moderator Hall of Fame 2014 Lunker
|
Moderator Hall of Fame 2014 Lunker
Joined: Mar 2005
Posts: 21,499 Likes: 267 |
Not my idea as I saw it on a few other ponds. Just passing on the info. Can't be a patent infringement as you added to many improvements and extras.
|
|
|
|
|
Joined: Sep 2003
Posts: 13,750 Likes: 295
Moderator Ambassador Field Correspondent Hall of Fame 2014 Lunker
|
Moderator Ambassador Field Correspondent Hall of Fame 2014 Lunker
Joined: Sep 2003
Posts: 13,750 Likes: 295 |
I want to see some pictures of the smallies hanging around the dock.
Excerpt from Robert Crais' "The Monkey's Raincoat:"
"She took another microscopic bite of her sandwich, then pushed it away. Maybe she absorbed nutrients from her surroundings."
|
|
|
|
|
Joined: Jul 2006
Posts: 7,615 Likes: 5
Ambassador
Field Correspondent Lunker
|
|
Ambassador
Field Correspondent Lunker
Joined: Jul 2006
Posts: 7,615 Likes: 5 |
Beautiful dock and setting Bski.
JHAP
~~~~~~~~~~
"My mind is a raging torrent, flooded with rivulets of thought cascading into a waterfall of creative alternatives."
...Hedley Lamarr (that's Hedley not Hedy)
|
|
|
|
|
Joined: Oct 2005
Posts: 6,934 Likes: 2
Ambassador
Field Correspondent Lunker
|
|
OP
Ambassador
Field Correspondent Lunker
Joined: Oct 2005
Posts: 6,934 Likes: 2 |
I want to see some pictures of the smallies hanging around the dock. I was intrigued by this little guy. He was in shallow water, right off the edge of the dock. I bet he was about 5" long. He was hiding underneath the rock to the left edge of pic, darting out for quick 4 or 5 second circuits in the immediate area every minute or so....then, back under the rock where it spent most time. It kinda creeped me cuz it has such unusual coloring/banding....worried that it was an unintended species introduction. 
|
|
|
|
|
Joined: Jul 2005
Posts: 4,596 Likes: 36
Lunker
|
|
Lunker
Joined: Jul 2005
Posts: 4,596 Likes: 36 |
Brestski, to me you mystery fish it looks like a very large male fathead minnnow.
|
|
|
|
|
Joined: Sep 2003
Posts: 13,750 Likes: 295
Moderator Ambassador Field Correspondent Hall of Fame 2014 Lunker
|
Moderator Ambassador Field Correspondent Hall of Fame 2014 Lunker
Joined: Sep 2003
Posts: 13,750 Likes: 295 |
I'd have to agree w/ Shortay.
On the introduction of unintended species of fish, don't worry. I already told you that I had seen Mudcat Joe at your pond when I was doing an initial fathead stocking for you. He was just standing behind a tree giggling like a fiend which usually means you are the proud recipient of bullheads.
Excerpt from Robert Crais' "The Monkey's Raincoat:"
"She took another microscopic bite of her sandwich, then pushed it away. Maybe she absorbed nutrients from her surroundings."
|
|
|
|
|
Joined: May 2008
Posts: 24
Lunker
|
|
Lunker
Joined: May 2008
Posts: 24 |
Very impressive, I'm new to Pond Boss and quite overwhelmed from all the info I have gathered so far, and have only scratched the surface. I will try and post some pics of the Dock that me and my Dad are in the process of constructing (not much but it'll be great for fishin off of). 
Last edited by Theo Gallus; 12/12/08 11:02 PM. Reason: Photo display
|
|
|
|
|
Joined: Oct 2005
Posts: 6,934 Likes: 2
Ambassador
Field Correspondent Lunker
|
|
OP
Ambassador
Field Correspondent Lunker
Joined: Oct 2005
Posts: 6,934 Likes: 2 |
Well then, Steve-man...allow me to welcome you to the show. Remember; we love pics and details. Don't be shy, don't hold back. Bring it.
-
Pick a relevant forum category and fire up a thread.
-
(edit; I just checked your profile. Been around since last May, so you likely don't need alot of guidance. I'm glad you're ready to share the progress of your dream)
Last edited by Brettski; 12/12/08 09:04 PM.
|
|
|
|
|
Joined: Nov 2004
Posts: 1,074
Lunker
|
|
Lunker
Joined: Nov 2004
Posts: 1,074 |
Glad to have you on board.
|
|
|
|
|
Joined: Dec 2006
Posts: 2,086
Lunker
|
|
Lunker
Joined: Dec 2006
Posts: 2,086 |
Welcome aboard Steve,we're glad you found us.Your new pond is looking good.
I subscribe Some days you get the dog,and some days he gets you.Every dog has his day,and sometimes he has two! 
|
|
|
|
|
Joined: Jun 2007
Posts: 7,099 Likes: 23
Ambassador Field Correspondent Hall of Fame Lunker
|
Ambassador Field Correspondent Hall of Fame Lunker
Joined: Jun 2007
Posts: 7,099 Likes: 23 |
The fish in the first pic doesn't look like a FH to me.
Could it be a sculpin or some sort of madtom?
|
|
|
|
|
Joined: Oct 2005
Posts: 6,934 Likes: 2
Ambassador
Field Correspondent Lunker
|
|
OP
Ambassador
Field Correspondent Lunker
Joined: Oct 2005
Posts: 6,934 Likes: 2 |
PUBLIC SERVICE ANNOUNCEMENT
When using green treated lumber for the framing of anything, always exercise hardware maintenance over the first few years. For instance, the year after I completed our covered dock-deck, I went over every stainless steel carriage bolt and most all of them accepted a couple of cranks to snug them back down. Green treated lumber will shrink a whole bunch.
Well, I skipped the second year.
Here now, some 3-1/2 years later, I decided it was time to take a look and see if anybody needed to be tightened up. GOOD IDEA, JAKE. I walked over to one the 6 x 6 main vert's and grabbed it with both hands and tried to give it a shake. WHOA; there was some play and the entire structure had a small tremor goin' on. Not good. So, I pulled out the ratchets, deep wells, and wrenches. Jeez, good call...some of the nuts were actually loose enough that I could have spun them with my fingers. I mean, some of those 1/2 x 8" stainless carriage bolts took 3 or 4 revolutions to pull it up tight as a drum.
At the end of the tune up, no more wobble.
|
|
|
|
|
Joined: Sep 2010
Posts: 119
|
|
Joined: Sep 2010
Posts: 119 |
Brettski.......After spending a couple hours reading every "lyric" of this beautiful tune, I have a couple of questions now that it is a few years old.
How is the color holding up and do you have any current pics? When did you reach "full" status and how is the pond holding water over time?
Some great knowlege shared and, with a total renovation of my acre pond coming this spring, some good planning tips.
|
|
|
|
|
Joined: Oct 2005
Posts: 6,934 Likes: 2
Ambassador
Field Correspondent Lunker
|
|
OP
Ambassador
Field Correspondent Lunker
Joined: Oct 2005
Posts: 6,934 Likes: 2 |
Hey Buzzworth, Thanks for the kind words. Some answers to your questions, below: How is the color holding up and do you have any current pics? Assuming you mean the deck stain, it is worn....but not horribly so. Since we are about 3-1/2 years past the application, I would say it looks about as I would have expected with midwest temps and precip. I don't have any current "up close" pics, but you raise a good idea for documenting wear and tear on that brand of stain. It's now on my list; thx.When did you reach "full" status It took 19 months. The PB forum summary is here. Our personal summary is here. ...and how is the pond holding water over time? It holds well, but we do suffer from evaporation, particularyly since we only have about 60 acres of runoff feeding 5 acres. We knew this was a little less than an ideal inflow, but having decent depth helps alot. I never took empirical measurement for evaporation, and I still maintain that we might have some leakage somewhere that is more than a pinhole, but the package works.
|
|
|
|
|
Joined: Sep 2009
Posts: 3,544
Hall of Fame Lunker
|
|
Hall of Fame Lunker
Joined: Sep 2009
Posts: 3,544 |
What part of Illinois you from brettski? If you don't mind me asking? I'm off interstate 70 about 50 miles east of st. Louis mo
I believe in catch and release. I catch then release to the grease.. BG. CSBG. LMB. HSB. RES. ![[Linked Image from i90.photobucket.com]](http://i90.photobucket.com/albums/k247/jmilczski/Fish/PBSubscribe.gif)
|
|
|
|
|
Joined: Oct 2005
Posts: 6,934 Likes: 2
Ambassador
Field Correspondent Lunker
|
|
OP
Ambassador
Field Correspondent Lunker
Joined: Oct 2005
Posts: 6,934 Likes: 2 |
What part of Illinois you from brettski? If you don't mind me asking? Nah, I don't mind the query....I get it every now and then. We prefer not to share that detail simply because I have chosen to put so much info "out there". That, and I am deathly fearful that the GSF will track me down and shag me outta the pond protection program.
|
|
|
|
|
Joined: Sep 2009
Posts: 3,544
Hall of Fame Lunker
|
|
Hall of Fame Lunker
Joined: Sep 2009
Posts: 3,544 |
lol.. Trust me no GSF here.. Anyways thought you might be close no biggie..
I believe in catch and release. I catch then release to the grease.. BG. CSBG. LMB. HSB. RES.
|
|
|
|
|
Joined: Feb 2023
Posts: 1
|
|
Joined: Feb 2023
Posts: 1 |
Looks great but I wonder how expensive will it be as to budget is concern.
|
|
|
Moderated by Bill Cody, Bruce Condello, catmandoo, Chris Steelman, Dave Davidson1, esshup, ewest, FireIsHot, Omaha, Sunil, teehjaeh57 |
|


.gif)