|
Forums36
Topics40,960
Posts557,934
Members18,495
| |
Most Online3,612
Jan 10th, 2023
|
|
|
|
Joined: Oct 2005
Posts: 6,934 Likes: 2
Ambassador
Field Correspondent Lunker
|
OP

Ambassador
Field Correspondent Lunker
Joined: Oct 2005
Posts: 6,934 Likes: 2 |
We have elected to put the second slab pour on hold. Not only are we waiting for a series of rain-free days, but we need to re-charge the checking account. My in-house bookkeeper has been VERY cooperative in juggling the books to meet my all-consuming pondmeister's disease, but my suggestion to forego eating has been trumped. Somewhat distrought, I immediately hooked up the trailer and initiated a 2 hour therapy session at Menards. There's something magical about quality time spent selecting, pumping, and bench pressing a bunk of green treat lumber. More importantly, my green-treat health plan has been pre-approved and funded  . - The docks have been engineered to consider the lateral force of shifting ice as our strongest foe at the foundation. This is the reason rebar cages were embedded within the concrete piers. The stainless steel post bases (pic in prev post) should provide a stout transition from the concrete pier tops to the 6 x 6 green treat timber vertical supports. 2 x stock will be the connecting structurals. All this will be tied together with stainless steel hardware. After the concrete piers cured, and during our last visit to tie the rebar mat for the upcoming 2nd concrete launch pour, we shot the top elevations of each pier. This allowed me to run the calc's and pre-cut the cumbersome 6 x 6 verticals at home. The 2 x stock is much easier to handle and will be cut to size at the jobsite. The tops of the SS anchor bolts protrude about 1". I want the timbers to bear directly down and upon the supporting post base, so an accommodation hole must be bored. This was done with a 1.750" dia forstner bit on site. 1.750" dia was selected to elimate bearing restriction by the 1.500" dia double washers under the nut on the post base bracket. The accommodation hole was bored on site because it's location varied from pier-to-pier based on fine-tuning the post base bracket location within the overall layout. I had the brackets fabricated with a 2.5" long slot for just this very reason. After the hole is bored, we soaked the entire end of the timber and hole with preservative. 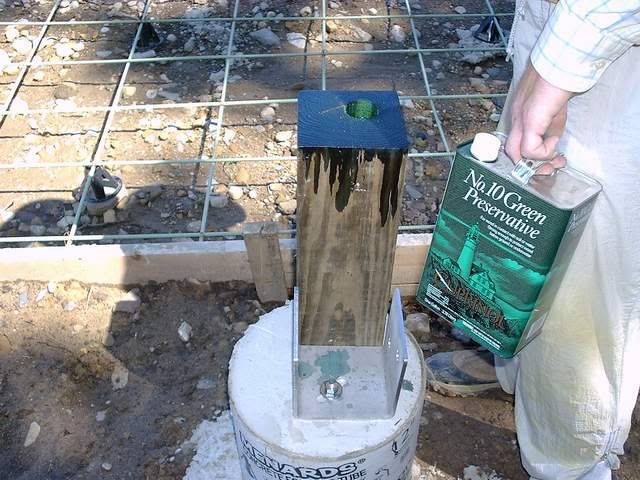 - - The vertical was dropped into the bracket and plumbed for level. 2 pc of 1/2" x 4" stainless lags are then cranked in, one from each side, to complete the vertical support. EDITOR'S NOTE: If you have ever done this kinda stuff and remember the time and effort expended spinning and cranking on a ratchet and socket to drive lag screws, there's a new sheriff in town. He's riding a compressor and slingin' an impact driver. Absolutely, positively, this is the only way to drive those beasts, hands down! (another editor's note: it just hit me like a ton'a'brix...DOH! I have a brand new Bosch hammer drill that I bought 2 years ago, sitting in a box in the basement. Betcha that would'a blown the bolt holes thru the timbers alot easier than the standard 1/2" drill I used. Like I said...DOH!) OK, I'm a little better now...let's continue. 2 x 8's were used as ledger boards. They are attached to the verts with 1/2" x 10" stainless carriage bolts (these are the holes that I was talkin' about during my above "hammer drill" epiphany). This foundation technique is typical and repeated for all the dock supports. 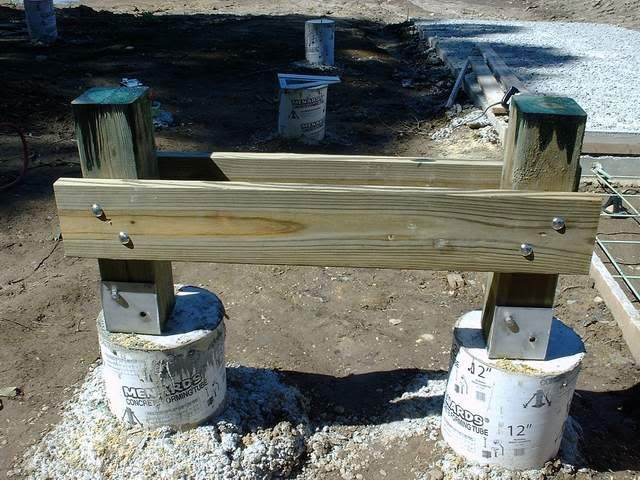 - - The dock at the this launch area has a 14' x 16' covered deck planned. This will be a construction headache unto itself and will be saved for another (soon to come) day. As a result, we are done for today on this dock after we install the 2 x 8 deck stringers. These outside stringer members are lagged into the verts with 5/16" x 4" stainless lags. The center stringer is toe-nailed into the ledgers with #10 x 3" stainless screws. 2 x 8 cross-blocking is planned between the stringers to minimize twist and rack; soon come. The resulting mass is strong. Donna-ski applies liberal coats of preservative to the tops of the verts as I chug Gatorade and take a few file pics. 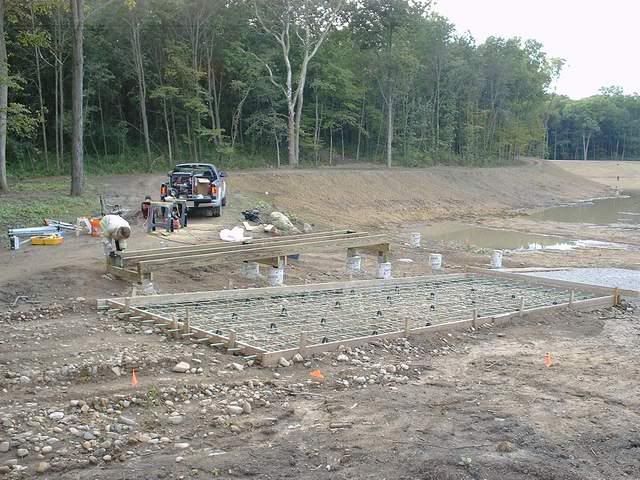 - - We pack up the truck and head on over to the beach area (man, I can't wait for the day when that means a picnic and a dip in the water). Not today, lifeguard boy. Strap on your toolbelt, we got's mo' woik to du. We followed the exact same process at the beach dock, except this project is a somewhat simpler since there is no covered deck planned. The first section of dock is 20 feet long, parallel to the sand beach. The second "L" section is another 12', the last 2 feet cantilevered. We selected this spot to create the beach area because of it's southern exposure, topography, and great view. As planned, there is virtually no shade on the entire knoll. Enter another good decision; the 10' square collapseable shelter. 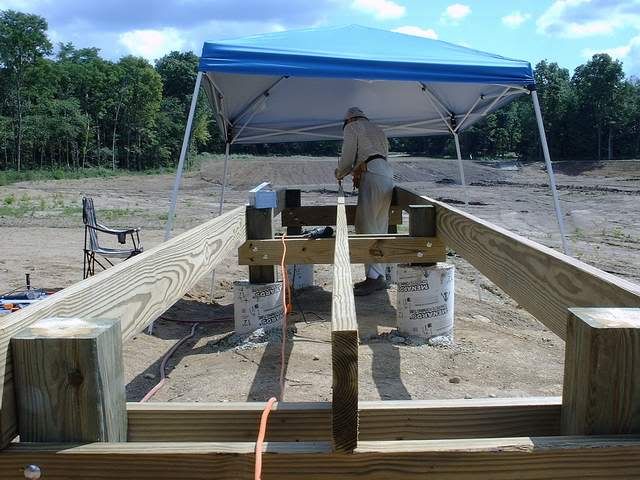 - - The "L" section was attached to the main dock section with stainless steel joist hangers. Instead of using nails, we opted for #10 x 3" screws to increase grip. 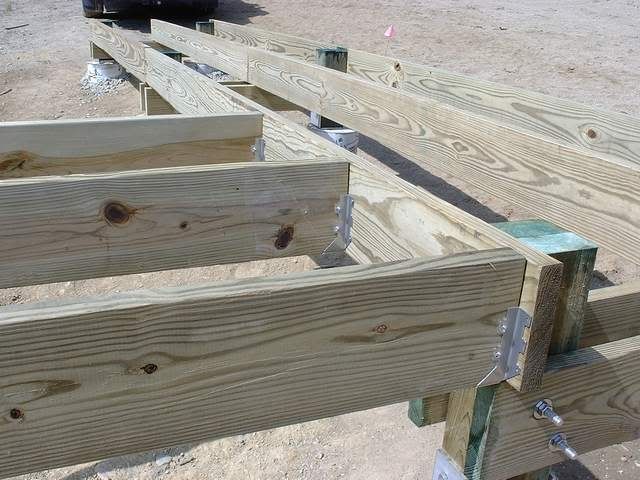 - - ...and then, the final product. This structure will also receive 2 x 8 cross blocks to resist twist and rack, but that will be the final touch before applying decking. 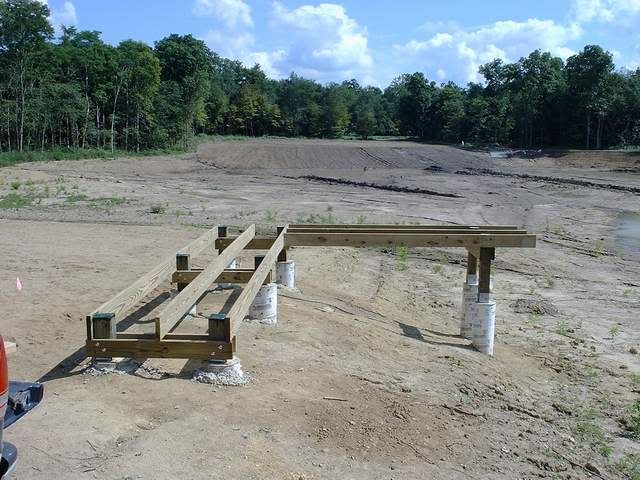 - 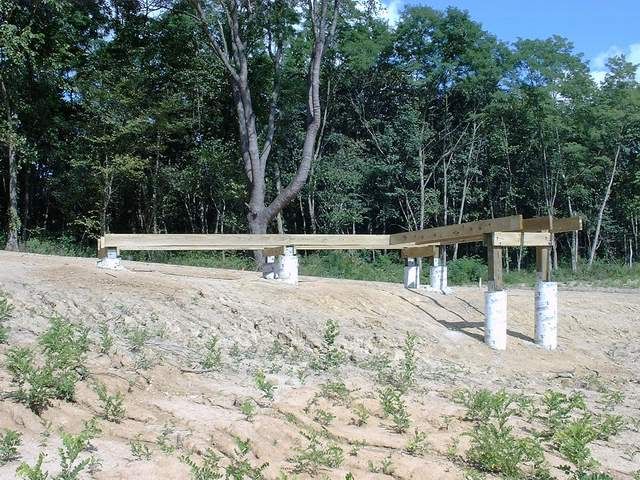
|
|
|
|
|
Joined: May 2004
Posts: 13,971 Likes: 276
Moderator Lunker
|
|
Moderator Lunker
Joined: May 2004
Posts: 13,971 Likes: 276 |
Good looking work, Brettski. I see the water's creeping a little closer to shore.
"Live like you'll die tomorrow, but manage your grass like you'll live forever." -S. M. Stirling ![[Linked Image from i.pinimg.com]](https://i.pinimg.com/736x/ed/b5/e7/edb5e7f935843b996cf52be593c9ebd2--smoothie-smooth-collie.jpg)
|
|
|
|
|
Joined: Apr 2006
Posts: 3,261
Ambassador Lunker
|
|
Ambassador Lunker
Joined: Apr 2006
Posts: 3,261 |
what kind of thought have you given deck material? since money is no object :rolleyes: i would recommend something requiring no maintenance other than sweeping, (i dont think you want to be re-applying stain or sealants in a couple years, over or near the water).
awesome project thread Brettski, you are truly making me dribble.....where's my bib?
GSF are people too!  
|
|
|
|
|
Joined: Oct 2005
Posts: 6,934 Likes: 2
Ambassador
Field Correspondent Lunker
|
|
OP
Ambassador
Field Correspondent Lunker
Joined: Oct 2005
Posts: 6,934 Likes: 2 |
Ol' Dave is on the right track... what kind of thought have you given deck material? since money is no object i would recommend something requiring no maintenance other than sweeping, (i dont think you want to be re-applying stain or sealants in a couple years, over or near the water). The plan is definitely low/no maintenance. That, and a non-skid type surface. I haven't selected the decking yet, but the final choice must meet the aforementioned criteria. The plan here is to complete the framing for both docks, then "hit the hooks" to allow moving back to structure placement and other various periphery projects that I wanna address BW (before water). This way, I can keep my radar scanning for a good deal on decking. There is a popular auction held in the midwest for construction materials. One of my pals has attended and says that overruns and excess decking is a hi volume item...I gotta try to check out their Fall event. - - We shifted back to the launch zone and focused on the main deck at the end of the dock. This was the one I somewhat feared. You see, we buy pretty much all our lumber at Menards; good price, great selection and stock. I believe they own the pressure treating facility...? Anyway, they move so much of this stuff that the stock is always fresh outta the pressure treating vessel. I mean it weighs tons!  The main supports for this 14' x 16' deck is 4 pc of 6 x 6 timbers that vary in length between 10 and 12'. When we "selected" these weighty beasts from the rack at Menards, I knew a special "installation experience" was in my future. I brought ropes, straps, cleats, pusher boards, and about 5 engineering plans for not only elevating them onto the concrete piers, but holding them there while the connecting structures could be applied to keep them vertical. In the end, it was good old fashioned backbone and sinew that got them up there and couple of stakes with wood batter piles that held them plumb. WHEW, what a relief! 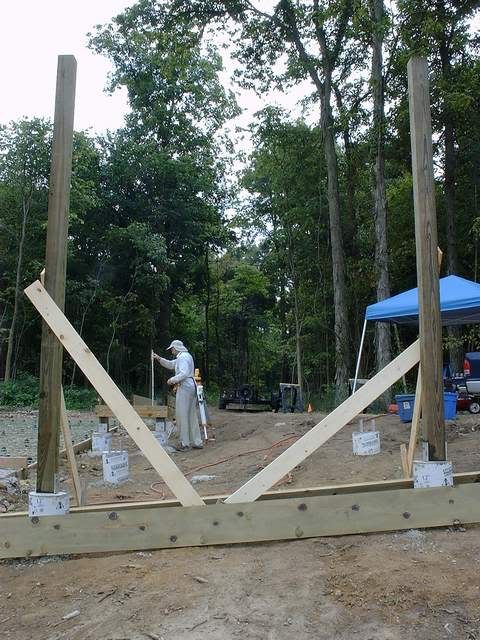 - - The main deck supports are 2 x 12 x 16', doubled up (one each side of the 6 x 6 vert) and thru-bolted with 3 pc 1/2" x 10" Stainless carriage bolts. 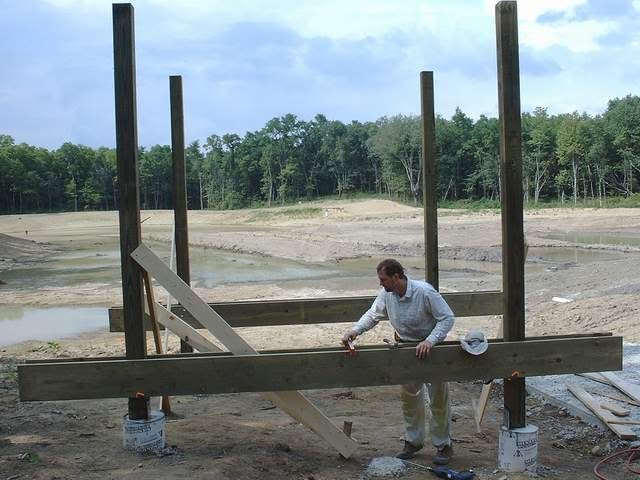 - - The floor joists are 2 x 10 x 14'. We flipped 'em up onto the deck supports to use as a temporary work deck. Next step, install the roof support members. A 2 x 10 cross member was installed to minimize racking and to tie the top of the verts. It also provides a shelf to set the main roof supports on for fastening to the verts (critical engineering foresight for a top-heavy and dangerously awkward construction segment). Identical to the deck support framing, 2 x 12 x 16' roof framing supports are installed. 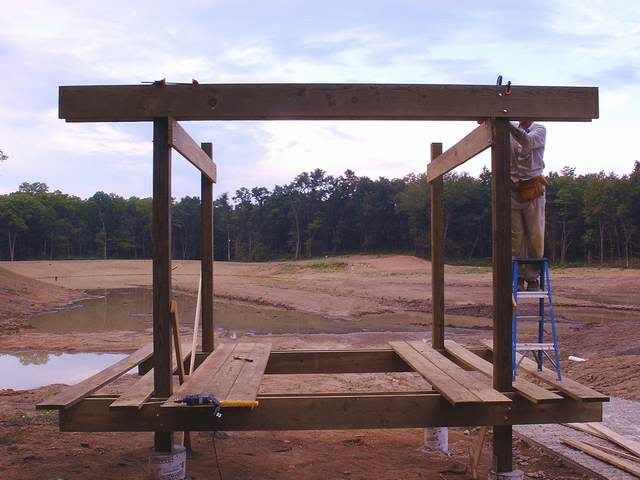 - - After the opposing, second set of 2 x 12 roof framing supports are installed, that's it for the roof for this year. The Spring 2007 plan is to set pre-fab roof trusses at 24" OC attached with hurricane clips. 1 x battens and painted metal roofing will complete the roof structure (inspired by the Jeff Gaines project...thanks, Jeff. A note of thanks also goes out to Ahvatsa who spun off the Gaines design to another great dock/deck project)
|
|
|
|
|
Joined: May 2004
Posts: 13,971 Likes: 276
Moderator Lunker
|
|
Moderator Lunker
Joined: May 2004
Posts: 13,971 Likes: 276 |
Brettski, I have the reputation on both sides of the family for overbuilding projects. "Hell for stout," my late father-in-law often said.
Sir, that dock post-and-frame looks as well built as anything I have put together. My hat is tipped in recognition of your planning, execution, and documentary footage.
Forget going back to college. I hereby grant you an Honorary Doctorate from the Hardly Able School of Construction Engineering.
"Live like you'll die tomorrow, but manage your grass like you'll live forever." -S. M. Stirling
|
|
|
|
|
Joined: Jun 2003
Posts: 107
Lunker
|
|
Lunker
Joined: Jun 2003
Posts: 107 |
Brettski,
It is interesting to watch your progress - great pictures!
Make sure that you install some diagonal bracing to keep the structure square. My metal roof was a bit heavy and shaky until I added diagonals.
I am pleased to report that my dock has handled some intense storms. We got hit hard a month ago and I lost dozens of large oaks, hickory and ash, but the dock stood firm with no damage.
Jeff Gaines
|
|
|
|
|
Joined: Sep 2003
Posts: 13,746 Likes: 294
Moderator Ambassador Field Correspondent Hall of Fame 2014  Lunker
|
Moderator Ambassador Field Correspondent Hall of Fame 2014 Lunker
Joined: Sep 2003
Posts: 13,746 Likes: 294 |
It is quite impressive.
By the way, Brettski,....don't be too surprised if you see swarms of fathead minnows in those mini-ponds. I was there last weekend.
On a less desireable side note, 'Ole Mudcat Joe was there too, although he'll testify that he didn't stock any bullies.
Excerpt from Robert Crais' "The Monkey's Raincoat:"
"She took another microscopic bite of her sandwich, then pushed it away. Maybe she absorbed nutrients from her surroundings."
|
|
|
|
|
Joined: Nov 2005
Posts: 773 Likes: 1
Lunker
|
|
Lunker
Joined: Nov 2005
Posts: 773 Likes: 1 |
Brettski,
Holey Moley!!! You've done it again. You started another must read thread that I'll have to come back to several times a day to see if you've updated it.
Your dock sounds like it will be large enough to be very roomy and allow you to spend allot of time there with lots and lots of friends. In my next life, that's just what I want to do.
Thanks for sharing the pics and keeping us updated.
Eddie
|
|
|
|
|
Joined: Oct 2005
Posts: 6,934 Likes: 2
Ambassador
Field Correspondent Lunker
|
|
OP
Ambassador
Field Correspondent Lunker
Joined: Oct 2005
Posts: 6,934 Likes: 2 |
Professor Gallus delivers a coveted award for achievement: Forget going back to college. I hereby grant you an Honorary Doctorate from the Hardly Able School of Construction Engineering.
...this should help offset my high school graduating class vote of "most likely to party". - - Jeff, my trusted PB dock motivational speaker, offers sound engineering advice... Make sure that you install some diagonal bracing to keep the structure square. My metal roof was a bit heavy and shaky until I added diagonals.
I am pleased to report that my dock has handled some intense storms. We got hit hard a month ago and I lost dozens of large oaks, hickory and ash, but the dock stood firm with no damage.
I am glad that you mentioned this, Jeff. It was already on the drawing board, but I needed to hear it from "the man who owns one". You see, about 6 years ago I built an octagonal gazebo off our back deck, using very similar construction technique except the verts are 4 x 4. After attaching the roof, it was shaky and spindly...like a big, drunk spider in the wind. I added 4 x 4 diagonals, mitred and thru-bolted into an "X", between each vert. The spider sobered up, stout and tight as a drum, and went on to become the model for the War of the Worlds. :rolleyes: If you go back to my last post, where I describe attaching the double 2 x 12 x 16' support members to the tops of the verts, you will remember and see the 2 x 10 cross member that I installed just below them to tie the verts together and minimize some of the rack. The plan would be to add another 2 x 10 just the other side of the existing and thru-bolt the entire mass...just like the perpendicular 2 x 12's they support. Then, I can cut 6 x 6 diagonals about 3 or 4 feet long, mitre the ends at 45 degrees (like one section of a picture frame). They can be thru-bolted, sandwiched between the 2 x stock running horizontal, and the other end can be either lagged or thru-bolted to the 6 x 6 vert. It will be OTT for structural integrity, but look very cool. The drawback will be the head-room obstruction potential. I s'pose if one kept them closer to 3 ft long overall, the chance of head bumps is minimized. I truly mourn the loss of your beautiful trees. They are not so easily replaced... - - ...Sunil is relentless (and appreciated): By the way, Brettski,....don't be too surprised if you see swarms of fathead minnows in those mini-ponds. I was there last weekend.
How and where do I find "certified" fathead minnows? I have read enough on this forum to fear introduction of unwanted guests. (oh yeah, and for the record, Norm's Ditch has about 3-4" of water and Sunil's Mound stands another 2 feet higher, surrounded by water ). - - Mr Walker chimes in support: Your dock sounds like it will be large enough to be very roomy and allow you to spend allot of time there with lots and lots of friends. In my next life, that's just what I want to do.
...Eddie, with your boundless DIY talent, I foresee you cutting down a redwood and carving the same deck, as one piece, with a stone sharpened grouser bar as a blade. Don't forget to wrap one end with a roll of ductape...I think that's how Henckels does it...? Oh yeah...and remember...all your hobbies have to wait 'til AFTER the dishes are cleaned and dried. No lip, Mister, or it's straight to the dozer without diesel! - - (thanks, guys....your support means alot)
|
|
|
|
|
Joined: Jan 2005
Posts: 1,239
Lunker
|
|
Lunker
Joined: Jan 2005
Posts: 1,239 |
Brettski remember those house plans I sent you, in rereference you stated you were wanting to build a small retreat cabin. Looks to me like you are already well on your way with that monster dock, just add a few more piers and some walls and wa-la a cabin on the water. Then you can quite worring about the slopes to the house pad etc and you'll save a bundle too. Looks great like all the rest or your work thus far.
Eddie he's correct you'll have to schedule dozer time now.
 The road goes on forever and the party nevers end...............................................
|
|
|
|
|
Joined: Oct 2005
Posts: 6,934 Likes: 2
Ambassador
Field Correspondent Lunker
|
|
OP
Ambassador
Field Correspondent Lunker
Joined: Oct 2005
Posts: 6,934 Likes: 2 |
...it seems the inventor in Rockytopper never takes a day off: ...just add a few more piers and some walls and wa-la a cabin on the water. C'mon RockyT...I promised the boss we would take a break after we finished framing it out. Besides, I'm thinkin a small houseboat might look nice tied up to it AND meet all the immediate camping requirements...once we see a bunch more water  . - - Well, 9 more yards of concrete and pad number 2 is poured and completed. This gives us 12' x 62' of launch. I figger the apron at the top will come in around 8 more ft of length. 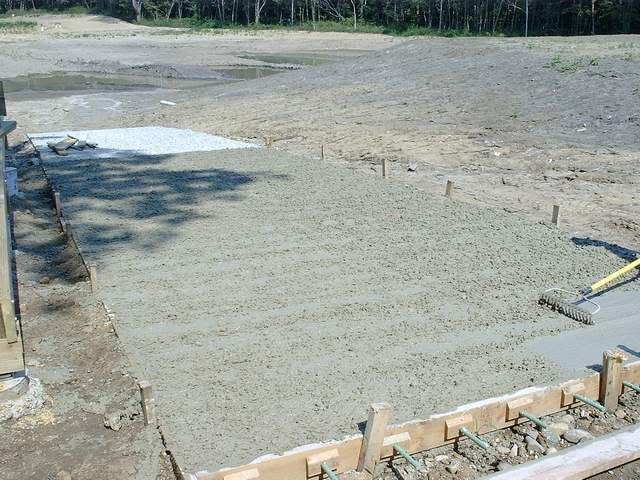 We stole a couple of 5 gal buckets-worth of concrete out of the end of the pour to set the strainer support rod on the intake end of the dry hydrant line. I'll post pics on that with the balance of the dry hydrant installation pics. Oh yeah, and talk about a close guesstimate of required concrete. I wrestled with ordering what calc'd out to exactly 9 yards, or order 10 and not sweat it. Well, I went with 9 :rolleyes: . We had about 4 more feet of the pour to go to get to the top and the driver gets out and climbs up to look into the barrel...this can't be good. He shakes his head and says it's gonna be close. Well, we finish the slab pour (barely) and he swings the chute over to my 2 five gal buckets staged off to the side. We got exactly both of them filled by me using the shovel to scrape out the chute. Not another pebble more. Poifect...I used the buckets to fill the hole for the dry hydrant support rod; end of story! - - A little lunch break, and back to the green treat. We put up the last 2 pc of 2 x 12 x 16' for the roof supports. Then we set the 2 x 10 x 14' floor joists by toe-nailing them into the 2 x 12 x 16' supports with #10 x 3" stainless screws. Then, we set blocks between the floor joists and screwed them thru the joists with the same screws. The resulting floor framework is solid. 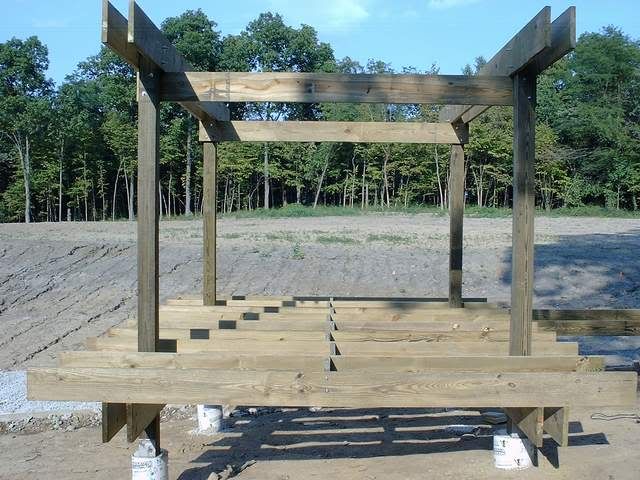 - - OK, time to go back to the dock and tie the whole shootin' match together. We laid in the last 2 x 8 x 10' stringers. They span from the 3rd concrete dock support to the deck we just completed framing. The attachment to the deck is with the same size/type stainless steel joist hangers we used on the beach pier with the same type #10 x 3" stainless screws for fasteners. There will be a small step up from the dock to the deck...it was an engineering issue I had to accept...not a real biggie. Anyway, it came together well.  - - We'll see how the boss feels about spending her last day of vacation. She's probably thinking R & R and maybe dinner or lunch at a nice restaurant. I'm thinkin' "stackin' tire pyramids and settin' PVC trees". There must be a reasonable compromise....? - (edit; a day later, the reasonable compromise was a nice picnic at the pondsite AFTER wrestling with old truck/tractor tires and assembling PVC trees. I gotta think I got the better end of the deal :rolleyes: . For details, spin off to the PVC trees thread and head to the bottom of the page for installation.)
|
|
|
|
|
Joined: Oct 2005
Posts: 6,934 Likes: 2
Ambassador
Field Correspondent Lunker
|
|
OP
Ambassador
Field Correspondent Lunker
Joined: Oct 2005
Posts: 6,934 Likes: 2 |
Originally posted by Gainesjs:
Make sure that you install some diagonal bracing to keep the structure square. My metal roof was a bit heavy and shaky until I added diagonals.
I am pleased to report that my dock has handled some intense storms. We got hit hard a month ago and I lost dozens of large oaks, hickory and ash, but the dock stood firm with no damage. OK Jeff...done. I picked up 4 pc of green treat 6 x 6 x 8ft and pre-fab'd 'em at home. I cut each 8 footer dead center with a 45 degree cut. Then, I pre-drilled the 1/2" hole for the mounting bolt at each 45, adding a 1.500" dia countersunk hole to accept and recess the washer and nut. The other end of ea timber brace, the square end, is the easy one and will be drilled on site during installation. I picked up 16 more 1/2" x 10" SS carriage bolts and matching washers and nuts. Load up the generator and we're back off to the project. It took a couple of hours but turned out great. 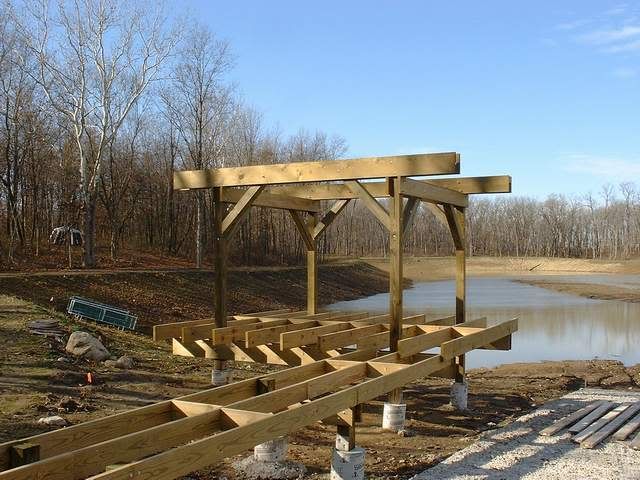 - - Before we installed the diagonal timbers, I had to add one more 2 x 10 ledger opposite the existing ledger....cake. Then the top end of each diagonal (the square end)is sandwiched between the 2 x stock and thru-bolted with the 1/2" SS carriage bolts. The 45 degree cuts mated with the verts absolutely dead on and bolted on like they belonged there all along. 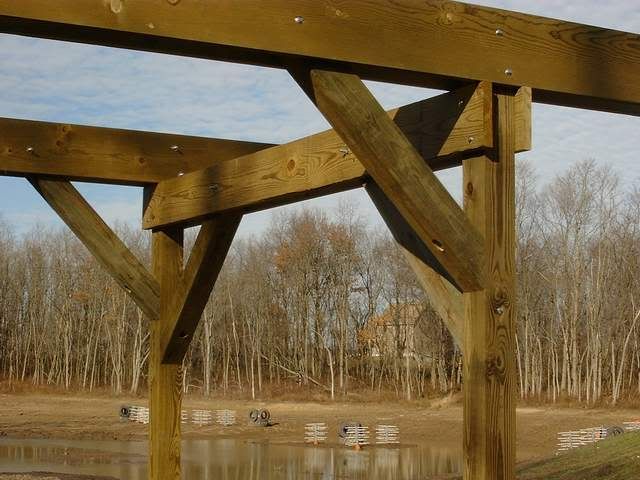 - - Now I have to keep my eyes and ears open to find a good deal on manufactured decking. After that, load up the trailer with pre-fab roof trusses and metal roofing. - QUESTION: I have very little exposure to metal roofing installation. I know that on a house a plywood or OSB roof deck should be installed. Should I do the same here or just use firring strips perpendicular to the trusses? I sure like the simplicity of firring strips AND the weight reduction.
|
|
|
|
|
Joined: May 2004
Posts: 13,971 Likes: 276
Moderator Lunker
|
|
Moderator Lunker
Joined: May 2004
Posts: 13,971 Likes: 276 |
Good work, Grasshopper. On metal roofing: Normal protocol is to use 2"x4"s (called purlins, today's $2 word that I didn't learn until my 4th barn), going perpendicularly across the trusses/rafter boards, to hold up the metal roofing, which itself is perpendicular to the purlins. Typical purlins spacing would be 2' apart, perhaps wider in areas with a lower expected snow load or for steeper roofs. The 2"x4"s are of course stronger in this role if oriented vertically (the 4" going up and down, the 2" contacting the rafters and the roofing). Concerned amateurs nail or screw the roofing through the raised ridges onto the purlins, barn #4's "professionals" (  :rolleyes: ) screwed it through the flats (we were a little unhappy about that - it may be OK since it's screwed, if nailed it would be a nightmare). Here's the best digital picture I could find of installed purlins and roofing (a ltttle blurry because the building was not the main subject). You can see the siding on the wall better and it is put on completely analogously to the roofing, other than the orientation of the 2"x4"s. I hop this helps. 
"Live like you'll die tomorrow, but manage your grass like you'll live forever." -S. M. Stirling
|
|
|
|
|
Joined: Oct 2005
Posts: 6,934 Likes: 2
Ambassador
Field Correspondent Lunker
|
|
OP
Ambassador
Field Correspondent Lunker
Joined: Oct 2005
Posts: 6,934 Likes: 2 |
I want to go with 4/12 prefab roof trusses, 24" o/c. I have to imagine that 2 x 4 purlins at 24" o/c should be plenty stout. A 4/12 pitched metal roof should shed snow fairly well...? This being true, laying them flat should be reasonable practice...? Besides, what type/length of fastener would be used to go thru 3.5" of inverted 2 x 4, plus seat/bond with the support member?
|
|
|
|
|
Joined: Nov 2005
Posts: 773 Likes: 1
Lunker
|
|
Lunker
Joined: Nov 2005
Posts: 773 Likes: 1 |
Brettski, I have some experience with metal roofs on wooden buildings. The attached picture is of my wife as we put the roof on our home. The metal is attached to the purlins. It's always screwed on. NEVER nailed. The screws have rubber gaskets on them that you tighten until it starts to bulge. Too tight and you will break the seal. The screws go through the low part of the metal directly into the purlins. You NEVER attach a metal roof through the ridges. Metal comes in three foot widths, but it's easy to overlap sections in one foot widths. Your supplier will pre-cut it to you in any length you want. Spacing of your truss's can vary from four feet to 16 feet or more. I like 4 foot centers on my truss's. Your purlins need to span the width of each truss. I like 12 foot pulins and I stagger there ends. Each one up starts on a different truss to tie everything together. My purlins are on 4 foot centers. Without snow, you can put them further, but snow load and pitch need to be engineered if you do that. I wouldn't. You can put them closer if you like, it's just extra lumber. With your truss's on 4 ft centers, you can use 2x4's on there flat sides. Further spacing of the trusses will require 2x4's on there edges. It's real easy to attach them on there flats, so that's the way I do it. This also gives you a large surface to attach your metal panels. I buy my stuff at www.muellerinc.com here in Texas. I know they are not in your area, but they have a good website with prices that should give you some ideas. Home Depot and Lowes don't sell good metal. If you want to do it once, buy from a metal building supply house. The main failure point on metal roofs is the screws. Mostly it's from overtightenign them, but cheap screws will fail. They either have inferior rubber gaskets or the metal is crap. Buy quality screws!!! To keep it simple, build a gable roof. A hip roof might look nicer, but it's more work and the framining is allot more involved. Have fun, Eddie 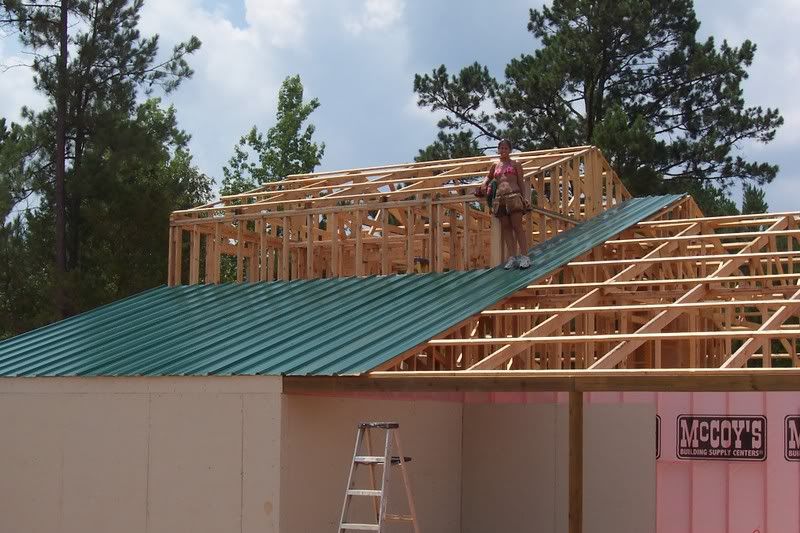
|
|
|
|
|
Joined: May 2004
Posts: 13,971 Likes: 276
Moderator Lunker
|
|
Moderator Lunker
Joined: May 2004
Posts: 13,971 Likes: 276 |
If the 2"x4"s are attached upright, you put two nails in at an angle from opposite sides. They only go through the bottom 1/2 to 1/3 of the purlin.
The barn pictured above has purlins every (IIRC) 28" or so, with a 5 foot span between the trusses (center section) or rafters (side sections). Given your purlins will only have to span 2' between trusses, laying them flat should be no problem at all.
I think 4/12 pitch trusses should be fine for your snow load, even if you're in the Lake Michigan snow belt, unless you're putting on gutters. A steel roof sheds snow a lot easier than shingles. 4/12 is not too bad to work on after it ages; roof sheets IME are shipped dripping with a silicon spray-like preservative that is really slippery until it drips/weathers off (it tastes lousy, too). Even if there's no preservative to speak of, they roughen up a little after the galvanized starts to oxidize. The roof above I worked from a roofing ladder suspending by rope from the opposite side of the barn, passed over the crown. But it has a lot bigger span and a lot higher drop (20+' for the center section) than your dock.
Use screws to hold the sheeting down. I used to make good money renailing steel roofs on pole barns after they'd aged a few years.
Are you going to seal off the under side of the trusses with sheeting like the classier dock roofs we've seen pictured here? It'd be nice to have it bird-, bug-, and varmint-proofed. Although the challenge of shooting a raccoon out of ones trusses without holing the roof can be fun.
"Live like you'll die tomorrow, but manage your grass like you'll live forever." -S. M. Stirling
|
|
|
|
|
Joined: Jan 2005
Posts: 1,239
Lunker
|
|
Lunker
Joined: Jan 2005
Posts: 1,239 |
Just to clarify what Eddie stated qoute " You NEVER attach a metal roof through the ridges."
His statements are true, however they do make lap joint screws that are designed to be screwed thru the ridges to connect each sheet to each other. They also make a seal tape that is applied between the sheets under this ridge joint. For steeper roofs like 6-12 pitch the seal is not really necessary but it is recomended for flatter slopes like 2-12.
The road goes on forever and the party nevers end...............................................
|
|
|
|
|
Joined: Nov 2005
Posts: 773 Likes: 1
Lunker
|
|
Lunker
Joined: Nov 2005
Posts: 773 Likes: 1 |
Rockytopper,
Thanks. There are two different types of screws. One that will drill through the metal and fasten to wood and anthere that is for metal to metal.
Eddie
|
|
|
|
|
Joined: Oct 2005
Posts: 6,934 Likes: 2
Ambassador
Field Correspondent Lunker
|
|
OP
Ambassador
Field Correspondent Lunker
Joined: Oct 2005
Posts: 6,934 Likes: 2 |
...Theo means well, but somehow it turns into more work and expense: Are you going to seal off the under side of the trusses with sheeting like the classier dock roofs we've seen pictured here? It'd be nice to have it bird-, bug-, and varmint-proofed. I considered it, but nothing more than a passing thought. Give me some ideas on SOP.
|
|
|
|
|
Joined: Mar 2005
Posts: 21,493 Likes: 266
Moderator Hall of Fame 2014 Lunker
|
Moderator Hall of Fame 2014 Lunker
Joined: Mar 2005
Posts: 21,493 Likes: 266 |
Be sure to look into the quality of the screws and rubber gaskets. One of my partners has a country house about 8 years old with a metal roof (life time guaranty on the roof but not the screws). The roof is in great shape but he found a leak. When he got it checked he found out that the gaskets have all deteriorated and every one must be replaced.
|
|
|
|
|
Joined: May 2004
Posts: 13,971 Likes: 276
Moderator Lunker
|
|
Moderator Lunker
Joined: May 2004
Posts: 13,971 Likes: 276 |
Originally posted by Brettski: ...Theo means well, but somehow it turns into more work and expense:
Are you going to seal off the under side of the trusses with sheeting like the classier dock roofs we've seen pictured here? It'd be nice to have it bird-, bug-, and varmint-proofed. I haven't done it myself, Bski, but I believe there have been 2 or 3 nice docks pictured here with the bottom of the trusses covered. The walkway from the house to the garage/apartment at Lusk Lodge II is done this way - pics in one of the last 2 issues of PB Mag.
"Live like you'll die tomorrow, but manage your grass like you'll live forever." -S. M. Stirling
|
|
|
|
|
Joined: Jan 2005
Posts: 1,239
Lunker
|
|
Lunker
Joined: Jan 2005
Posts: 1,239 |
Brettski it is also a good idea to pre drill the sheets with a hole bigger than the screw dia but still small enough to be sealed by the washer. The reason is to allow the sheets room to expand and contract with temperature changes.
The road goes on forever and the party nevers end...............................................
|
|
|
|
|
Joined: Oct 2005
Posts: 6,934 Likes: 2
Ambassador
Field Correspondent Lunker
|
|
OP
Ambassador
Field Correspondent Lunker
Joined: Oct 2005
Posts: 6,934 Likes: 2 |
So, I�m in the midst of planning completion of the launch dock/deck and the dock at the beach area. The launch dock/deck will require decking, roof trusses with purlins, and the metal roofing. The beach dock is considerably simpler, requiring only decking. The next step for both is obvious; installing the decking. I have installed numerous square feet of decks in my lifetime. All of it has been treated lumber, both the frame and the decking. Whenever I completed a deck, I would always admire its beauty. About 2 or 3 years later, I would swear that next deck would be a composite type decking to eliminate maintenance and prolong aesthetic appeal. I haven�t forgotten this self-imposed promise for these upcoming projects. I still firmly believe in treated lumber for the framing, but I have strongly voiced my belief to spend the money for a better decking product. Well, here I am�.it�s time to pull the trigger. I have been doing my due diligence on decking material and, as usual, now know enough to be dangerous. The way I see it, there are three basic material compositions to consider. A) Treated lumber B) composite decking C) Hi density polyethylene (HDPE). The treated lumber is easy to understand since it is the most commonly used product for these type structures. The composite decking is a bit more complicated because it is a blend of plastics and wood fibre. There are different blends and percentages of content. They do eventually break down, mostly because of the wood fibre content. The warranties vary, mostly from 10 � 25 years. The price corresponds. Then I researched HDPE. I was sure I found my new hero. It is a 100% solid plastic product, UV protected, and the warranties are in the 50-year range. They mold the stuff with the color throughout the plastic, so any scratches or gouges reveal the exact same color. Also, the finish is molded with faux wood grains for �looks� and traction. I will admit that, based on on-line product pics, the close-up aesthetic appeal is, well, plasticky. But this is a boat dock. Sure, I want it to look good, but more importantly I want it to wear and last forever�.zip maintenance. I think this stuff gets me there. No matter what product I select, I definitely plan to use hidden fasteners. I did a very small stair-step project last year and tried the under deck galvanized rails. These are the 4� long continuous strips that you screw to the top edge of the framing joists. They have pre-punched holes every 1� that will accommodate a deck screw that is run upward and into the bottom of the decking board above it, drawing it down to the galvanized strip and (theoretically) snug against the framing joist. It is awkward work and I was not impressed with the results. I am sold (until further notice) on the Eb Ty hidden fastener system. This is the plan for fastening whatever I finally do select. So, I am now searching and hoping to find an HDPE product that I can afford. This is my first forbidding barrier. All the name brands that are true HDPE are mega-expensive. The only one I found locally to inspect was an extruded product that looked really great on a display at one of the local lumberyards. It�s called Eco. A piece that is 5.5� wide x 16� long costs $41. Yikes! Then I found what I hoped to be my answer to the HDPE affordability equation. A factory that actually makes the stuff and will sell retail direct. EPS Plastic Lumber . They have a plant in the Chicago area�perfect! This stuff is absolutely killer. A true 2 x 6 (1.5� x 5.5�) dimensional lumber�err�plastic. They have some closeout product that will work perfectly for my launch dock/deck; the 16� pc is $38 each. And this is a good deal�? Here�s how I calculate this. I am going to focus only on the launch dock/deck for completion (the beach dock is far away from the living zone of the pondsite, so it is not as important for looks�.the launch area is). Anyway, to deck the entire launch dock/deck with this HDPE deal that I found, it will cost $2200 in materials and hidden fasteners. I think Curly Howard said it best: Nyaah, aah, aah! Now, for the flip side, to do the same area in 2 x 6 treated lumber for the decking, including Eb Ty hidden fasteners, the total cost would be $700. Another factor: the plastic lumber will weigh 1100# for just the 14� x 16� deck. That�s a lot of weight, ain�t it? Oh yeah, and get this. Dski is with me and has approved funding of the big bux product if I am 100% sure of the quality and longevity. I really only have one big problem: I can�t do it. I can�t bring myself to spend that kind of dough for this project. So, I analyze it the best I can and this is where I wind up. If I use the Eb Ty hidden fasteners and do a nice job of securing the treated 2 x 6 decking, it will last forever (or at least my lifetime). Accept the fact that it will weather and turn a dull gray and many of the boards with split and crack here and there. At least there won�t be that snappy look of a gazillion screw-head craters. With the money left over (2200 � 700 = $1500), buy the roof materials and finish it off for the same amount of dough as just the plastic magic-deck. Heck, if I do the beach dock with treated, I might be able to use the savings to buy a power washer for lazy cleaning maintenance and a couple gallons of good transparent stain to fake myself out. �.or, do you pull the trigger and buy the killer plastic lumber? - - (a nice product summary by This Old House)
|
|
|
|
|
Joined: Mar 2004
Posts: 229
Lunker
|
|
Lunker
Joined: Mar 2004
Posts: 229 |
Of all your living areas how much time will you spend at the dock/deck?
Where will be the first place you take guests?
We don't live on our pond, the dock is crude, yet it is the center of action in the summer. And after we build a house I would guess the dock will still be the center of a lot of action.
Of course when the treated lumber decking fades, if it doesn't bother you, I would bet it wouldn't bother anyone else.
Faded wood might even be a good look around the pond.
|
|
|
|
|
Joined: Nov 2005
Posts: 773 Likes: 1
Lunker
|
|
Lunker
Joined: Nov 2005
Posts: 773 Likes: 1 |
I've had just a little bit of exposure to the new decking materials and haven't seen one yet that I like over PT Wood. In addition to there upfront price, you really need to have your joists on 12 inch centers. Even then, some will begin to sag over the years.
I screw down the decking on my projects. I like to snap a chalk line to get them all lined up too. Then I screw them down until the heads disapear into the wood. Two screws per joist for the length of the board.
If you do go with PT wood decking, buy it a month or two before you install it. The shrinkage in that first few weeks will be severe. Then it will stabalize and you can get your spacings pretty accurate.
Don't spread them out, just stack them outside so they will keep from warping while drying out. Home Depot and Lowes will take warped ones back, so don't mess around with any of them. No point in it. I ususally buy a dozen extra with the plans to return what's not used.
I like the look of weathered wood, but Thompsons has there water seals in colors now. You just spray it on every year and it looks great.
Eddie
|
|
|
Moderated by Bill Cody, Bruce Condello, catmandoo, Chris Steelman, Dave Davidson1, esshup, ewest, FireIsHot, Omaha, Sunil, teehjaeh57 |
|


.gif)