|
Forums36
Topics40,961
Posts557,949
Members18,499
| |
Most Online3,612
Jan 10th, 2023
|
|
|
8 members (Dave Davidson1, Angler8689, Boondoggle, Sunil, highflyer, Bill Cody, Ervin, Theo Gallus),
1,169
guests, and
166
robots. |
|
Key:
Admin,
Global Mod,
Mod
|
|
|
|
Joined: Oct 2005
Posts: 6,934 Likes: 2
Ambassador
Field Correspondent Lunker
|
OP

Ambassador
Field Correspondent Lunker
Joined: Oct 2005
Posts: 6,934 Likes: 2 |
Windows: Need more light. Try some triangular windows above the sliding glass doors. If they are non-opening they are really not that expensive.
Agreed on the lighting...and ventilation. I mentioned this already in a previous post. I always assumed that those triangular windows were killer in price. What I really need is skylights that open to ventilate. I was concerned for their installation in a standing seam roof, but I googled around and wound up at the Velux website. They sell a flashing kit for my exact application. This might be the ticket.
|
|
|
|
|
Joined: Jul 2006
Posts: 240
Ambassador Lunker
|
|
Ambassador Lunker
Joined: Jul 2006
Posts: 240 |
Woodstoves 101. Not sure I should be the guy to do this, but here goes. Also not sure what you mean by bends, but I have always noted that the more bends there are the more opportunity for creosote build-up and more opportunity for fires. Creosote builds up when unburned or inefficiently burned gases and debris cools in the chimney and resolidifies on the sides. After a while you can get enough of a buildup that ignites via spark or high heat. The resulting fire can be quite intense. If the fire is not contained to the chimney, obviously bad things happen. To reduce the risk of chimney fires, you first burn dried and aged wood. You will also want to clean the chimney. This involves running a brush down the chimney which cleans all of the accumulated debris off of the walls. A stainless steel liner gets a poly brush (shaped just like the flue) which can be run down through the chimney with fiberglass poles that screw together every three or four feet. Masonry liners get a metal brush.
When you clean a chimney, all of that debris will need to go somewhere. With a masonry chimney, you will often find a clean-out at the base of the chimney, usually below the point of where the woodstove's vent pipe enters the flue. This way the debris passes the woodstove and can be easily cleaned out. It is a dirty job. Add that dirt to the dirt that you will drag in with the firewood and you may end up with an unhappy Donna-ski.
Another concern that I have is that with the size of that room, even a very small unit will probably heat up fast and darn near chase you out of the room.
You may want to consider a wood pellet or corn stove or propane gas ventless logs as these units require little if no venting. The pellet stoves have a fire burning inside, you can view it through the glass, and it still looks good. Some vent via a PVC pipe through the wall. Again, not all models are the same and I am no professional.
I am not a heating professional. I have very little experience with pellet stoves. We have ventless propane logs in our second floor family room and appreciate the convenience and the cleanliness as compared to a wood fire up there. When we stoned the chimney from the first floor to the ceiling, we had the stone guys build a faux fireplace on the second floor. It has not vent but you wouldn't know it at a casual glance. There may even be a picture in the habitat threat somewhere.
As for our woodstove, we have 6 plus acres of hardwoods here and I burn a lot of firewood in a year. We only burn dead stuff. I also cut firewood from other people's places when I have an opportunity. We burn about 10 cords a year, which is a lot of wood. We heat our entire house with a wood boiler hooked into a hydronic heating system. It is a good, even heat but it requires a lot of work. Keeps me in the outdoors, anyway. We permanently mounted a ladder on the roof (steep roof) to make it easier to clean. I clean ours about once a month, but we get more buildup because it is a boiler. Long story. Anyway, that is what I know about woodstoves. Please keep asking I am will continue my loquacious ways.
|
|
|
|
|
Joined: May 2004
Posts: 13,972 Likes: 276
Moderator Lunker
|

Moderator Lunker
Joined: May 2004
Posts: 13,972 Likes: 276 |
Did we have a big - discussion - about flues here a couple of months ago?
Bski, I don't think any bends in chimneys are needed to draw properly. As Victor noted, you need to be so far above the roof to draw well, and the straighter the better wrt cleaning.
We have the chimney swept once a year. The main ceramic chimney is brushed from the roof down. The last guys had a large shop vac that was attached to the basement end of the flue which eliminated any mess coming into the basement. The metal flue from the stove to the wall we detach, carry outside, and brush out there before reinstalling.
There can be an incredible amount of creosote residue which has fallen out of the flue in the off season at the top of the stove when we clean it in the Fall.
"Live like you'll die tomorrow, but manage your grass like you'll live forever." -S. M. Stirling ![[Linked Image from i.pinimg.com]](https://i.pinimg.com/736x/ed/b5/e7/edb5e7f935843b996cf52be593c9ebd2--smoothie-smooth-collie.jpg)
|
|
|
|
|
Joined: Jul 2006
Posts: 7,615 Likes: 5
Ambassador
Field Correspondent Lunker
|
|
Ambassador
Field Correspondent Lunker
Joined: Jul 2006
Posts: 7,615 Likes: 5 |
So, let's talk woodstoves... Theo and I touched on this a bit a few posts above. I know a little about them, but enough to say I know exactly what I want. Here is what I do know that I want: - a freestanding woodburner with a door on the front (that closes to seal the firebox) with glass to view the fire
- something that burns fairly efficiently
- reasonable, low cost
I have seen a Vogelzang unit that has the look I seek, but don't know if it's just a piece of consumer junk. Well timing is everything. We (JWHAP AND I) just installed the Vogelzang Defender. WE am very happy with this wood stove. It is no skippy junk model. California has VERY stringent EPA standards when it comes to wood stoves and this stove was one of the few that meets those standards. This stove is a very solidly build cast iron stove with a brick lined fired box. Nice large window. It heats up nicely and burns efficiently. We am very happy with it. A tip, if you have a Harbor Freight near you then you can order it directly through them. They will ship it to your nearest store for nothing and will load it into your truck (4 Runner in my case). Everyone else wanted over $125 to ship the stove to us. The stove is dang heavy (250 pounds) but I lifted it out of my truck by myself, of course, despite my softish appearance I'm a manly man. DIED yelled at me for lifting it myself but I got the job done. - That's a very good point on the chimney regarding location on the structure. I want to keep it very simple, so an insulated metal stainless steel stack might be where I'm going. I don't want another unit downstairs; just the unit upstairs in the main living area.
Doesn't the flue have to have a couple of bends to draft correctly?
If I go thru the roof where it is currently located, the stack is gonna be pretty tall (and spindly) to make it up the same height as the ridge. Maybe I run the flue up from the stove, inside the structure and follow the interior roof line until it is closer to the peak; then exit....?
Tell me about the chimney cleaning thing. What is involved and how bad is it? Chimney parts can be purchased from both Northern Tool and Harts Hearth. The Harts Hearth website (and telephone support) are very helpful in helping you determine what is needed for your chimney, however they are more pricey than Northern Tool. Ultimately we used a combination of Harts Hearth and Northern Tool. Oh and by the way Northern Tool had a lot of chimney parts that were not in their catalogs. Prepare to spend some money on chimney parts. Our chimney cost more than the wood stove (somewhere around a grand, since you are planning a two story structure the cost will be higher). Duraplus is the brand name of chimney parts we used (black stove pipe inside and double walled stainless outside) it is very well rated. Another tip is that the inside "black" pipe should be sealed with high temp sealant, we used 800 plus degrees Direct Vent Sealant, this will prevent any inside chimney pipe leaks. We chose a "through the wall" type of installation, rather than cut a hole in our brand new roof. JWHAP and I did the entire install, including cutting the wall hole and mounting the chimney pipes in one day. Duraplus has an elbow that is designed as a clean out access as well. You can order wall anchoring straps and a roof anchor strap. Once the chimney and all of the anchor straps are installed it is very solid. . Ricki did all of the research and designed our chimney, I did the stove research. All in all we am very happy with the entire installation. The wood stove works great, heats up quickly, and provides great heat. The chimney drafts fantastically and IHMO looks great.
JHAP
~~~~~~~~~~
"My mind is a raging torrent, flooded with rivulets of thought cascading into a waterfall of creative alternatives."
...Hedley Lamarr (that's Hedley not Hedy)
|
|
|
|
|
Joined: Oct 2005
Posts: 6,934 Likes: 2
Ambassador
Field Correspondent Lunker
|
|
OP
Ambassador
Field Correspondent Lunker
Joined: Oct 2005
Posts: 6,934 Likes: 2 |
|
|
|
|
|
Joined: Jul 2006
Posts: 7,615 Likes: 5
Ambassador
Field Correspondent Lunker
|
|
Ambassador
Field Correspondent Lunker
Joined: Jul 2006
Posts: 7,615 Likes: 5 |
Outside Chimney. Note we did not want to have ANY holes in the roof so we anchored the supports to the walls (and used sealant). The chimney is VERY sturdy. At the bottom of the elbow thing is the chimney cleanout. 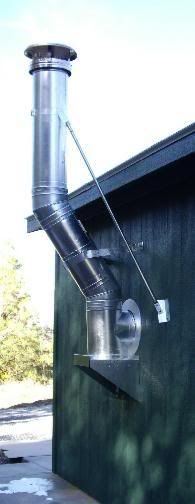 The Defender woodstove installed in our shop. I know, I know, I should do a thread on the shop that we built in 2008. You can see the expoxy floor coating that we put on the concrete floor and the paneling job we are doing (the trim board has not been installed yet, hince the unfinished look). It is a work in process. And you guys thought I was goofing off all year, shame on you. 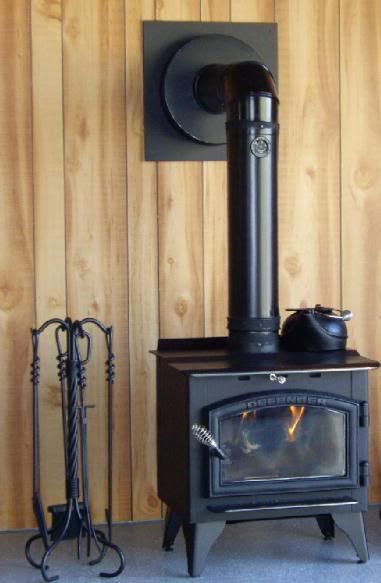
JHAP
~~~~~~~~~~
"My mind is a raging torrent, flooded with rivulets of thought cascading into a waterfall of creative alternatives."
...Hedley Lamarr (that's Hedley not Hedy)
|
|
|
|
|
Joined: Nov 2008
Posts: 70
Lunker
|
|
Lunker
Joined: Nov 2008
Posts: 70 |
Woodstoves: We've heated our cabin with a woodstove for the past 3 years. Couple of points to consider - every bend in the pipe cuts the draft by a percentage. Straight up is best. Also, heat rises. We have 1152 square feet that we heat well with a cheap vogelzang boxwood stove. Its the bigger one, BX42 I believe. I placed it downstairs right next to the door to aide in feeding the thing. The wood stays outside with the bugs where it belongs and I just open the door, haul in a small load and put it right into the stove. The upstairs stays toasty - sometimes too warm because the stove doesn't seal real tight. If the stove was upstairs, the downstairs would be chilly and the upstairs would broil. But I caution you, hauling load after load of wood up the stairs is going to get old fast.
Midwest Dave, 3.5 acre lake, 47 acres timber & CRP.
|
|
|
|
|
Joined: Oct 2005
Posts: 6,934 Likes: 2
Ambassador
Field Correspondent Lunker
|
|
OP
Ambassador
Field Correspondent Lunker
Joined: Oct 2005
Posts: 6,934 Likes: 2 |
BINGO That's the kinda stove I want. Thanks J & JW HAP. - I know, I know, I should do a thread on the shop that we built in 2008. we understand if you don't want to... You can see the expoxy floor coating that we put on the concrete floor and the paneling job we are doing (the trim board has not been installed yet, hince the unfinished look). ...or maybe that tiny voice in your head has registered as a PB forum member and is using your empty shell to send us the details....
|
|
|
|
|
Joined: Feb 2008
Posts: 98
Lunker
|
|
Lunker
Joined: Feb 2008
Posts: 98 |
Brettski, I would be a little cautious wrt a chimney like JHAP's. Albeit a beautiful application for where JHAP lives, where we live, the sheets of ice coming off that pitch might do considerable damage to it?  JHAP, Beautiful stove and chimney (reinforcements look awesome), and floor looks great too!!! That chimneys gotta be a breeze to clean, well thought out, nice clean application!
I have buried the hatchet.
\_~ <*((((((((((((((((<
|
|
|
|
|
Joined: Apr 2004
Posts: 705
Lunker
|
|
Lunker
Joined: Apr 2004
Posts: 705 |
Outside Chimney. Note we did not want to have ANY holes in the roof so we anchored the supports to the walls (and used sealant). The chimney is VERY sturdy. At the bottom of the elbow thing is the chimney cleanout. Nice set up. I have an old small pot belly wood stove that I want put in my barn but, like you, don't want to have the chimney go through the roof or attach the braces to the roof either. Any idea how much the through the wall chimney set up cost or what the rule of thumb is for clearance from the roof?
|
|
|
|
|
Joined: Jul 2006
Posts: 7,615 Likes: 5
Ambassador
Field Correspondent Lunker
|
|
Ambassador
Field Correspondent Lunker
Joined: Jul 2006
Posts: 7,615 Likes: 5 |
Nice set up. I have an old small pot belly wood stove that I want put in my barn but, like you, don't want to have the chimney go through the roof or attach the braces to the roof either. Any idea how much the through the wall chimney set up cost or what the rule of thumb is for clearance from the roof? The set up that you see there was about $1,000 complete. The chimney parts don't come cheap. Well actually you can get cheaper chimney parts but when it comes to a chimney we decided not to go cheap. Fire is a HUGE risk in our area and I wasn't going to take any chances. The outside chimney parts are all double walled and have a "thermal blanket" sandwiched in the middle. With the stove running you can place your hand on the outside pipe and it is warm but not hot - DON'T try this with the single wall black pipe that is inside though.  The Duratech Duravent Class A chimney pipe (used outside) can be placed as close as 2 inches away from combustibles. Ours is about 8 inches away from the wall. The Harts Hearth folks recommend that your chimney extend a minimum of 3 feet over the top of the roof line, we extended ours 4 feet over the edge of the roof line. Please keep in mind that I'm no wood stove/chimney expert. We did a lot of research and called both Harts Hearth and Northern Tools several times when designing our system. The Harts Hearth folks were very helpful, we ordered some parts from them and other parts from Northern Tool (Northern Tool was significantly cheaper on some parts but they didn't have all of the parts). The hardest part of the system was the design. The installation was fairly straight forward. Oh and another tip, we used a "Roto Zip" to cut the circular hole through the wall - if you don't have one of these or something simular then get one. I use my Roto Zip for all kinds of stuff and it works great.
JHAP
~~~~~~~~~~
"My mind is a raging torrent, flooded with rivulets of thought cascading into a waterfall of creative alternatives."
...Hedley Lamarr (that's Hedley not Hedy)
|
|
|
|
|
Joined: Jul 2006
Posts: 7,615 Likes: 5
Ambassador
Field Correspondent Lunker
|
|
Ambassador
Field Correspondent Lunker
Joined: Jul 2006
Posts: 7,615 Likes: 5 |
Brettski,I would be a little cautious wrt a chimney like JHAP's. Albeit a beautiful application for where JHAP lives, where we live, the sheets of ice coming off that pitch might do considerable damage to it? Why do you store sheets of ice on your roof?  Keep in mind I'm no chimney expert and like you said 40 where our place is in Northern California we don't get sustained snow on the roof. It will only snow once or twice a year (usually a inch or so) at our place and even then it doesn't last more than a day or so. JHAP,Beautiful stove and chimney (reinforcements look awesome), and floor looks great too!!! That chimneys gotta be a breeze to clean, well thought out, nice clean application! Thanks 40.
JHAP
~~~~~~~~~~
"My mind is a raging torrent, flooded with rivulets of thought cascading into a waterfall of creative alternatives."
...Hedley Lamarr (that's Hedley not Hedy)
|
|
|
|
|
Joined: Oct 2005
Posts: 1,285 Likes: 1
Lunker
|
|
Lunker
Joined: Oct 2005
Posts: 1,285 Likes: 1 |
I'm a fan of Velux skylights. They have awsome flashing kits and I've never had one leak...going on 14 years already on some that I've installed. They have a handy groove cut into the jamb for easy drywall finishing too.
Consider a stove with an outside air intake. No sense in using heated air from inside to fuel the fire.
 "The greatest enemy of knowledge is not ignorance, it is the illusion of knowledge." Stephen W. Hawking
|
|
|
|
|
Joined: Mar 2006
Posts: 1,319
Lunker
|
|
Lunker
Joined: Mar 2006
Posts: 1,319 |
Bski, I was curious about how much a conventional septic system will cost you up there. I just put one in here at the place. In the county I live in, if you have more than 10 acres and only one house on it you can install it yourself. You must have a site plan prepared by an engineer, which I did. I hired several guys to help dig hole and install septic tank. 1000 gallon baffled tank cost me 640 bucks, plus 115 bucks to deliver and sit in hole. The tank weighs 9000 lbs so it was worth the charge. We installed 30 bio diffusion panels at a cost of 1400 bucks.I would say total cost was around 3500 bucks. 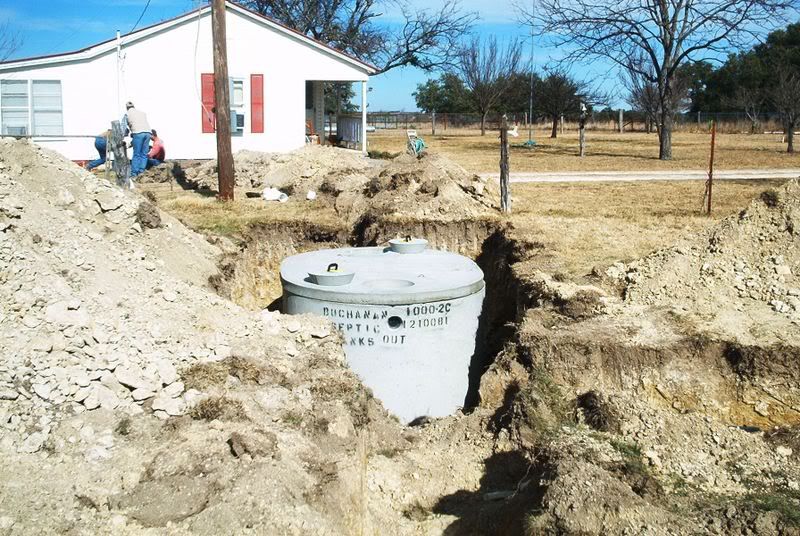 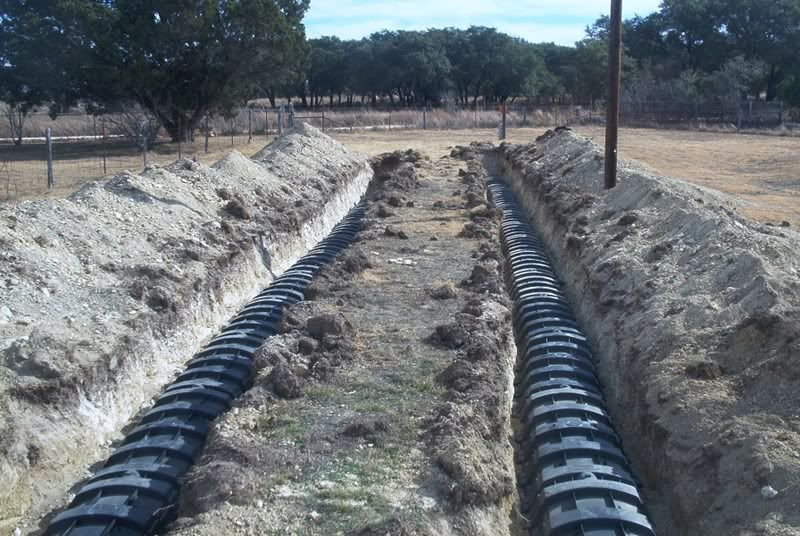
Last edited by heybud; 01/06/09 10:09 AM.
In Dog Beers, I've had one.
|
|
|
|
|
Joined: May 2004
Posts: 13,972 Likes: 276
Moderator Lunker
|
|
Moderator Lunker
Joined: May 2004
Posts: 13,972 Likes: 276 |
Bski, here's our basement woodstove. I would characterize it as a different style than JHAP's, whose stove approaches showroom attractivity. Note the squirrel cage blower on the back forcing air through the heatilator pipes coming out on the front. For the record, it is a Warnock-Hersey Model 24-FC-24-AC. We bought it in 1999, so I suppose it's doubtful that same model is still made. The interior flue is double-walled metal-bestos and, like JHAP's exterior flue, gets warm but not too hot to touch (usually). If you see the little round dial sitting on the lower level top surface, that's a woodstove thermometer. I have found it useful for knowing when the stove temp is not too cold (supposedly this enables creosote production) or too hot (this is when the flue gets too hot too touch). The stove itself requires a 30" clearance from any walls. In accordance with fire/insurance code, the metal flue clears the floor trusses above it by a minimum of 18" (you can see where the idiot that built the house screwed that up and the flue had to be moved down a few inches). 
"Live like you'll die tomorrow, but manage your grass like you'll live forever." -S. M. Stirling
|
|
|
|
|
Joined: Apr 2006
Posts: 3,261
Ambassador Lunker
|
|
Ambassador Lunker
Joined: Apr 2006
Posts: 3,261 |
just for some ideas..... skylights in metal roof w/ velux flashing kits, no leaks in 15 yrs: 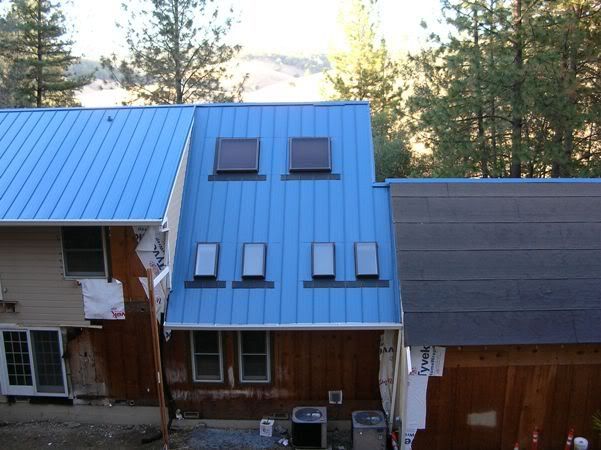 dormers in metal roof: 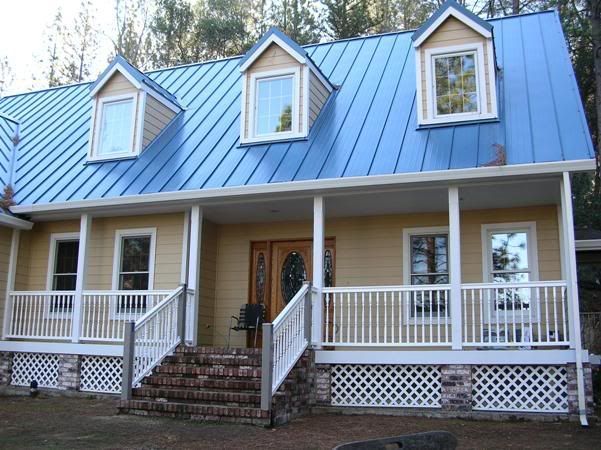 triangular windows: 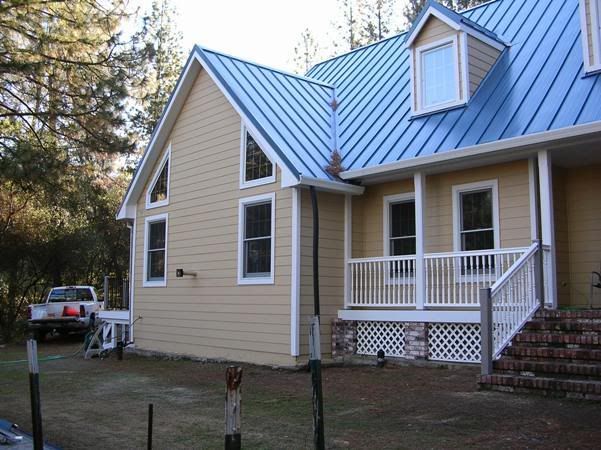
GSF are people too!  
|
|
|
|
|
Joined: Apr 2006
Posts: 3,261
Ambassador Lunker
|
|
Ambassador Lunker
Joined: Apr 2006
Posts: 3,261 |
re: pellet stoves...i begrudingly have one, came w/ house. its a freestanding breckwell. although i wanted a big fireplace in the living room where the stove resides, we never changed it out, and have grown quite fond of it. DWIED really loves it, its neat, easy to use, we burn about a 1 ton of pellets a season.....if using as sole heat for house, double that. you can see the pellet stove "chimney" in the last pic.
i've wanted a wood burning stove for years and will finally be installing a small one in the back covered porch area, i like that defender JHAP installed.
Last edited by dave in el dorado ca; 01/06/09 10:19 AM.
GSF are people too!
|
|
|
|
|
Joined: Mar 2006
Posts: 1,319
Lunker
|
|
Lunker
Joined: Mar 2006
Posts: 1,319 |
Bski, Have you ever looked at metal framing package some companies offer. We looked at one and the walls come already assembled with door and window openings. Then you just screw them together as the plan calls for. Good thing is that the only weight bearing walls are the exterior ones so a ruff truss can be free spanned. The one we looked at was about 1300 sq ft and the cost was around 10 grand, not including floor trusses if you need them.
In Dog Beers, I've had one.
|
|
|
|
|
Joined: Oct 2005
Posts: 6,934 Likes: 2
Ambassador
Field Correspondent Lunker
|
|
OP
Ambassador
Field Correspondent Lunker
Joined: Oct 2005
Posts: 6,934 Likes: 2 |
Thanks Heybud....do ya have a link or something to their (or their competitor's) website?
...interesting
|
|
|
|
|
Joined: Mar 2006
Posts: 1,319
Lunker
|
|
Lunker
Joined: Mar 2006
Posts: 1,319 |
The one we looked at was Rhino Metal Bldg. They have house plans that come with framing packages but probably could work up something for you.
In Dog Beers, I've had one.
|
|
|
|
|
Joined: Oct 2005
Posts: 6,934 Likes: 2
Ambassador
Field Correspondent Lunker
|
|
OP
Ambassador
Field Correspondent Lunker
Joined: Oct 2005
Posts: 6,934 Likes: 2 |
DIED....you nailed the skylight/roof windows. BAM!
Did you do the installations? Degree of difficulty? I was reading the on-line instructions for the Velux flashing kit installation. It didn't look like too big a deal. The only part that seemed cheezy was the bottom flashing that sticks to the roof. It appears that you have a similar installation. Any feedback?
-
I'm confused on your statement of 15 years without an issue. I thought this was a new roof for you? Sunil-sarcasm?
-
(edit)...oh yeah, and btw....the crib looks awesome! Nice job, mahn.
Last edited by Brettski; 01/06/09 08:56 PM.
|
|
|
|
|
Joined: Apr 2006
Posts: 3,261
Ambassador Lunker
|
|
Ambassador Lunker
Joined: Apr 2006
Posts: 3,261 |
no i didnt. a local company out here did the install and they did a great job.. the cheezy lookin bottom is actually pure lead. it has a corrugated look and is hand molded over the ridges on the roof. the roofers mildly complained about the number of cuts in the metal roof panels required to fit around all the skylights (i recall they said they made over 50 cuts on the roof panels).
in other words, the flashing install was simple, the metal roof fit around the skylights was labor intenisve.
the skylights which never leaked were originally installed when the house was built 15 yrs ago and with similar flashing kits. the original flashing kits were damaged too much for re-use during the comp roof demo. so new velux flash kits were installed w/ new roof.....the new kits have gone through several rains w/ no leakage.
thanks for the kudos, i'm ready to be done w/ remodeling.
GSF are people too!
|
|
|
|
|
Joined: Oct 2005
Posts: 6,934 Likes: 2
Ambassador
Field Correspondent Lunker
|
|
OP
Ambassador
Field Correspondent Lunker
Joined: Oct 2005
Posts: 6,934 Likes: 2 |
thanks for the kudos, i'm ready to be done w/ remodeling.
Yeah, Dski laid down the law a couple months ago and told me that the LNP project needs to chill this winter so we can paint the white walls in our principal residence. Heck, 13 years with white....what's the big deal? Oh yeah, and the 13 year old carpeting in the living/dining room and vinyl tile in the kitchen are being evicted to make room for 700 sq ft of Ash flooring from Lumber Liquidators. I'm gonna be busy.
|
|
|
|
|
Joined: Jul 2005
Posts: 202
Lunker
|
|
Lunker
Joined: Jul 2005
Posts: 202 |
Brettski,
I am sure you have thought of it, but food for thought: When you turn the upstairs into a workshop, remember you might be building some rather large projects at some point and need to find a way to safely and as easily as can be, transport the materials and finished project up and down those stairs so make sure they are wide and your front door as well. You might want to move the stairs/front door over so they are inline with each other because bending lumber around that corner is going to be a big can't do unless I am missing something.
|
|
|
|
|
Joined: Jan 2005
Posts: 1,239
Lunker
|
|
Lunker
Joined: Jan 2005
Posts: 1,239 |
The main comment I have ( and it's not a kook one)is you got to many hall ways. GET RID OF THEM! Your goal is to make use of every inch of space in the box. Hallways are a major waist of space. I always always avoid them. I am a true believer in the "OPEN CONCEPT" design approach and combined use of space. Get more from less. Look & feel Bigger. Below is another take on the pond cabin/shop. From what you're saying you are on a tight budget. The plan below is based on a 24 x 36 foot print and yields you more shop and living space by combing them together. Once abandoned the kitchen could become the work bench area of the shop. 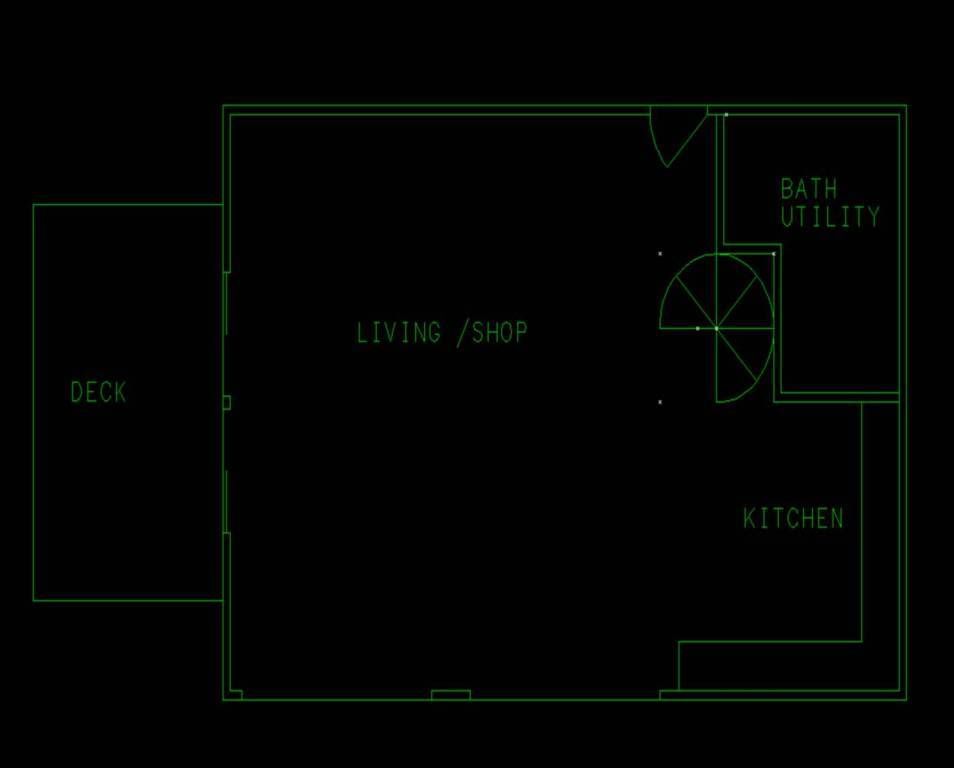 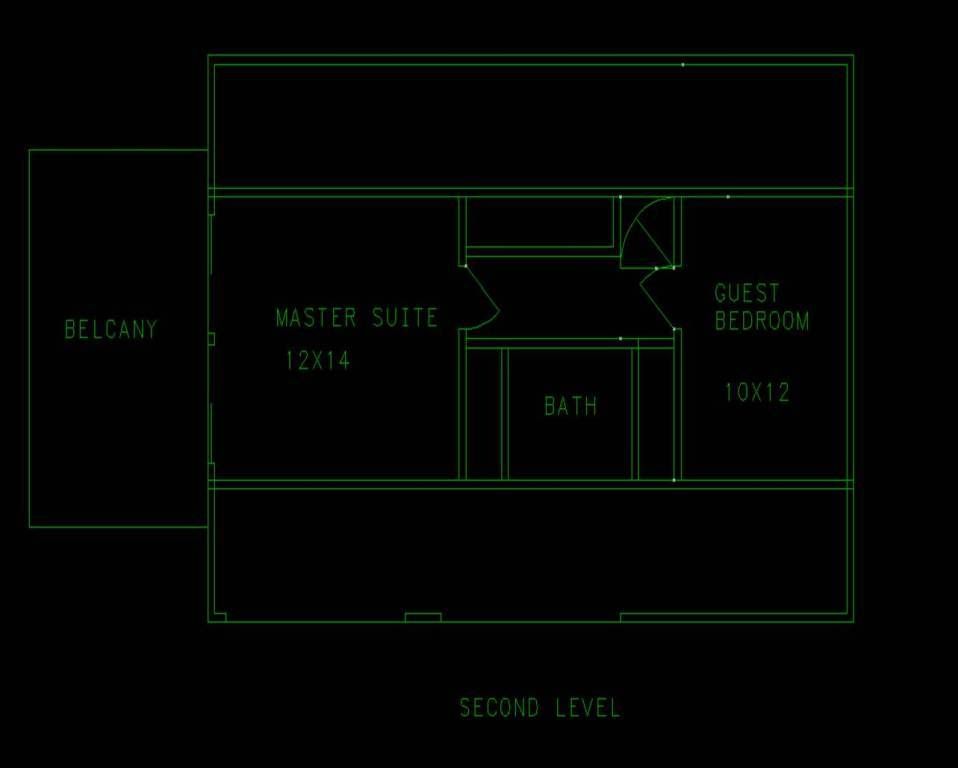 I have to agree with Eddie. A single story is much more economical than multi story. Have you considered a metal building structure? The cost of the unfinished shell is far less than a stick built home or shop. THey can be finished out to look like a stick structure if desired. The cost of the foundation alone would be far less. The foundation you have planned would cost a fortune in my neck of the woods. Perhaps due to the soils or frost in your area the large footings and grade beam are required. Good luck my friend. One last comment "DO NOT USE OSB under the metal roof" period. OSB will not hold wood screws near as well as good old fashion plywood. 5/8 thick min. If you don't believe me just ask my neighbor. His entire metal roof has peeled back over the ridge twice in 10 years. Mine has never even rippled. It cost me 2500$ more than OSB but money well spent. OSB is fine for the side walls. Although I usally put good ole ply wood on the four corners for shear loads.
Last edited by rockytopper; 01/07/09 11:44 AM.
 The road goes on forever and the party nevers end...............................................
|
|
|
Moderated by Bill Cody, Bruce Condello, catmandoo, Chris Steelman, Dave Davidson1, esshup, ewest, FireIsHot, Omaha, Sunil, teehjaeh57 |
|


