|
Forums36
Topics40,976
Posts558,122
Members18,509
| |
Most Online3,612
Jan 10th, 2023
|
|
|
12 members (Boondoggle, FishinRod, anthropic, TEC, catscratch, Treebanger, Bill Cody, Pat Williamson, SetterGuy, bmo, JoshMI, Sunil),
1,115
guests, and
229
robots. |
|
Key:
Admin,
Global Mod,
Mod
|
|
|
|
Joined: Feb 2009
Posts: 31
Lunker
|

Lunker
Joined: Feb 2009
Posts: 31 |
no way! I might have to have one of these. You going to build one? Might be fun to build a one room guest cabin like this. Just a bedroom and bathroom, maybe little frig. Guest would be talking about that for years!
|
|
|
|
|
Joined: Oct 2005
Posts: 6,934 Likes: 2
Ambassador
Field Correspondent Lunker
|
|
Ambassador
Field Correspondent Lunker
Joined: Oct 2005
Posts: 6,934 Likes: 2 |
If you just make sure that your subgrade (stone, sand, whatever) is properly compacted and level, it has no problem supporting anything. My concrete guy suggested I add a couple inches to the floor in case I wanna pull the tractor in the shop. 7000 lb Farmall 560...
Type V XPS has a compressive strength of 100 psi. I'll probably go with Type VII, at 60 psi which is plenty strong. Tractor with concrete would only be about 30 psi or less... If we took your 7000# tractor and divided the weight into the 4 point loads (bearing points at the tire contact patch) we would get 1750# per tire (this is not an accurate distribution of the weight, but good enough for discussion). OK, a 1750# load onto a 100 psi max support would require a minimun of 17.5 sq inches of even distribution...or...a contact patch of 3.5" x 5" minimum. This all assumes that you are pulling the tractor right on top of the insulation and the point load is evenly distributed across the contact patch. I don't know what the contact patch size is for your tires, but I bet it exceeds the 17.5" min at all 4 corners. This is good, but it illustrates just how close you are to exceeding the support capacity. Now...let's add the concrete and reinforcing. Yes, it adds some weight to the foam support, but it is relatively negligible. It all comes back to the lateral distribution of the point load by the reinforced concrete; just how far it pushes the load out radially. I don't know what that calc is, but it illustrates how vital it is in the big picture of load support for this application. - ...did I get that right?
|
|
|
|
|
Joined: May 2004
Posts: 13,977 Likes: 277
Moderator Lunker
|
|
Moderator Lunker
Joined: May 2004
Posts: 13,977 Likes: 277 |
Thanks Matt,
Yeah, I did pick up on insulating the edge. I have a good link to a site that describes most everything you guys have pointed out, right down to the plastic clips that stick into the insulation.
I'm having a hard time believing that the slab (with the 2" hi density insul supporting it) would have the nuts to adequately support the weight of vehicles, trucks, and implements. It just don't seem right. I'm sure that upgrading to rebar would provide improved lateral distribution of the point loads, but is that the reason...or...is the foam really strong enough. Sorry, but I just can't buy it. Bski, buy a sheet of the foam and drive the truck onto it. See what happens with a (near) point load. Then distribute with a sheet of 3/4" plywood or a large board. Extrapolate.
"Live like you'll die tomorrow, but manage your grass like you'll live forever." -S. M. Stirling ![[Linked Image from i.pinimg.com]](https://i.pinimg.com/736x/ed/b5/e7/edb5e7f935843b996cf52be593c9ebd2--smoothie-smooth-collie.jpg)
|
|
|
|
|
Joined: Jan 2009
Posts: 77
Lunker
|
|
Lunker
Joined: Jan 2009
Posts: 77 |
Hey you guys....
Thoughts? Tips? Brettski: Did exactly this for a 30x40 pole shed workshop for my best buddies ol' man. WORKS GREAT! Used 4 runs of about 300' each, 1/2" ID Pex, spaced at 12" OC...about 1 foot of tube per square foot. 300' per run is about max, otherwise you can't use the cheap (readily available) TACO brand, $100 pumps...not enough head to overcome flow resistance. Much longer and you have to step up to 3/4" tube and "High Flow" pumps. We started 6" from ext. walls, and alternated flow (first run CW, second CCW, etc.) but you can do that with how you hook up PEX to manifolds. Just start wherever and make loops leaving enough tube to reach back to the start point. For us, it's all one "zone". Not sure why folks want the manifold in a box on the floor...I mounted manifolds on the wall and ran tubing up to it, but it's a shop so we didn't care about "hiding" all that stuff. Make sure your insulation is rated for below grade work, and High Density...AND make sure you insulate the heck out of the edge of the slab. We messed up a bit...snow melts away from the slab outside, so we know we're losing heat, but it still only takes $50-75/month to keep the place at 70F+. We also used these plastic clips (google PEX screw clips) that twist into the insulation to attach the tubing. Laid out rebar on top of that...never have to worry about puncturing that tubing later as it's in the bottom inch or so of 5" of concrete. All was bought locally at Menards...maybe a grand for everything, including the 50 gal gas HWH. I'm doing this in my shop this summer, too. I would also recommend putting manifolds on the wall. My manifolds are in the utility room and one in the closet. I would also suggest usage of manifolds with flow meters built in. They are very nice for setting up and especially for troubleshooting. I have three zones (on the far end of the house) controlled by servo-valves. One of the valves developed a short in the limit switch while ago and overheated one zone. Checking the flow meters revealed the bad one just by looking at the manifold. http://na.rehau.com/files/Brochure_about_manifold_components.pdf
Last edited by Ladia; 03/14/09 07:16 AM.
We live in a barn (aircraft hanger) converted to a house.
0.7 ac leaky pond.
|
|
|
|
|
Joined: Jan 2009
Posts: 28,562 Likes: 849
Moderator Ambassador Field Correspondent  Lunker
|
Moderator Ambassador Field Correspondent Lunker
Joined: Jan 2009
Posts: 28,562 Likes: 849 |
Brettski:
I am planning on doing the same thing (radiant heat in a shop floor) but I'm going about it a bit differently. Here's my plan and why I'm doing it this way.
My radiant heat company suggested 5/8" tube. They also suggested that because it'll be in a shop, that it should be installed directly on the foam. There is a gun that staples the tubing directly to the foam, and that is what they recommended. On advice of my concrete guy, he recommended a 5" thick slab. From what I've read, and what the radiant people preferr, is NOT to use wire mesh, use rebar instead and put it on chairs to get it in the middle of the slab and up off the tubing. My concrete guy agrees. He said #4 rebar on 2' centers, if I want to make it stronger, put them on 1' centers. They (radiant people) prefer rebar because 1)it won't be smashed into the tubing by the workers walking on it when the concrete is poured and leveled, therefore minimizing any potential punctures, 2) the tubes will stay on the bottom of the slab where they belong.
The concrete guy liked the idea because his guys wouldn't have to pull up the mesh to try and get it centered in the slab like it's supposed to, and he said that the rebar spaced that far apart would let his guys step between the bars. The radient people said that stepping on the tubes wouldn't damage them providing the workers didn't "jump up and down on them". From working with concrete out in california, in addition to the rebar or mesh, we had the fiberglass "hairs" mixed in the concrete as well. My boss said "the fibers will stop any surface cracks, but it's the steel that gives the concrete it's structural strength." I know of 2 different buildings here in Indiana that were poured that way, one with radiant heat in the floor and one without and neither of them show any signs of cracking where it wasn't supposed to crack.
So, I'm going with 5/8" O2 barrier Pex attached to the foam, #4 rebar on 2" tall chairs, 5" slab with fiber reinforced concrete.
Manifolds on the wall too. BUT, from what I've read, there aren't any UV sabilizers in the PEX tubing, so any that would be exposed to sunlight need some sort of UV protection, whether paint, inside a closet or some sort of sleeve. You know that the PEX should be in a plastic sleeve when it transitions from horizontal to vertical, right?
Last edited by esshup; 03/13/09 07:55 PM. Reason: PEX info.
|
|
|
|
|
Joined: Oct 2005
Posts: 6,934 Likes: 2
Ambassador
Field Correspondent Lunker
|
|
Ambassador
Field Correspondent Lunker
Joined: Oct 2005
Posts: 6,934 Likes: 2 |
Thanks esshup; good input. The issues with mesh being "pulled up" in a slab is one of the oldest in the book. The only time you can feel somewhat assured that it was done correctly is when you pour the slab yourself. Even then, it's not as accurate as rebar on chairs. If you saw my threads on the boat launch and our shed, you'd know that I'm a rebar guy. I oughta be; my first job out of high school was making shop drawings for placing and sizing rebar for architectural drawings. Working in a steel warehouse that fabricates rebar helps, too.  OK, so it's rebar in the slab. Believe me, 2' o.c. is unheard of. It's 12" O.C E/W. I agree about the 12" o.c to aid in navigating the pour zone; been there, dun that. 5" slab; no biggie. Fibreglas additive; jury's still out, but I'm not opposed to it. Yeah, familiar with the staples. I know squat about the thermodynamics, but assumed having the tubing centered in the slab would make more sense. I can see the "radiant" wisdom in sandwiching it between the slab and the foam insulator layer. 5/8" ID, eh?...
|
|
|
|
|
Joined: Jan 2009
Posts: 77
Lunker
|
|
Lunker
Joined: Jan 2009
Posts: 77 |
Thanks esshup; good input. The issues with mesh being "pulled up" in a slab is one of the oldest in the book. The only time you can feel somewhat assured that it was done correctly is when you pour the slab yourself. Even then, it's not as accurate as rebar on chairs. If you saw my threads on the boat launch and our shed, you'd know that I'm a rebar guy. I oughta be; my first job out of high school was making shop drawings for placing and sizing rebar for architectural drawings. Working in a steel warehouse that fabricates rebar helps, too. OK, so it's rebar in the slab. Believe me, 2' o.c. is unheard of. It's 12" O.C E/W. I agree about the 12" o.c to aid in navigating the pour zone; been there, dun that. 5" slab; no biggie. Fibreglas additive; jury's still out, but I'm not opposed to it. Yeah, familiar with the staples. I know squat about the thermodynamics, but assumed having the tubing centered in the slab would make more sense. I can see the "radiant" wisdom in sandwiching it between the slab and the foam insulator layer. 5/8" ID, eh?... Tubes located deeper in the concrete will result in more even surface temperature and are less vulnerable to screws drilled to the floor. To locate the tubes in the concrete you need a friend in the fire department. They have infrared imaging camera. It works very well. You can also use infrared thermometer, push the trigger and pass it over the floor and watch the display. The tube is just below the maximum temp measured. This works best when the floor is turned on after few days of being off.
We live in a barn (aircraft hanger) converted to a house.
0.7 ac leaky pond.
|
|
|
|
|
Joined: May 2006
Posts: 30
Lunker
|
|
Lunker
Joined: May 2006
Posts: 30 |
Here are some pics of my radiant install in 2000 sq foot walk out basement in house I am building. Keys points for me when installing radiant: - try to insulate the slab (bottom and edges) and install tubing closer together on perimter edges. - worry less about about tube spacing but DO get all the tubing in the slab that the specs call for. - pressurize the tubing with air before concrete pour. If you see bubbles, scoup out the concrete from around the damaged area ... you can do the tubing repair and patch the concrete spot after the rest of the pour. 1st picture shows tubing stapled to foam and rebar on chairs ready for pour: 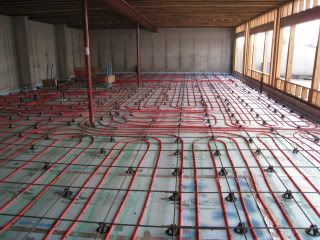 Remember to steer clear of toilet wax rings or you might melt them! 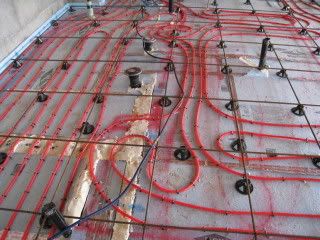 Manifold Picture: 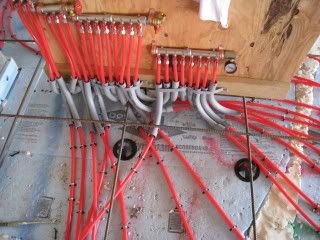 I hope this helps. I am setting up a driveway snow melt next week and will try to post some pics of that set up as well.
30 acre paradise
|
|
|
|
|
Joined: Oct 2005
Posts: 6,934 Likes: 2
Ambassador
Field Correspondent Lunker
|
|
Ambassador
Field Correspondent Lunker
Joined: Oct 2005
Posts: 6,934 Likes: 2 |
Thanks Nick; well done, sir. Those pics really tell a story. I assume the areas with the spray foam insulation are the rough plumbing where the top/pipe is slightly higher than the sheets of foam. ???
-
(edit) What ID of pex did you install?
Last edited by Brettski; 03/14/09 06:18 AM. Reason: ID ?
|
|
|
|
|
Joined: May 2006
Posts: 30
Lunker
|
|
Lunker
Joined: May 2006
Posts: 30 |
Brettski, You are correct on the spray foam. We use a seperate 6 mil vapor barrier so we spray foam any irregularities caused by plumbing rough in or structural components. The tubing is 1/2". While I do not discourage folks from have tubing projects engineered, we have found that 99.5% of the time 1/2" pex on 12" o.c. and 6" o.c. on exterior perimeter walls in a properly insulated slab will meet normal heat load requirements in west central MO. When we do exterior snow melt, we use the same above rules and step up to 5/8" pex (3/4" works better but is hard to justify the expense). I found a couple more pics: Vapor barrier install before foam (blue pipes are geothermal header pipes stubbed up at future mechanical room): 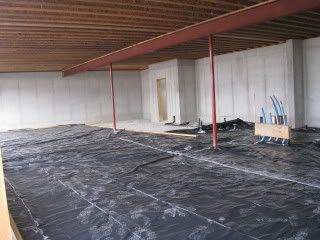 2" foam insulation install on floor (1" @ perimeter where floor slab meets foundation wall): 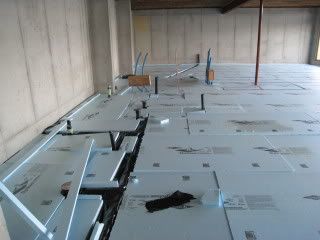 Hope this helps. Nick
Last edited by Nick; 03/14/09 12:39 PM.
30 acre paradise
|
|
|
|
|
Joined: Jan 2005
Posts: 469
Lunker
|
|
OP
Lunker
Joined: Jan 2005
Posts: 469 |
Brettski,
Sorry for the delayed reply...
It is 1/2" PEX. I used ty-wraps to secure it to the wire mesh. I think everything else has been covered. Try to plan ahead on whether you might want to zone off any areas, and run one of your loops into that area. Say for instance, an office area in your workshop. You may never zone it off, but the option will be there. I wouldn't worry too much about damage to one of the loops. That PEX is really tough.
Also, Google "Grundfos UPS15-58". This is a 3 speed circulator pump that is perfect for this kind of application. I got one for $35 + shipping.
Nick added a very important point. Pressurize the PEX before the pour. I put 40PSI in and watched it hold for 2 weeks before the pour.
Last edited by Jersey; 03/17/09 12:50 PM.
Hey Moe, I'm trying to think but nuthin's happening!
|
|
|
|
|
Joined: Mar 2006
Posts: 388
Lunker
|
|
Lunker
Joined: Mar 2006
Posts: 388 |
We know the solution coming in from the pond (temperature-wise was too cold) caused the geo to not geo. Hope to get a fix on that. Should have that thermostat in in a week or so and be able to visualize changes. Next week the loops in the pond will be floated up and more 'fluff' as Ladia called it--added. They will also for sureness as they have to float it up anyway to the surface--they will add another loop. My techs will come out again when the loop installer is here and make sure everything is in sync again (and of course, add my new thermostat that will enable me to know when heat strips kick on  ). Thru the trials and tribulations, I still would highly recommend my geo installer. I'm learned so much since installing geo. The tax savings for the geo we installed last year is an added bonus. 
|
|
|
|
|
Joined: Jan 2005
Posts: 469
Lunker
|
|
OP
Lunker
Joined: Jan 2005
Posts: 469 |
Pictures, pictures, pictures!!!
Hey Moe, I'm trying to think but nuthin's happening!
|
|
|
|
|
Joined: Mar 2006
Posts: 388
Lunker
|
|
Lunker
Joined: Mar 2006
Posts: 388 |
Sure will. I plan to leave work to watch it myself as I missed it all when initially done.
|
|
|
|
|
Joined: Jan 2009
Posts: 77
Lunker
|
|
Lunker
Joined: Jan 2009
Posts: 77 |
We know the solution coming in from the pond (temperature-wise was too cold) caused the geo to not geo. Hope to get a fix on that. Should have that thermostat in in a week or so and be able to visualize changes. Next week the loops in the pond will be floated up and more 'fluff' as Ladia called it--added. They will also for sureness as they have to float it up anyway to the surface--they will add another loop. My techs will come out again when the loop installer is here and make sure everything is in sync again (and of course, add my new thermostat that will enable me to know when heat strips kick on ). Thru the trials and tribulations, I still would highly recommend my geo installer. I'm learned so much since installing geo. The tax savings for the geo we installed last year is an added bonus. Unfortunately I am out of home and don't have pictures of properly "fluffed" coils on my puter. They should put several spacers (About three pieces of 1" plastic pipe somewhat longer than diameter of the coil laid across the diameter of the coil. Like spokes fashion.) between every layer. In other words each layer has to be separated by spacers at least on six points. Turns of each layer should be also separated so the water could flow freely through them. It is a lot of work and might require cutting off one end of the coils from the main pipe to allow for unwinding of the turns. They should place the coils somewhat higher than the deepest point of the pond. Every pond gets silted and you don't want the silt restricting flow through the coils. If your pond is deep enough the coils could be placed few feet above the deepest point. The water is also somewhat warmer at that location.
Last edited by Ladia; 03/20/09 09:41 PM.
We live in a barn (aircraft hanger) converted to a house.
0.7 ac leaky pond.
|
|
|
|
|
Joined: Feb 2009
Posts: 31
Lunker
|
|
Lunker
Joined: Feb 2009
Posts: 31 |
why are they having to do all this? Was it not installed right the first time? How long have you had the geo system? Glad you are finally getting it fixed! maybe next winter will show a big difference in power bills. We still plan to do this....IF we ever get this pond built!!
|
|
|
|
|
Joined: Jan 2009
Posts: 77
Lunker
|
|
Lunker
Joined: Jan 2009
Posts: 77 |
why are they having to do all this? Was it not installed right the first time? How long have you had the geo system? Glad you are finally getting it fixed! maybe next winter will show a big difference in power bills. We still plan to do this....IF we ever get this pond built!! I am just guessing that it is "the lowest bidder syndrom". The geo installer subcontacts the loops to the lowest bidder and they, in order to make money, hire inexperinced people and cut corners. But at the end it is a responsibility of the geo installer to make it right. The moral of the story is that the lowest bidder isn't always the cheapest one. In the better case they are just new in the bussines and hopefully learn from the experience. There is more to it than throw five coiled bunches in the the pond.
Last edited by Ladia; 03/23/09 05:12 PM.
We live in a barn (aircraft hanger) converted to a house.
0.7 ac leaky pond.
|
|
|
|
|
Joined: Jan 2009
Posts: 77
Lunker
|
|
Lunker
Joined: Jan 2009
Posts: 77 |
why are they having to do all this? Was it not installed right the first time? How long have you had the geo system? Glad you are finally getting it fixed! maybe next winter will show a big difference in power bills. We still plan to do this....IF we ever get this pond built!! Make sure the pond holds water before you put the coils in. In opposite case you might be better off installing ground loops. To limit digging find a contractor that does horizontal drilling. http://a-onegeothermal.com/horizontal.htmlI think it is also cheaper than digging
Last edited by Ladia; 03/23/09 03:33 PM.
We live in a barn (aircraft hanger) converted to a house.
0.7 ac leaky pond.
|
|
|
|
|
Joined: Mar 2006
Posts: 388
Lunker
|
|
Lunker
Joined: Mar 2006
Posts: 388 |
The coils were similiar to those we'd seen pictures of(I have a feeling I'm far from the only one whose loops could use more 'fluff'). Actually, two bidders were the same and it came down to the one we chose; pretty much all geo pond loop work itself goes to a couple of installers out of Indy (maybe he wasn't watching them close enough and maybe we weren't smart enough). Our geo techs use the same loop persons and has a good work relationship with them. You know how that goes--live and learn. In the end, it will be fine.
|
|
|
|
|
Joined: Jan 2009
Posts: 77
Lunker
|
|
Lunker
Joined: Jan 2009
Posts: 77 |
The coils were similiar to those we'd seen pictures of(I have a feeling I'm far from the only one whose loops could use more 'fluff'). Actually, two bidders were the same and it came down to the one we chose; pretty much all geo pond loop work itself goes to a couple of installers out of Indy (maybe he wasn't watching them close enough and maybe we weren't smart enough). Our geo techs use the same loop persons and has a good work relationship with them. You know how that goes--live and learn. In the end, it will be fine. The correctly "fluffed" coil should allow for free flow of water between the turns of the coil. The flow is generated by thermosyphoning. Since the temperature differential is just few degrees the flow is quite slow. Because of slow velocity of the water effective heat exchange requires large contact surface. Therefore the correct fluff affects overall efficiency of the geo system especially during high load operation. I understood that you are going to use aerator(s). Placing them under the coils should definitely improve the velocity of water in the coils. As I said before fluffing coils correctly takes quite an effort and time (lot of cable ties and spacers). In general the individual turns shouldn't touch each other and be at least 1/2" apart. You should be able to see trough the coil looking down as well as horizontally. Later on the coils gets "polluted" by algae and other stuff living in the water. If the turns touch or are too close the stuff will plug the passages and the efficiency of the coil will decrease. It always happens few years after warranty expires. Do not take "This is how we always do it for an answer." They might be doing it all wrong all the time. By the way the more I think about that I should refluff my coils too. Warranty is expired so I am on my own.
Last edited by Ladia; 03/24/09 06:02 PM.
We live in a barn (aircraft hanger) converted to a house.
0.7 ac leaky pond.
|
|
|
|
|
Joined: May 2006
Posts: 274
Lunker
|
|
Lunker
Joined: May 2006
Posts: 274 |
i would like to refluff my coils too 
|
|
|
|
|
Joined: Mar 2006
Posts: 388
Lunker
|
|
Lunker
Joined: Mar 2006
Posts: 388 |
Interesting, Ladia. So how often you think a 're-fluff' should occur? We did have our aerator in the vicinity but it has since moved so we will be putting two aerators out this summer. The initial one we had in a bucket of rocks but it probably tipped over or the current moved it as the bouy is close to the bank now. This winter was extremely harsh with winds and we've had some erosion along the edges of the pond and dock that I need to take care of this summer. I didn't want to put rip-rap (cosmetic) but I think I best do so.
|
|
|
|
|
Joined: Jan 2009
Posts: 77
Lunker
|
|
Lunker
Joined: Jan 2009
Posts: 77 |
Interesting, Ladia. So how often you think a 're-fluff' should occur? We did have our aerator in the vicinity but it has since moved so we will be putting two aerators out this summer. The initial one we had in a bucket of rocks but it probably tipped over or the current moved it as the bouy is close to the bank now. This winter was extremely harsh with winds and we've had some erosion along the edges of the pond and dock that I need to take care of this summer. I didn't want to put rip-rap (cosmetic) but I think I best do so. It is important to fluff the coils properly first time and they will perform for many years very likely for life of the system. My coils are fluffed but not perfect. I think they might possibly plug. I need to drain my pond for leakage repair so I will get a chance to see how they look after about four years of operation and fix them if necessary.
We live in a barn (aircraft hanger) converted to a house.
0.7 ac leaky pond.
|
|
|
|
|
Joined: Feb 2009
Posts: 31
Lunker
|
|
Lunker
Joined: Feb 2009
Posts: 31 |
will be interesting to see how they look once you drain the pond. Take pictures!
|
|
|
|
|
Joined: Mar 2006
Posts: 388
Lunker
|
|
Lunker
Joined: Mar 2006
Posts: 388 |
For ours, when they drain some of the solution out of the loops, the loops will actually float to the surface and they will pull them to shore. It was pretty interesting to see it sink (says my hubby). He will be watching tomorrow again and taking lots of pics.
|
|
|
Moderated by Bill Cody, Bruce Condello, catmandoo, Chris Steelman, Dave Davidson1, esshup, ewest, FireIsHot, Omaha, Sunil, teehjaeh57 |
|