|
Forums36
Topics41,068
Posts559,162
Members18,570
| |
Most Online3,612
Jan 10th, 2023
|
|
|
12 members (Justin W, wps456, Boondoggle, catscratch, Theo Gallus, Sunil, JoeDK, azteca, Dave Davidson1, Knobber, anthropic, Black Creek WW),
525
guests, and
543
robots. |
|
Key:
Admin,
Global Mod,
Mod
|
|
|
|
Joined: Jun 2005
Posts: 14
Lunker
|
OP

Lunker
Joined: Jun 2005
Posts: 14 |
Ryan: I had considered the freezing issue and decided to wait and see exactly what water remains in the pipe with the 45 degree elbow. If I think it will have the potential to crack the elbow I will probably drill a small drip hole in the elbow to allow most of the water to drain slowly out of the elbow. In theory that should take care of the possibility of freezing water damaging the elbow.
Rock Creek
|
|
|
|
|
Joined: Oct 2005
Posts: 1,285 Likes: 1
Lunker
|
|
Lunker
Joined: Oct 2005
Posts: 1,285 Likes: 1 |
Then why is it called a trap? "Outlet elbow The elbow on the outlet end of the pipe serves three purposes. It acts as an aerator so the anoxic bottom water is aerated before it enters the stream, as an energy dissipator so a deep plunge pool doesn't develop and as an air lock so siphoning will begin at lower water levels (low flows) and will continue until air enters the upstream air vent." See http://extension.missouri.edu/explore/agguides/agengin/g01530.htm for reference I think their adjustable intake vent is pretty neat too. The article also brings up a good point about the intake freezing. What if just water in the air vent freezes, forming a plug? Couldn't that potentially drain the pond if a siphon started?. It seems as though it would be better that the vent was above the bottom of the high point in the overflow pipe.
Last edited by Ryan Freeze; 10/17/07 02:53 PM.
 "The greatest enemy of knowledge is not ignorance, it is the illusion of knowledge." Stephen W. Hawking
|
|
|
|
|
Joined: Apr 2007
Posts: 2,287
Lunker
|
|
Lunker
Joined: Apr 2007
Posts: 2,287 |
All this siphon theory has helped me understand something. I'm not bright, at least about this stuff anyways.
I want to ask you siphon brained folks for help. Construction will start soon on Cindy's pond. The contractor has bid on a dual level pond with about a 3 foot difference in the levels. When I first talked to the contractor about two levels I said I was thinking in terms of having two siphons, on at each elevation. What I just realized is that I'm not certain that both siphons can function at different elevations. To maintain the pond at the higher level would require closing off the lower siphon. In that case we lose that volume of drainage. Right? IIRC the contractor included two different sized pipes, perhaps with the smaller one at the lower level with the higher siphon being adequate for the entire pond.
Without rambling on more here's my basic question; how best can we design drainage for a dual level pond?
I really like the idea of a siphon system if feasible.
|
|
|
|
|
Joined: Mar 2005
Posts: 21,537 Likes: 279
Moderator Hall of Fame 2014  Lunker
|
Moderator Hall of Fame 2014 Lunker
Joined: Mar 2005
Posts: 21,537 Likes: 279 |
Determine what size pipe you need along with your emergency spillway. Use 2 pipes that size one at each level with the ability to close off the lower one with a valve and cap on the pipe.
|
|
|
|
|
Joined: Jan 2005
Posts: 469
Lunker
|
|
Lunker
Joined: Jan 2005
Posts: 469 |
I have a 22 1/2 degree trap at the bottom of both siphons.
Hey Moe, I'm trying to think but nuthin's happening!
|
|
|
|
|
Joined: Jun 2007
Posts: 7,099 Likes: 23
Ambassador Field Correspondent Hall of Fame Lunker
|
Ambassador Field Correspondent Hall of Fame Lunker
Joined: Jun 2007
Posts: 7,099 Likes: 23 |
Chris brings up a good point about the vent tube. The piping system that is being referred to is not actually a syphon, but is a bottom water drain system, UNLESS the vent tube gets blocked. The pupose of the vent is to prevent a syphon from beggining. Ryans drawing is great and is a true syphon. If you use the Pond Dam System, make sureyou use a trash guard on the vent tube so you DON'T ever create a syphon. You can always create a syphon system by blocking off the vent and then opening it when you get to the point were you want to draw the water down to. BTW, this is the easiest and least expensive way to retrofit a drain into a pond 20' deep or less and if 100% sealed there is no chance of leakage causing a dam failure, like a conventional "through the dam" drain.
For GW. If you want a dual level pond, setup your syphon for the highest pool level, you can add an extension to the vent tube to lower it to your desired "low" level by creating the syphon action at any time. There would be no need for two seperate systems. To maintain the "low" pool level, you would need to restart the syphon each time the pool level raised, because the syphon will not self-start until the "high" level is reached.
|
|
|
|
|
Joined: Jun 2005
Posts: 14
Lunker
|
|
OP
Lunker
Joined: Jun 2005
Posts: 14 |
I started this thread a few months ago and yesterday the water in my pond got high enough to start the syphon. In previous times this much rain would have gone over the emergency spillway and would have damaged it as originally constructed (since the original construction I have had the spillway reworked at a cost of several thousand dollars). This time, the 10 inch sypon started as the vent pipe went under water and when the pond level reached the top of the sypon pipe at the level where the syphon pipe went through the top of the dam. I have a 45 degree elbow at the bottom of the syphon and when I first viewed the sypon flow it was a full pipe and was ejecting water 4 to 5 feet in the air and throwing it 8 to 10 feet away from the syphon outlet. I went to the vent pipe and it was clear from the sound that the water was passing through the sypon pipe under pressure. There was no whirlpool around the vent pipe but I assume it was full of water. Likewise, there was no whirlpool over the intake which is 10 feet deep.
Most impressive was the fact that the emergency spillway did not get used even though water was coming into the pond from approximately 70 acres of grassland and was coming in in large volume. As I observed the pond level, I could see that the pond level was declining and after about an hour it was down about 6 inches and continuing.
The design of the syphon follows the pond dam piping specifications and I am very pleased with how it is working.
Rockcreek
|
|
|
|
|
Joined: Oct 2005
Posts: 1,285 Likes: 1
Lunker
|
|
Lunker
Joined: Oct 2005
Posts: 1,285 Likes: 1 |
Cool. That'd make a good video.
"The greatest enemy of knowledge is not ignorance, it is the illusion of knowledge." Stephen W. Hawking
|
|
|
|
|
Joined: Apr 2007
Posts: 2,287
Lunker
|
|
Lunker
Joined: Apr 2007
Posts: 2,287 |
I'm happy with my siphon since adding a trap to the outlet. I'm still confused as to why it has started two different times when the pond wasn't receiving much water at all. Both times this happened during a period where no rain had fallen for several days.
|
|
|
|
|
Joined: Feb 2009
Posts: 941
Lunker
|
|
Lunker
Joined: Feb 2009
Posts: 941 |
OK I have read though all of the siphon threads and still have a couple of questions.
Did anyone ever get an answer to does the trap freeze and ways to avoid this? Prevent damage?
I am still confused a bit on starting the siphon manually to lower the pond level or drain it. From what I could gather the first step is to block the vent pipe with either a cap over the end or value. Then the outlet side needs to be closed off. Has anyone considered using a threaded coupling at the end and a threaded plug to do this? Any issues with this? After closing off the outlet pipe fill it with water via the vent tee. Since the pond is at or below normal pool the pipe will not completely fill with water, how to get the rest of the air out of the pipe or is there enough pull with the water in the downslope side? The downslope side will be 6' to 15' lower than the pond side.
|
|
|
|
|
Joined: Mar 2004
Posts: 229
Lunker
|
|
Lunker
Joined: Mar 2004
Posts: 229 |
Rock Creek mentioned drilling a hole in the bottom of the elbow to let it drain so it won't freeze.
I would doubt 6' would start a siphon with some air in the system but would be optimistic about 15'.
lassig,
To get the rest of the air out of the intake pipe you either have to:
put a check valve in it
put a valve you can close in it
vacuum out the air, vacuum pump or the vacuum of a gas motor
suck the water into the pipe with a water pump with the suction hooked to the vent
wait for a flood
If you use a threaded coupling you will get very wet getting it unscrewed and it will be pretty tight with the pressure on it. Should work several times, last couple threads might get damaged with repeat usage.
|
|
|
|
|
Joined: Feb 2009
Posts: 941
Lunker
|
|
Lunker
Joined: Feb 2009
Posts: 941 |
Thanks for the suggestions. Based on where we are building the pond I think I will have the 15' difference (if not more). Should I add something to assist in the vacuum or after filling with water I coujld put the shop vac over the vent tube to get the air out of the tube and use a value in the vent tube to seal it off. I thought I posted this this afternoon. For some reason it isn't here. This is my plan for the siphon systemm, any commnets 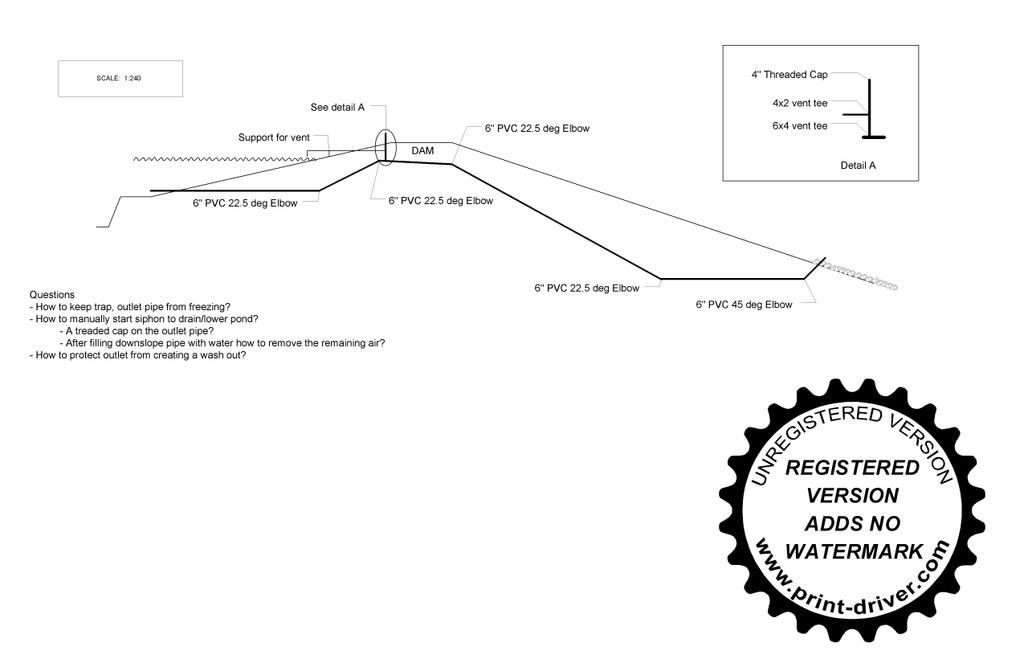 FYI does anyone know how to post pdfs so they could be used enstead of this jpg, or do someone have a conversion tool for jpgs that don't add a watermark.
|
|
|
|
|
Joined: Jan 2005
Posts: 469
Lunker
|
|
Lunker
Joined: Jan 2005
Posts: 469 |
Lassig,
Your drawing is exactly what I have. Two 12" siphons with 4" vents. One is about 2" higher than the other, and I don't think the higher one has ever been used. It is absolutely amazing how much water a siphon can move. I am now keeping the vent cap off of the higher siphon just to keep the pond about 2" deeper.
Since my pond is spring fed, there is always at least a good trickle of water flowing through the pipe. Since this water comes off the pond bottom, it would never let the discharge elbow freeze. But living in Ga helps too.
Hey Moe, I'm trying to think but nuthin's happening!
|
|
|
|
|
Joined: Oct 2005
Posts: 1,285 Likes: 1
Lunker
|
|
Lunker
Joined: Oct 2005
Posts: 1,285 Likes: 1 |
If the bottom of your trap elbow was exposed, or buried in pervious rip-rap, a small hole could be drilled in the bottom of the elbow...say 1/4" to allow it to drain during non-siphoning flow. The elbow should still function as a trap once there enough water to overcome the 1/4" hole.
To manually start the siphon, cap water level vent or extend underwater. Cap discharge (a valve that's easy to open that doesn't create a place for a clog to develop is ideal). Use a shop vac to remove air from the system through the vertical vent pipe and cap off (a check valve would be handy on the vertical vent pipe to assist in this). Carefull open discharge and stand back.
Rip rap over geotextile fabric would be good for the immediate discharge area. If there is a ditch or swale leading from the discharge, there are turf reinforcing geotextiles, TRF, that can be installed that allow vegetation (grass usually) to grow through it and can handle a lot of water while preventing erosion. TRFs are pretty inexpensive and require no more than seasonal mowing of the vegetation.
"The greatest enemy of knowledge is not ignorance, it is the illusion of knowledge." Stephen W. Hawking
|
|
|
|
|
Joined: Feb 2009
Posts: 941
Lunker
|
|
Lunker
Joined: Feb 2009
Posts: 941 |
THanks for the comments guys. I like the idea of the 1/4" hole, doesn't require any maintenance. I had the following ideas today before seeing this post, I may still implement this 
|
|
|
|
|
Joined: Oct 2005
Posts: 1,285 Likes: 1
Lunker
|
|
Lunker
Joined: Oct 2005
Posts: 1,285 Likes: 1 |
Possibly add a check valve in the vertical pipe and a shutoff valve in the horizontal pipe in Detail A for manual starting. In detail B, you could drill a weep hole in a spare 6" threaded cap in the cleanout Y and exchange it seasonally with a non drilled cap. Consider a lesser angle elbow (maybe a 22.5 or 45 depending on slope) on the horizontal siphon break vent. This would allow you to easily extend it deeper along the slope if a drawdown is desired. It would be less vulnerable than extending the horizontal pipe to reach deeper water and probably look nicer too.
"The greatest enemy of knowledge is not ignorance, it is the illusion of knowledge." Stephen W. Hawking
|
|
|
|
|
Joined: Feb 2009
Posts: 941
Lunker
|
|
Lunker
Joined: Feb 2009
Posts: 941 |
Ryan,
Again thanks for the suggestions. I really like the suggestion on changing the vent pipe elbow and will consider this. As for the check value do they make them for 4" pipe? Figure that I will have to make an adaptor that screws on to the top of the vent and reduces the pipe size down to 1 1/2". Then my shop vac would fit over it and I can get a check value for that size of pipe. Not sure how many times I will manually siphon the pond down, just nice to konw this can be done.
|
|
|
|
|
Joined: Oct 2005
Posts: 1,285 Likes: 1
Lunker
|
|
Lunker
Joined: Oct 2005
Posts: 1,285 Likes: 1 |
I didn't catch that you had a 4" vent pipe. A 2" vent/siphon break will be plenty for for a 6" siphon and will make it easier to begin siphoning. 2" check valves are about $10. Check valves aren't 100% reliable so you'll want the check valve capped off and only remove the cap to attach a vac to manually start.
"The greatest enemy of knowledge is not ignorance, it is the illusion of knowledge." Stephen W. Hawking
|
|
|
|
|
Joined: Feb 2009
Posts: 941
Lunker
|
|
Lunker
Joined: Feb 2009
Posts: 941 |
Ryan,
Thanks again, So the vertical piece (coming up from the 6" pipe) could be 2"? I haven't seen a 6" to 2" Tee?
|
|
|
|
|
Joined: Oct 2005
Posts: 1,285 Likes: 1
Lunker
|
|
Lunker
Joined: Oct 2005
Posts: 1,285 Likes: 1 |
Ryan,
Thanks again, So the vertical piece (coming up from the 6" pipe) could be 2"? I haven't seen a 6" to 2" Tee? That's what I was thinking. Maybe a 2" saddle? http://www.plumbingsupply.com/saddle.html
"The greatest enemy of knowledge is not ignorance, it is the illusion of knowledge." Stephen W. Hawking
|
|
|
|
|
Joined: Nov 2004
Posts: 1,074
Lunker
|
|
Lunker
Joined: Nov 2004
Posts: 1,074 |
A pluming store will be able to get you from 6inch to 2inch maybe not in one conection, but it is done all the time
|
|
|
|
|
Joined: Feb 2009
Posts: 941
Lunker
|
|
Lunker
Joined: Feb 2009
Posts: 941 |
I am currently planning on using a couple of pieces to get me down to 1.5" (6x6x4 tee and then a 4x4x2 tee followed by a 4 to 2 reducer and then a 2 to 1 1/2 reducer). Trying to get to 1 1/2" in the vertical part of the vent so the shop vac can be used to vacuum out the air to start the siphon. The horizontal part will be 2" and have a value in it to asist in the manual siphon. Just was trying to see if I can get by will less parts and a more direct route? See drawing here
Last edited by lassig; 03/03/09 07:51 AM.
|
|
|
|
|
Joined: Nov 2004
Posts: 1,074
Lunker
|
|
Lunker
Joined: Nov 2004
Posts: 1,074 |
|
|
|
Moderated by Bill Cody, Bruce Condello, catmandoo, Chris Steelman, Dave Davidson1, esshup, ewest, FireIsHot, Omaha, Sunil, teehjaeh57 |
|


.gif)