|
Forums36
Topics41,058
Posts559,017
Members18,563
| |
Most Online3,612
Jan 10th, 2023
|
|
|
|
Joined: Nov 2004
Posts: 1,074
Lunker
|

Lunker
Joined: Nov 2004
Posts: 1,074 |
DCox
The difference in test holes is the standard. If you dig three holes and they are all the same that would be unusal. The first picture showed lots of topsoila, save as much as you need to cover any area that is disterbed.
Leave the trees if they don' get in the way of the work.
OTTO
|
|
|
|
|
Joined: May 2008
Posts: 30
Lunker
|
|
OP
Lunker
Joined: May 2008
Posts: 30 |
Well, a little time has passed, but I actually finished the pond. I decided to break ground with my John Deere tractor and at least get the top-soil stripped back:   The tractor and box blade actually did a pretty good job in this initial stage:   Unfortunately, those two trees in the middle had to go, but their remnants are used later.
|
|
|
|
|
Joined: May 2008
Posts: 30
Lunker
|
|
OP
Lunker
Joined: May 2008
Posts: 30 |
The next step was to dig the core trench. From our test holes, I knew I would either reach shale or good clay. I started initially with the tractor and box blade--which got old very quickly: 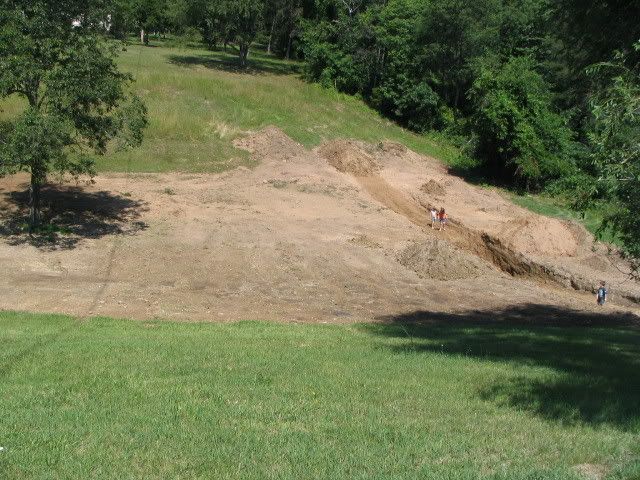 Here some of the kids are inspecting the work to make sure it is to specs:   At this point I knew I needed to rent a bulldozer if I was ever going to move the project along. It is getting pretty late, so I will try to post the dozer and completion pics tomorrow.
|
|
|
|
|
Joined: Apr 2003
Posts: 122
Lunker
|
|
Lunker
Joined: Apr 2003
Posts: 122 |
Nice work! I know what you mean, I started digging a trench for spring development with my loader and quickly realized I needed an excavator. I love the supervisory board checking the work.
|
|
|
|
|
Joined: May 2008
Posts: 30
Lunker
|
|
OP
Lunker
Joined: May 2008
Posts: 30 |
|
|
|
|
|
Joined: May 2008
Posts: 30
Lunker
|
|
OP
Lunker
Joined: May 2008
Posts: 30 |
The next phase was to remove overburden in the basin, get to the good clay, and mix it in with some decent dirt for building up the dam. Again, the dozer did a great job on this step as well:    There were a lot of very large stones/boulders, but only on the east side of the basin. I began to suspect that some of the stones were the foundation remains of an old structure. This assumption would later prove correct. Anyway, the dozer moved them up and out of the way with no problem: 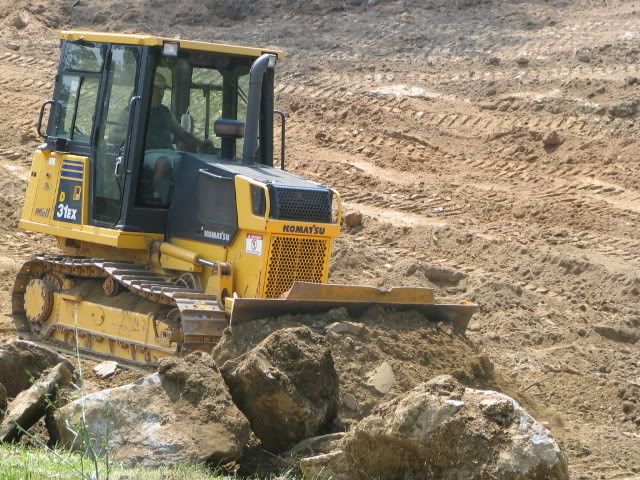 The basin, etc. begins to shape up nice. I was surprised to not only find an abundance of clay, but also by the different states it was in within such a close vicinity to one another. For example, I found one strip that looked pure grey and was in wet plastic form--it was a very specific vein. Right beside it, where the ground had been open to the elements from the season water running through, that very same clay had hardened into shale. In the midst of this you would find the same clay in the form of large hardened folds of rock. It really was quite fascinating.   
|
|
|
|
|
Joined: Jul 2006
Posts: 240
Ambassador Lunker
|
|
Ambassador Lunker
Joined: Jul 2006
Posts: 240 |
Congratulations on a great looking project and location! Very impressive. What model of John Deere did you start the project with?
|
|
|
|
|
Joined: May 2008
Posts: 30
Lunker
|
|
OP
Lunker
Joined: May 2008
Posts: 30 |
Victor, a JD 790. Great little tractor. Here I am shaping the dam some, in between adding more materials:   I am not sure why, but I find these two pics interesting: 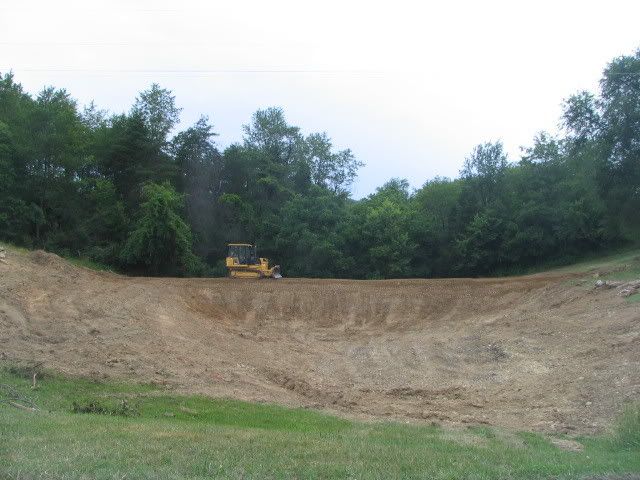  Here the two oldest daughters are the watchers:  Interestingly, I repeatedly shot my lines with the laser level, and kept discovering that I was taking too much material off one particular portion on the top of the dam. I finally got it about right.
|
|
|
|
|
Joined: Apr 2003
Posts: 122
Lunker
|
|
Lunker
Joined: Apr 2003
Posts: 122 |
Nice!! <--------------Equipment envy 
|
|
|
|
|
Joined: May 2008
Posts: 30
Lunker
|
|
OP
Lunker
Joined: May 2008
Posts: 30 |
I will try to get the last bit in here in the next couple posts. As mentioned earlier, I hit the dreaded Weikert shale in one strip adjacent to where the ground eroded from the seasonal run off down the middle. The best plan would have been to immediately cover it with clay, but I had to go deeper in this particular location. Here is where renting a larger dozer would have been nice, but the finish dozer still did a good job. The trick was to get the edge of the blade angled down, and to move downhill and across. It is hard to explain, but it worked well and dug the shale deposit right out. This was encouraging since the guy who came with the backhoe to dig the test holes could barely pierce the stuff. I was a bit nervous at this point since hitting hard-pan or other subsurface base of this nature isn't the best route to ensure a sealing pond (which was my original concern to begin with). However, here is where the unexpected bonus of a nice deposit right in the basin of both pure grey clay and a rich mixture of clay and dirt paid off nicely. I had enough to completely smother the shale area I had excavated . . . in fact, I had enough to line the entire basin of the pond fairly deep. Here you can see more compaction of this clay with the tractor:     I had to use the tractor's brakes so much while compacting that some liquid was oozing out out some overflow holes in the rear axle. I thought I had heated them so much that the gasket behind the brakes shoes had failed allowing transmission fluid to leak. I pulled the covers and discovered that the rotor had gotten hot enough to actually cause whatever factory grease was in there to become runny. I redressed the shoes and rotors, cleaned everything up real good, and put it back together. Everything was fine after that. I wasn't looking forward to pulling those seals. As I was compacting this clay, sometimes the sun would take too much moisture out and I would have to hose it down. Everyone around quickly discovered to beware of six-year-old's with water hoses! 
|
|
|
|
|
Joined: May 2008
Posts: 30
Lunker
|
|
OP
Lunker
Joined: May 2008
Posts: 30 |
I had to return the rental dozer soon, so now was the time to cut my overflows on each side of the dam:  It is a little hard to explain, but basically when the water reaches a certain level, it will follow the overflows, which are sloped away from the dam back into the virgin soil cut out from the hill sides. I picked this approach up from reading Tim Matson. The red lines represent the full water line shot with my level. Since then, I have lined the hillside with large stones, and have also heavily seeded and strawed this whole area. I am going to wait and see what it looks like later, but I may also line it with some rip-rap or a bit smaller rock. Before I had an opportunity to get some seed and straw down, it rained a couple times. As you can see, the water held well. It is still there, minus a little bit of evaporation:    I now turned to fish structure. The trees I had to take out and all the boulders that I didn't use to line the overflow area came in handy. Some of these materials also found its place up on the bank where it is quite decorative:   Now it was time for seed and straw. It was pretty hot when I put it all down:    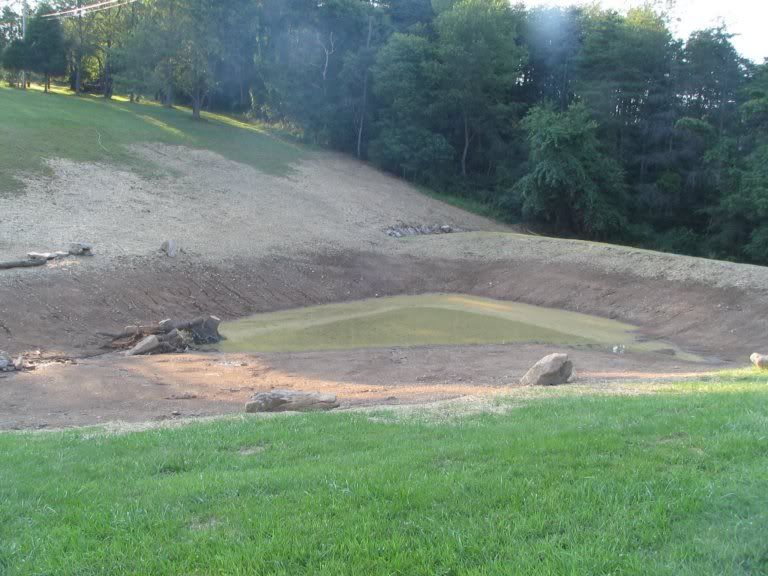 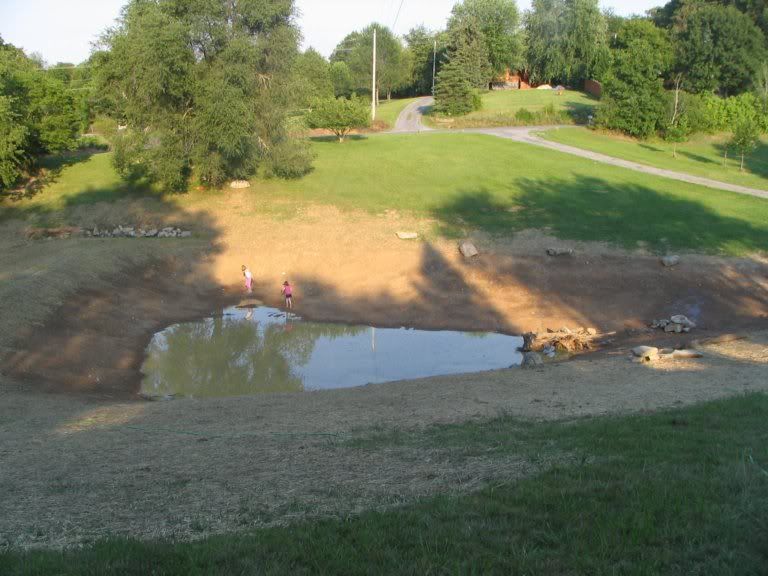 Now I am just watering the seed until it is established, waiting for rain to come and fill the pond. I will post some more pics when it is finally full (God-willing). Anyway, the latest addition to the oversight committee appeared happy with the work, so that is all that matters:  
|
|
|
|
|
Joined: Apr 2003
Posts: 122
Lunker
|
|
Lunker
Joined: Apr 2003
Posts: 122 |
That is really nice work. What do you anticipate your finished area to be? And how deep?
|
|
|
|
|
Joined: May 2008
Posts: 30
Lunker
|
|
OP
Lunker
Joined: May 2008
Posts: 30 |
That is really nice work. What do you anticipate your finished area to be? And how deep? Thanks for the kind words. It about 1/3+ acre. The more shallow area is probably about 4ft (I wanted to avoid weeds), but slopes pretty gradual so I can make a kids beach with some sand, etc. The deeper area is 12-15ft. It is a great place for a future dock for the kids to swim. After about a year, I plan to put some catfish and bluegill in--maybe a just a few LM bass just to watch them grow. On the other side of the driveway culvert is an old hand-dug well and watershed spring. There are some really nice trees as well. My plan is to put a second pond there (a bit smaller). Phase three will be to dig out the driveway in between the two and connect the two ponds. I then want to put a covered bridge across the expanse. I want to model it after the old New England style from the 19th century (hopefully). It would be nice to do a small version of this one in Newfield, NY. It is the only one from the 19th century being used in NY, and we used to live just down the road from it when I was little kid.  I can't remember where I found this online, but it is more to the size: 
|
|
|
|
|
Joined: Apr 2003
Posts: 122
Lunker
|
|
Lunker
Joined: Apr 2003
Posts: 122 |
What a cool project, that bridge is great. I'm curious, how long did it take you to get to this point once you got the dozer?
|
|
|
|
|
Joined: May 2008
Posts: 30
Lunker
|
|
OP
Lunker
Joined: May 2008
Posts: 30 |
I rented the dozer June 26 and had it for seven days. In two days I pretty much had everything roughed in pretty good. It cost the same to rent it for three days or seven, so I just held on to it and poked around pushing up stumps on the property, and then spreading my topsoil piles around the pond. I could have spread the soil with my tractor bucket and box blade, but you can really move soil quickly and get a good finish grade with a dozer this size. I finally bought 100lbs of fescue/rhye mix and about 15 bales of straw. All that was finally spread and covered two days ago. I could have been done sooner I suppose, but some other things came up that needed attention. Also, I never look forward to spreading straw--I spent a lot of time working in blistering hot barns stacking it non-stop off the hay elevator as a kid. Probably some Pavlovian behavioral response on my part now as an adult.
|
|
|
|
|
Joined: Apr 2003
Posts: 122
Lunker
|
|
Lunker
Joined: Apr 2003
Posts: 122 |
That's pretty quick work, gotta love it when a plan comes together. I'll be interested to see it at full pool. Hopefully we'll get some rain soon.
I have the same response to hay and straw. been there, done that, got the t-shirt.
|
|
|
|
|
Joined: May 2004
Posts: 14,033 Likes: 300
Moderator Lunker
|
|
Moderator Lunker
Joined: May 2004
Posts: 14,033 Likes: 300 |
Great Pics of a nice looking pond, DCox.
"Live like you'll die tomorrow, but manage your grass like you'll live forever." -S. M. Stirling ![[Linked Image from i.pinimg.com]](https://i.pinimg.com/736x/ed/b5/e7/edb5e7f935843b996cf52be593c9ebd2--smoothie-smooth-collie.jpg)
|
|
|
|
|
Joined: Jul 2006
Posts: 240
Ambassador Lunker
|
|
Ambassador Lunker
Joined: Jul 2006
Posts: 240 |
Great job and great location. It will be great to see full with new grass growing all around. Good luck!
|
|
|
|
|
Joined: May 2008
Posts: 30
Lunker
|
|
OP
Lunker
Joined: May 2008
Posts: 30 |
Thanks Theo and Victor.
The info. on this site, the Perfect Pond book, and Tim Matson's books (which are more inspirational/ideas oriented) were really helpful from start to finish. I am already looking forward to the second one, God-willing.
|
|
|
|
|
Joined: Oct 2005
Posts: 6,934 Likes: 2
Ambassador
Field Correspondent Lunker
|
|
Ambassador
Field Correspondent Lunker
Joined: Oct 2005
Posts: 6,934 Likes: 2 |
Please allow me to tip my hat to your DIY accomplishment. Your passion and drive are obvious; so is your high quality of work. I look forward to brim full. Congrats, DCox.
|
|
|
|
|
Joined: Nov 2004
Posts: 1,074
Lunker
|
|
Lunker
Joined: Nov 2004
Posts: 1,074 |
|
|
|
|
|
Joined: May 2008
Posts: 30
Lunker
|
|
OP
Lunker
Joined: May 2008
Posts: 30 |
Well, a little update: the pond recently made it to full pool, and I have started the second pond on the other side of the driveway: 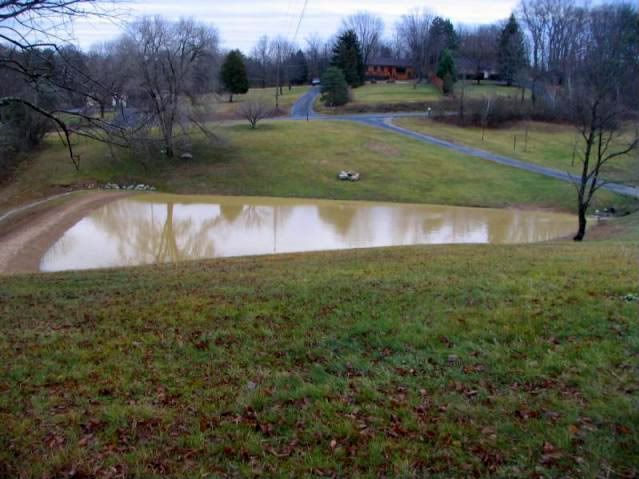 Relatives out-of-state wanted updates, so I created a little blog. If you are interested, I picked up the pond photos and commentary where this thread left off at: http://dcoxpond.blogspot.com/As soon as this wet weather ends, I am going to be diving back into work on the second pond.
|
|
|
|
|
Joined: Jul 2006
Posts: 7,615 Likes: 5
Ambassador
Field Correspondent Lunker
|
|
Ambassador
Field Correspondent Lunker
Joined: Jul 2006
Posts: 7,615 Likes: 5 |
Beautiful place D! I enjoyed reading through your blog. You mentioned the geothermal heat pump using a pond. Do you have or are you planning to have this set up?
I'm considering a closed-loop system when I build a home at our pond property. Mostly for summer cooling.
JHAP
~~~~~~~~~~
"My mind is a raging torrent, flooded with rivulets of thought cascading into a waterfall of creative alternatives."
...Hedley Lamarr (that's Hedley not Hedy)
|
|
|
|
|
Joined: May 2008
Posts: 30
Lunker
|
|
OP
Lunker
Joined: May 2008
Posts: 30 |
Hi, JHAP. Thanks for the kind words! After the second pond, I am going to be turning my attention to major changes to the structure of the house. At that time I am going to be installing geothermal solutions for both summer and winter.
One of my colleagues is pretty experienced in this type of thing, so I will be drawing some on his expertise. My hope is to get a base-line constant heat established in the house year round, and then supplement it with wood heat in the winter (I love the glow of wood warmth). To be frank, my main goal is to save as much money as possible on utilities; there is absolutely nothing political or trendy in my motivations, lol.
|
|
|
Moderated by Bill Cody, Bruce Condello, catmandoo, Chris Steelman, Dave Davidson1, esshup, ewest, FireIsHot, Omaha, Sunil, teehjaeh57 |
|


