|
Forums36
Topics40,944
Posts557,788
Members18,483
| |
Most Online3,612
Jan 10th, 2023
|
|
|
6 members (Steve Clubb, Boondoggle, Bill Cody, Snipe, Dave Davidson1, FishinRod),
1,045
guests, and
207
robots. |
|
Key:
Admin,
Global Mod,
Mod
|
|
|
|
Joined: Nov 2005
Posts: 773 Likes: 1
Lunker
|
OP

Lunker
Joined: Nov 2005
Posts: 773 Likes: 1 |
We're on one of the submerged islands. I like this picture because it gives you a good idea of the size of my dam. Lots of dirt there!!!! Eddie 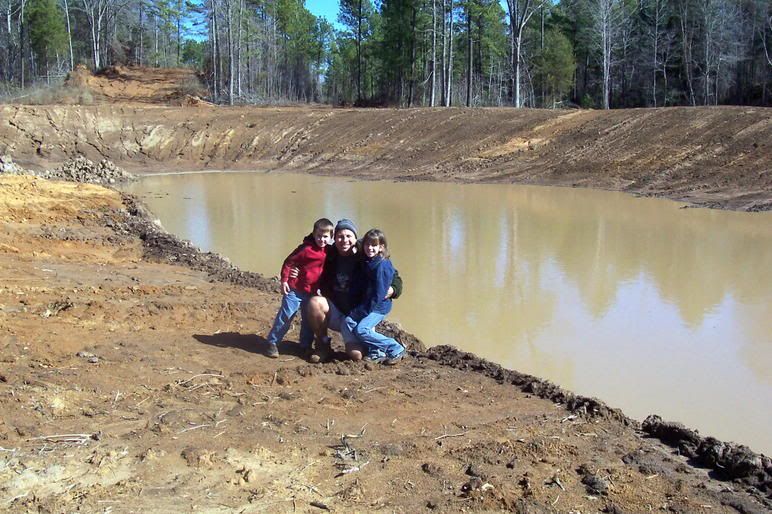
|
|
|
|
|
Joined: Jul 2005
Posts: 151
Member
|
|
Member
Joined: Jul 2005
Posts: 151 |
Eddie,
That is going to be one nice looking pond. I love ponds with timber in the background.
|
|
|
|
|
Joined: Oct 2005
Posts: 6,934 Likes: 2
Ambassador
Field Correspondent Lunker
|
|
Ambassador
Field Correspondent Lunker
Joined: Oct 2005
Posts: 6,934 Likes: 2 |
Now THAT'S an anti-seep collar... (these are the product I mentioned a few posts back) 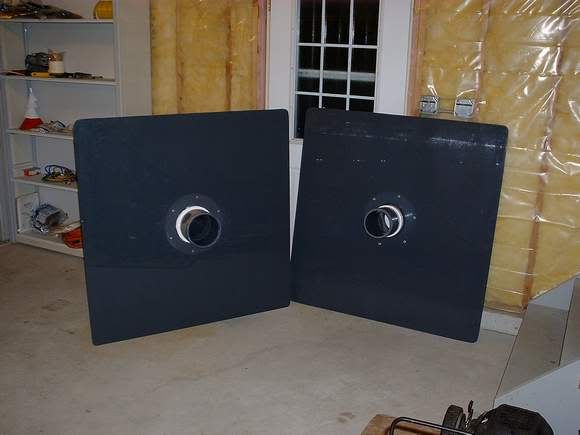 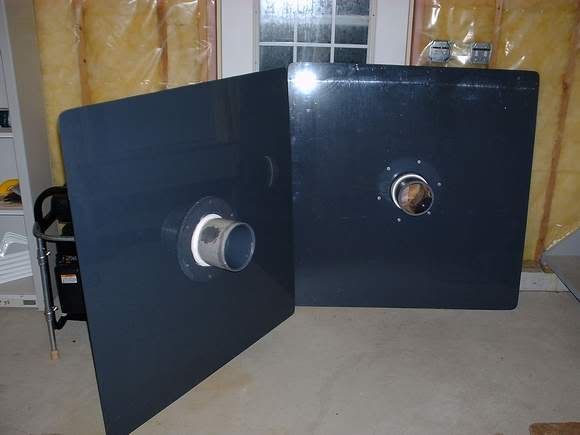 I just took delivery of 'em and wanted to share the product for "drain-guyz". .250" thick PVC x 48" square, 6" Sched 80 fitting thru center, male one side-female other side, caulked and SS bolted. Purty nice...purty 'spensive...but don't care if they work purty gud.
|
|
|
|
|
Joined: May 2004
Posts: 234
Lunker
|
|
Lunker
Joined: May 2004
Posts: 234 |
Brettski,
Very nice looking product!
Do these folks have a web site?
I really like the idea of PVC and/or PE (poly ethylene) material.
Many soils in this Country can be very corrosive to steel and even zinc coated (galvanized) steel.
Ed
|
|
|
|
|
Joined: Oct 2005
Posts: 6,934 Likes: 2
Ambassador
Field Correspondent Lunker
|
|
Ambassador
Field Correspondent Lunker
Joined: Oct 2005
Posts: 6,934 Likes: 2 |
|
|
|
|
|
Joined: Nov 2005
Posts: 773 Likes: 1
Lunker
|
|
OP
Lunker
Joined: Nov 2005
Posts: 773 Likes: 1 |
Brettski,
Thanks for the picture and personal email about the valves.
I ended up buying the 6 inch butterfly valve from my supplier. He adjusted the price some, and worked with me on the accesories to make it worthwhile. He was still more than the deal you mentioned, but I'm confident in his products and don't know about that one.
I'll post some pics of the modifications I made to it, and the install, but not right now. Too much to do. LOL
Eddie
|
|
|
|
|
Joined: Oct 2005
Posts: 6,934 Likes: 2
Ambassador
Field Correspondent Lunker
|
|
Ambassador
Field Correspondent Lunker
Joined: Oct 2005
Posts: 6,934 Likes: 2 |
Good for you, Mr Walker! As goes most projects, this pond thing is truly another string of tedious, important decisions that must line up like a string of pearls...lest it results in costume jewelry. Whodathunk, eh?
I was thinkin' of you a couple of weeks ago. My right-hand gal (wife, bride, aka; boss) went and picked up 790 ft of 6" pvc pipe with the truck and utility trailer....found it on Ebay. I will have inventory way beyond need and likely wind up trying to sell what's left over when the smoke clears. The deal was too good to pass up.
-
(edit note)...hey, is the dozer back up and pushin? Did you get drenched last week (or so)?
|
|
|
|
|
Joined: Mar 2006
Posts: 13
Member
|
|
Member
Joined: Mar 2006
Posts: 13 |
|
|
|
|
|
Joined: Nov 2005
Posts: 773 Likes: 1
Lunker
|
|
OP
Lunker
Joined: Nov 2005
Posts: 773 Likes: 1 |
It's another rainy day here, so I've added some more pics to my photobucket account. This is the 6 inch butterfly valve that I bought. Eddie 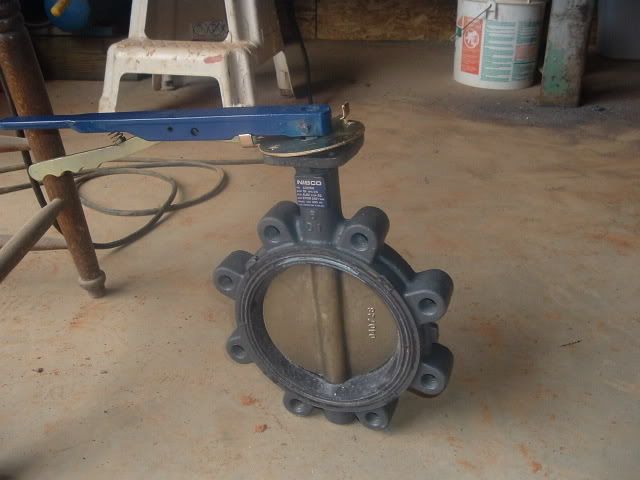
|
|
|
|
|
Joined: Nov 2005
Posts: 773 Likes: 1
Lunker
|
|
OP
Lunker
Joined: Nov 2005
Posts: 773 Likes: 1 |
The valve will sit at the bottom of a four foot trench. The valve handle has to be above grade, so I welded up this extension. It's galvanized pipe that will fit inside a 2 inch galvanized pipe to act as a sleeve. My goal was to stop the soil from contacting the soil. Eddie 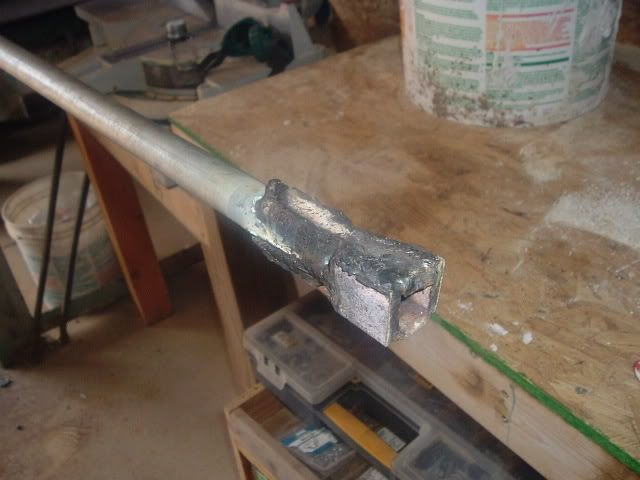
|
|
|
|
|
Joined: Nov 2005
Posts: 773 Likes: 1
Lunker
|
|
OP
Lunker
Joined: Nov 2005
Posts: 773 Likes: 1 |
The valve will sit between two six inch uprisers. When it's closed, the water will have to rise to the level I want it before it will flow out. Or I can open the valve and drain it down. The wye's are from Lowes. They were five dollars cheaper for each one than the plumbing supply house. Eddie 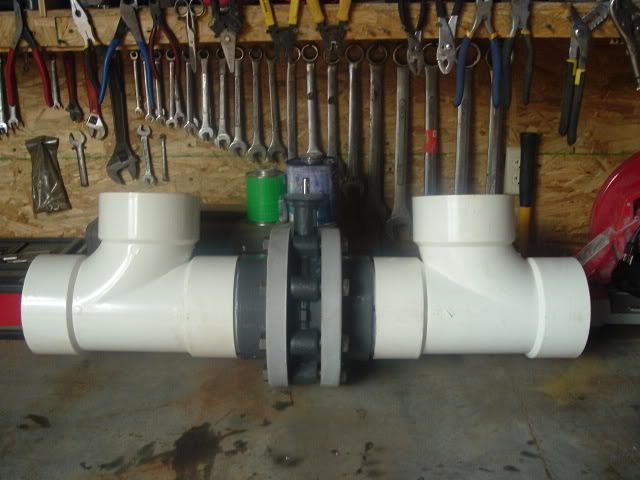
|
|
|
|
|
Joined: Nov 2005
Posts: 773 Likes: 1
Lunker
|
|
OP
Lunker
Joined: Nov 2005
Posts: 773 Likes: 1 |
I bought 160 feet of SDR 35 six inch pipe from the supply house. It was half the price of Schedule 40. Since it's not a high preasure application, it's plenty strong. The only problem with SDR 35 is that it has a different outside diameter than the Schedule 40 fittings that I bought. Eddie 
|
|
|
|
|
Joined: Nov 2005
Posts: 773 Likes: 1
Lunker
|
|
OP
Lunker
Joined: Nov 2005
Posts: 773 Likes: 1 |
That last picture didn't seem to load. I'll try again. Eddie
|
|
|
|
|
Joined: Nov 2005
Posts: 773 Likes: 1
Lunker
|
|
OP
Lunker
Joined: Nov 2005
Posts: 773 Likes: 1 |
That last picture didn't seem to load. I'll try again.
Eddie
[img] [IMG]http://i44.photobucket.com/albums/f40/okosongoro/Lake096.jpg [/img][/IMG]
|
|
|
|
|
Joined: Nov 2005
Posts: 773 Likes: 1
Lunker
|
|
OP
Lunker
Joined: Nov 2005
Posts: 773 Likes: 1 |
I tried, lets see what happens with the next one. Here is the valve in the ground. The valve extention is inside the yellow sleeve. I painted the extension and the sleeve with Rustolium primer and yellow paint to help protect them over time. The SDR 35 is conected to the wye's with the rubber unions. They come with a single stainless steel hose clame on each end. I doubled this with another set of stainless steel hose clamps. Eddie 
|
|
|
|
|
Joined: Nov 2005
Posts: 773 Likes: 1
Lunker
|
|
OP
Lunker
Joined: Nov 2005
Posts: 773 Likes: 1 |
I decided to pour concrete around the pipe to stop the water from following he smooth sides of the pipe. This will also be easier to compact, and give me a really good seal. Eddie 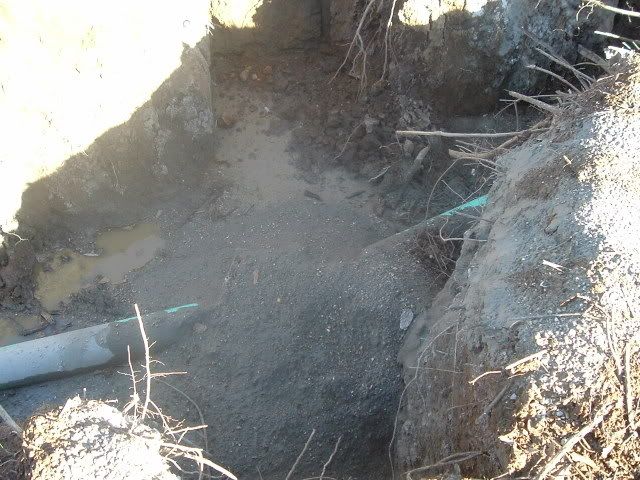
|
|
|
|
|
Joined: Nov 2005
Posts: 773 Likes: 1
Lunker
|
|
OP
Lunker
Joined: Nov 2005
Posts: 773 Likes: 1 |
One of the reasons I went with this type of drain is that I like the idea of pulling the water from the bottom of the lake. I've been told, and it makes sense to me, that this will also take out some of the silt in that area. I doubt it will take very much, but no other method will pull any silt with it. I haven't seen this addressed yet, but after the drain pipe was lying there, I started wondering about how to keep it from plugging up with other debri that settles to the bottom of the lake. It wouldn't take much to plug it up and make the entire thing useless. After walking the isles at Lowes, I saw this plastic fence material. It's pretty heavy duty and solid plastic. NO RUST. I built a tent shaped frame from 3/4 schedule 40 PVC and 30 T's. It's ten feet long and each side is three feet. I have no idea of the volume it holds, but figure the two inch squares will keep out anything big enough to plug the pipe, but allow smaller stuff to pass through. I also went with the tent design because I was afraid something heavy might settle on top of it and crush it. Now heavy stuff should slide downt he sides. Eddie 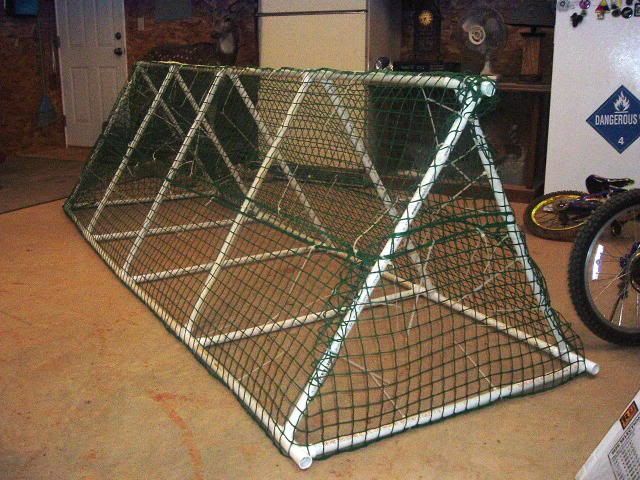
|
|
|
|
|
Joined: Nov 2005
Posts: 773 Likes: 1
Lunker
|
|
OP
Lunker
Joined: Nov 2005
Posts: 773 Likes: 1 |
I slid it under about a third of the way into the drain pipe. I was worried that somebody fishing might hook it and pull it out, but after backfilling the ditch and compacting it with my backhoe, it's in there solid. Several thousand pounds of clay will keep the pipe down, which will keep the filter down. Eddie 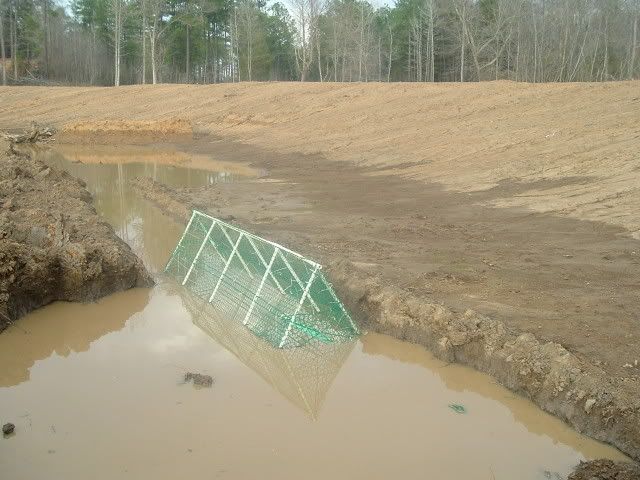
|
|
|
|
|
Joined: Nov 2005
Posts: 773 Likes: 1
Lunker
|
|
OP
Lunker
Joined: Nov 2005
Posts: 773 Likes: 1 |
The last storm that came through droped 4 inches of rain. I was curious about the drain and how well it will work, so I closed it and let some water into the lake. Most of my shoreline is built up to divert runnoff away from the lake for now. Later when I'm done, I'll put some culverts in, but for now I'm trying to keep it as dry as possible. You can barely see the top of the filter in this picture. Eddie 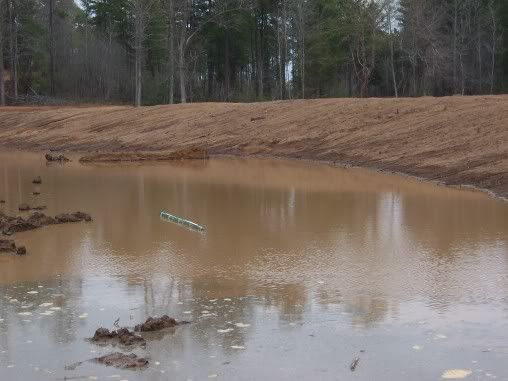
|
|
|
|
|
Joined: Nov 2005
Posts: 773 Likes: 1
Lunker
|
|
OP
Lunker
Joined: Nov 2005
Posts: 773 Likes: 1 |
Here's the drain doing what it's supposed to do! Now I'm waiting for things to dry out to get back to my digging. The turbo is back in the dozer, but there's still a few other problems. Each one I fix leads me to one more. Eddie 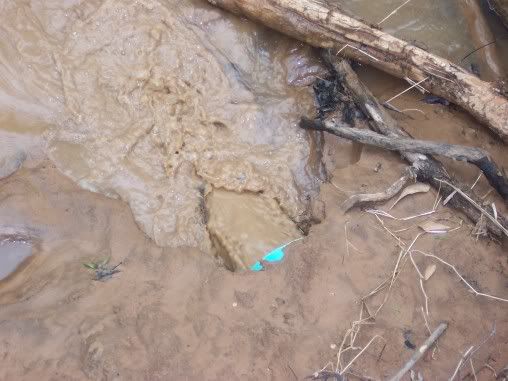
|
|
|
|
|
Joined: Nov 2005
Posts: 121
Lunker
|
|
Lunker
Joined: Nov 2005
Posts: 121 |
Looks good, but if I were you I'd form up around the inside of your valve pit and pour an open top concrete box surrounding the valve. You could put a steel or concrete cap on top. That would keep the dirt off your valve and stem, probably at least double the life of the system. But if you did that you'd need to install a pvc drain at the bottom of the box to drain any water which might accumulate inside. Sounds like some expensive repairs on the dozer.
|
|
|
|
|
Joined: Nov 2005
Posts: 121
Lunker
|
|
Lunker
Joined: Nov 2005
Posts: 121 |
I'd also be careful of the rubber unions. When the ground starts to settle they could be pulled apart by tension induced in the pipe. I've made 'custom' pvc adapters out of pipe or stock couplings by heating the pvc and enlarging it to the size you need by working the hot pvc over the size pipe you are adapting to. You could probably find a bell reducer that would adapt to the wye and you could form to the diameter of the SDR 35. Then you could glue it all up.
|
|
|
|
|
Joined: May 2004
Posts: 13,966 Likes: 276
Moderator Lunker
|
|
Moderator Lunker
Joined: May 2004
Posts: 13,966 Likes: 276 |
You, Sir, have been busy and creative!
Like TNHB the rubber unions would worry me the most. But they do make rubber unions for pressurized domestic water line repair (60psi), so they can be tougher than we might think.
If you have all that horizontal and vertical pipe fixed solidly, that should help the unions hold up.
P.S. Your strainer tent looks like structure - it might just protect small fish that draw big fish.
"Live like you'll die tomorrow, but manage your grass like you'll live forever." -S. M. Stirling ![[Linked Image from i.pinimg.com]](https://i.pinimg.com/736x/ed/b5/e7/edb5e7f935843b996cf52be593c9ebd2--smoothie-smooth-collie.jpg)
|
|
|
|
|
Joined: Jan 2005
Posts: 1,239
Lunker
|
|
Lunker
Joined: Jan 2005
Posts: 1,239 |
Not to question what you have done, but would it have been cheaper and easier to just install the stand pipe manifold as close to the end of the drain pipe as practical and just install two drain pipes beyond the stand pipe manifold and cap one at the end with a screw in plug? Just a thought I know the valves are rather pricee.. Looks great as is ... good luck..
 The road goes on forever and the party nevers end...............................................
|
|
|
|
|
Joined: Nov 2005
Posts: 773 Likes: 1
Lunker
|
|
OP
Lunker
Joined: Nov 2005
Posts: 773 Likes: 1 |
TN Hillbilly,
Thanks for the pointers. I'm still undecided how I plan to protect the vavle assemble above grade. I've been thinking of just filling dirt until I have a mound to keep water away, then build a box that willcover it. I have quite a bit of Hardi Siding that works great for this. Once I know how high the uprisers need to be, I'll have a better idea on how to finish it off.
The rubber unions might be a problem. With both ends of the pipes exposed and such a short run, I have my doubts about how much movement there will be, but I don't doubt that it could happen. Since there's no significant preasure on them, I think I can get away with it.
This might be one of those really bad mistakes, or I got it right.
Theo,
Thank you sir.
I do a little construction around this area of Texas and have dealt with a few of the water companies. At first I was amazed that they use rubber unions for some of their repairs, but they swear by them. This is bigger than what I've seen them use on water lines, but it's very common on drain lines. I'm calling this a drain line and don't think their will be enough preasure to cause any issues.
Obviously I could be wrong, but my fingers are crossed and I did double up on my clamps!!!
Rockytopper,
A friend has the exact type of setup you mention. He has screw in plugs at two feet intervals that he can remove to drain his pond down to the desired level. He leaves the top one open to handle light rains and overflow.
To me, it looks messy. The pipe sitting in the air with all these fittings. Below the pipe he has piles of rock to cut down on erosion. After the water leaves his pipe, it flows down to his neighbors property.
In my situation, the pipe drains into the creek that is my property line. I own half the creek. I want to dump the water into the creek as fast as I can and keep it nice looking. Right now it's sort of unfinished in the pics, but eventually there will be bermuda grass growing around a nicely finished box of some kind to protect it from the elements and blend in with nature.
The valve was $150. Yes, that's allot for a valve, but thanks to Brettski, I was able to get a better price on it. There are cheaper valves and more expensive ones. I have around $600 into the hole thing, including pipe. Not an insignificant amount, but it's low enough that I couldn't use cost as a reason not to do it.
Eddie
|
|
|
Moderated by Bill Cody, Bruce Condello, catmandoo, Chris Steelman, Dave Davidson1, esshup, ewest, FireIsHot, Omaha, Sunil, teehjaeh57 |
|


