|
Forums36
Topics40,963
Posts557,993
Members18,503
| |
Most Online3,612
Jan 10th, 2023
|
|
|
7 members (bmicek, Fishingadventure, esshup, anthropic, 4CornersPuddle, gautprod, FishinRod),
1,192
guests, and
252
robots. |
|
Key:
Admin,
Global Mod,
Mod
|
|
|
|
Joined: Oct 2011
Posts: 30
|
OP

Joined: Oct 2011
Posts: 30 |
What? Forty three years you say? Yep, it's true. I built my first and last small cattle tank 43 years ago when I was 17 years old. It was so much fun, and so satisfying to me that I vowed then that I would someday buy some property where I could build another pond, on a larger scale. Last year, about this time, we signed the papers on a 68 acre tract of land here in east Texas.
For the last 43 years I have been studying books, internet sites, examining other people's ponds, and talking with people who know something about the subject. And last year I found this website, which I consider an excellent source for research, a place to read about successful pond projects as well as problematic projects or even total failures. I will also soon be subscribing to the Pond Boss magazine.
Shortly after acquiring our land last year, we purchased a 38 HP John Deere tractor with loader, shredder, box blade, and a three point dirt scoop. I have spent many hours just grading roads and leveling and filling eroded areas and high spots, etc. But I also found time for some preliminary pond work. I have since acquired a used, small bulldozer in great shape and a two yard dirt scraper to help with things.
Most of the acreage is going to be a tree farm. It was clear cut about 8 years ago and has since reseeded itself and has plenty of pines and oaks, from seedling size to some over 25 feet tall. But there are also tons of sweet gum trees and lots of trash trees and brush too. It will take a few years to slowly clean up and thin out stuff so the good trees can prosper. But we are leaving several acres alone for a wildlife refuge, with plans for an eventual small wildlife pond or two.
But the main projects are to prepare for a shop and house that we plan to spend the rest of our life living in, and to build two ponds close by. One will be the pond that collects all the watershed water, and will overflow into the larger pond which I plan to stock for fishing. We also have plans for two water wells. One will be for the house, with a typical submersible AC electric powered pump, and the other with a solar powered DC electric pump to feed the ponds during sunlit hours.
I have already begun work on these projects and am planning to document my work on the ponds here, both as a place to keep a log of progress and hopefully as more helpful information for others reading this site. It's slow progress as I still have a full time job and can only work on the property on weekends.
But before I begin, I want to say thanks to all who have posted here already. I have read a lot of this site and am continuing to do so as time permits. A forum is a great place to go for help as you usually get not just one viewpoint, but several. And there appears to be a lot of talent and experience available here for the taking. All that is required is that you ask your question properly.
So off I go. I will post a few pictures with information on them to bring you up to my current status, and we'll go from there. I'm just glad that the 42 years of just research are over and I'm actually moving dirt now. It's a great feeling to build your dream, and I'm loving every minute I spend doing so.
Red Rock Rancher 
|
|
|
|
|
Joined: Oct 2011
Posts: 30
|
|
OP
Joined: Oct 2011
Posts: 30 |
First is a Google Earth image that shows the entire 68 acres. It is comprised of three separate tracts of land. The top right rectangle is the 50 acre tree farm, but will also contain the majority of the larger fishing pond. The bottom rectangle is a 14 acre tract that contains old growth forest and pasture, and contains the entire, smaller watershed-catching pond, which I call the settling pond. Our homesite is also on this tract. The left rectangle is a 4 acre tract that we bought just to provide a driveway to the farm to market road. It is about half old growth forest and half pasture. 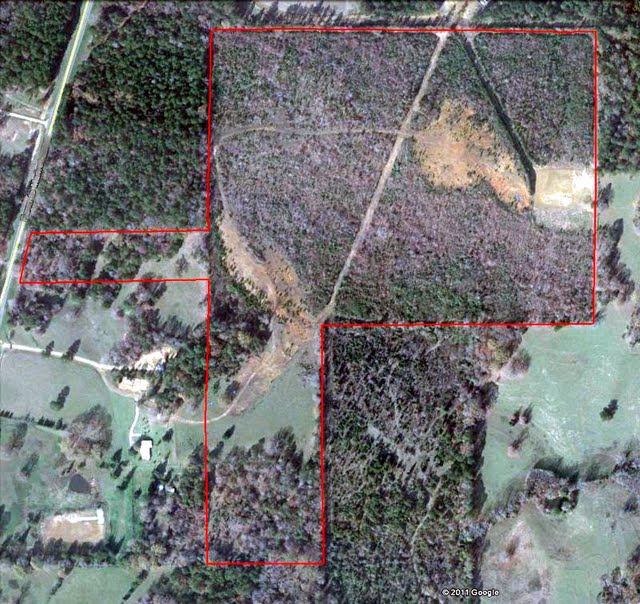 As you can see, there is a gas well and two pipeline right-of-ways on the 50 acre plot. The two reddish looking areas are where iron ore was dug and crushed to make gravel by a previous owner years ago. There is still literally tons of iron ore on the property, from pea gravel size to boulders that probably weigh over a ton. And there are places where the ground looks like it is solid rock for several square feet. When it comes to rock, I have a plentiful resource.
Red Rock Rancher
|
|
|
|
|
Joined: Oct 2011
Posts: 30
|
|
OP
Joined: Oct 2011
Posts: 30 |
Now I've zoomed in to the area of interest for this topic. I have outlined the location of the house and the two ponds. The pond closest to the house site is the settling pond, and the other is the proposed fishing pond. The settling pond has several acres of watershed, mostly to the south, that will feed it. Also there is a pipeline right-of-way, undetectable from this view, just to the southeast side of both ponds which limits any growth in that direction. I could buid another pond on the other side of the right-of-way, but the locations I have picked out are far better, as you will hopefully see. Late last year I built two small test dams to check the amount of water I can expect from a rainfall, and it appears from the two fairly good rains we got in early spring that I will get a good bit from the watershed. But as any of you who live in the vicinity know, this was definitely not the year for rains here in Texas. We are still under drought conditions and until a couple of weeks ago had not seen any rain since July. That is why I am plannig a solar powered water system to feed the ponds. I saw many ponds in the area go completely dry this summer, and I don't want that to happen to mine, ever.  By the way, these Google Earth images are from before we purchased the property. A lot has changed since then.
Red Rock Rancher
|
|
|
|
|
Joined: Jul 2011
Posts: 475
|
|
Joined: Jul 2011
Posts: 475 |
What part of Texas are you in? I'm just curious, I have cousins in Helotes and in the Medina lake area. Utopia and Bandera are some favorite spots to hunt.
Give a man a fish, and he will eat for a day. Teach a man to fish and he will sit in a boat and drink beer.
|
|
|
|
|
Joined: May 2011
Posts: 1,752 Likes: 33
|
|
Joined: May 2011
Posts: 1,752 Likes: 33 |
You want to be careful with rocks. If they are truly rocks then its okay but it is gypsum it will make the ground mellow and cause the pond to leak.
|
|
|
|
|
Joined: Oct 2011
Posts: 30
|
|
OP
Joined: Oct 2011
Posts: 30 |
This photo was taken when we first purchased the property. I was standing about where the house is located on the previous picture and am looking to the northeast. It is not real easy to tell as it has grown over, but the area to the right of the road and over to the small pine trees is a trough of sorts where they dug iron ore out. Where I'm standing in this picture is now under about 150 yards of dirt that was scraped out of the two pond areas to build up for our house and shop pad. The southern end, or input of the settling pond is located just to the left of that largest little pine sapling just to the right of the picture center. We are looking downhill here.  Next is a picture of some of the iron ore rock still in the ground. This is located between the two ponds. I am unable to do anything to it with the equipment I own. If I decide to remove it, I would imagine it will take a fair sized excavator to get under it and bust it out. But I kind of like it the way it is and will probably use it as a waterfall for the overflow of the settling pond on its way to the larger fishing pond. 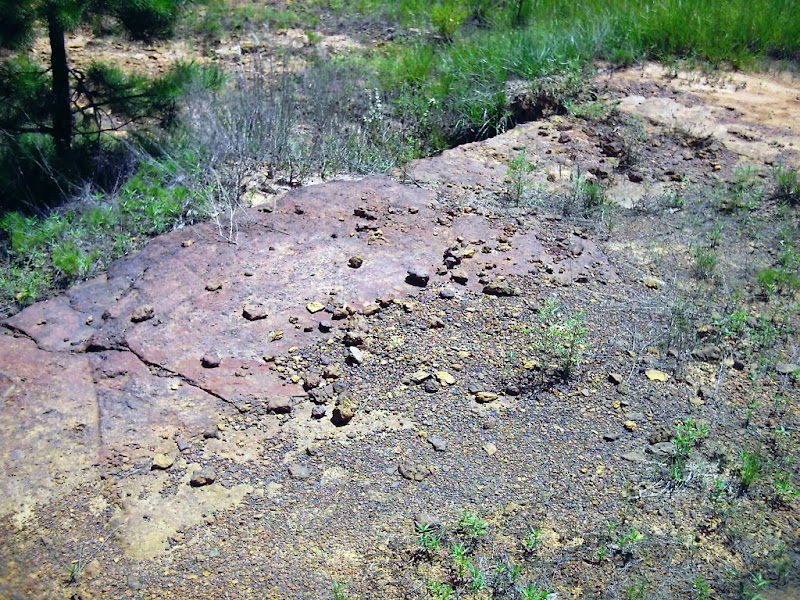 Next is a picture of the little test dam I built in the large pond area to check its watershed. This was shortly after one of the spring rains and the pond actually overflowed the dam enough to erode it. It broke the day after I took this and all the water escaped downhill, but its purpose was served, so it didn't bother me at all. It's hard to tell but that is almost five feet of water next to the dam.  The dirt in this picture is typical of all the pond area for both ponds. It had iron ore dug out down to this clay layer. Some sediment had built up over it and I pulled that off to use for the test dam and to fill some low spots elsewhere on the property. That's one reason the dam burst. I will be using this sediment dirt for the top of the dam later on as it will grow grass very well. The clay is good quality for dam core building. Elsewhere on the property are tons of sand when I need that later. I definitely have all the resources needed for these projects, and for that I am grateful. I shouldn't have to purchase any materials.
Red Rock Rancher
|
|
|
|
|
Joined: Oct 2011
Posts: 30
|
|
OP
Joined: Oct 2011
Posts: 30 |
James, this is in Rusk County, south of Longview, Texas and east of Tyler.
You mentioned one of my favorite areas of Texas. We have been to the Frio River several times and are planning another trip there in a year or two. Utopia is where we go to buy our meat to barbeque after a long day floating the river on tubes. The best steak I have ever eaten came from the little grocery store there in Utopia. I grilled it over mesquite wood I collected on the way back to the cabin from Utopia. I wish I could get beef that good here.
Jludwig, it is definitely iron ore, through and through. There is no gypsum anywhere around here that I know of except about 25 miles east. But everything on this property is iron ore for sure. I have not even seen a rock of another color. I wish I did have other kinds as I plan to build several rock retaining walls and the color change would be more attractive.
Red Rock Rancher
|
|
|
|
|
Joined: Oct 2011
Posts: 30
|
|
OP
Joined: Oct 2011
Posts: 30 |
One more post tonight then it's bedtime for Bonzo. Here are some pictures of the equipment I am using. I will probably have to rent an excavator down the road somewhere, but I'm going to do all I can with what I have first. I am in no hurry to finish these ponds. We probably won't build our house for a year or two, and the ponds don't have to be finished by then. I'm planning to take my time and do it right. So if it takes me a week to gouge out with the dozer what an excavator can do in a day, I will have fun on the dozer for a week.  First is the tractor. It is just a 38 HP utility tractor with four wheel drive and hydrostatic drive. It's so easy to do blade work with compared to two wheel drive, manual shift tractors I have used in the past. This picture is taken where I was dumping a load of iron ore/dirt mixture on my homemade poor man's gravel sifter I built to sift gravel for my driveway. It's slow going, but does the job. Once I get a shop built and a welder purchased, I will probably build one out of metal with a shaker on it. I have to rake the material over the hardware cloth on this one. But I'm a patient man and can always use the exercise. 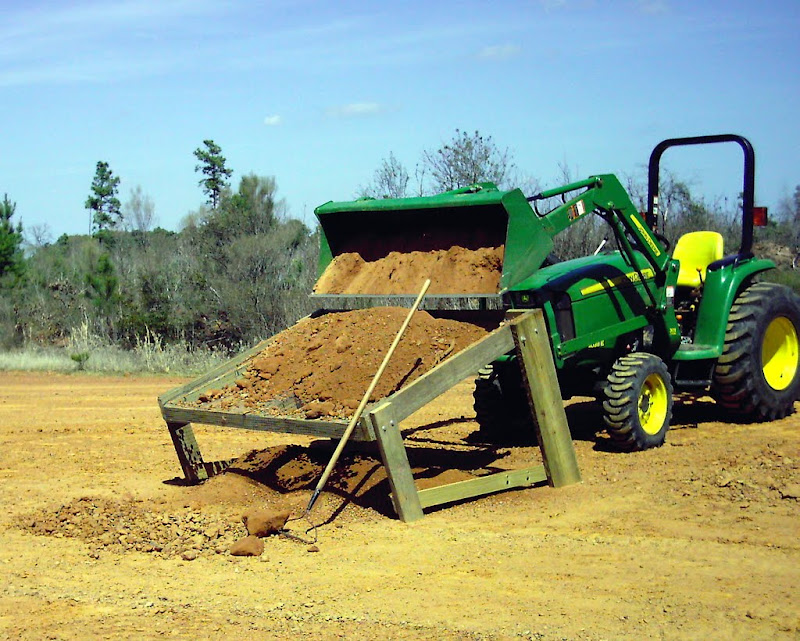 Next is the little Komatsu 40 HP dozer I purchased used. The undercarriage had all been replaced and the engine probably had an overhaul before it was exported from Japan as it doesn't smoke and has plenty of power. The hydraulics don't leak a drop anywhere. I love working on it. I never knew pushing dirt and trees was so much fun.  Here is the 2 yard dirt scraper I bought used. My little tractor is underpowered for it when it comes to scraping the solid clay, but it does an excellent job in a more sandy soil. The scraper also does a great job as a grader with the bucket set in the unload position. The box blade follows the hills and valleys a lot, but the scraper takes off the tops and fills in the holes due to its length. I think it will be very handy when I get to the finishing work on the dams. It's manually operated with a rope on the spring-loaded dump lever. I wouldn't want to use it all day long because of that, but it's fine for a while. 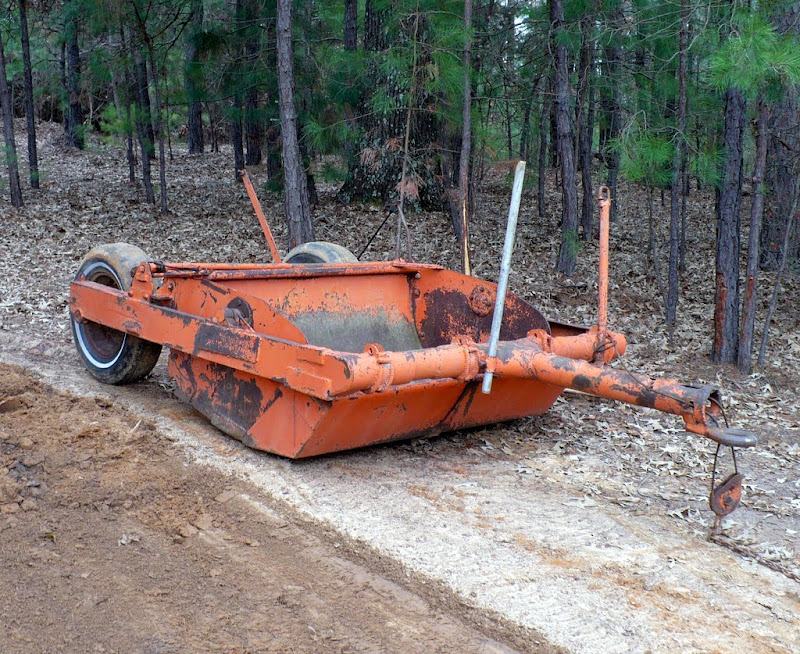 That's all for now. Next time I'll post pictures of the settling pond and bring it up to date as of last weekend. Right now, this old man needs some sleep.
Red Rock Rancher
|
|
|
|
|
Joined: Jan 2006
Posts: 16,055 Likes: 277
Moderator Lunker
|
|
Moderator Lunker
Joined: Jan 2006
Posts: 16,055 Likes: 277 |
Neat toys and it seems like you have your work cut out for you. I have the same JD tractor. Mine is now about 6 years old with only about 300 hours. I almost killed myself before I took it back to the dealer to get liquid put into the back tires.
I'm not familiar with iron ore for pond building. Does it hold water OK?
If I had that Komatsu, I would probably never shut it off.
Another old goat on her, Cisco, is doing just about the same thing you are doing but he is West of the D/FW metroplex.
It's not about the fish. It's about the pond. Take care of the pond and the fish will be fine. PB subscriber since before it was in color.
Without a sense of urgency, Nothing ever gets done.
Boy, if I say "sic em", you'd better look for something to bite. Sam Shelley Rancher and Farmer Muleshoe Texas 1892-1985 RIP
|
|
|
|
|
Joined: Jul 2011
Posts: 475
|
|
Joined: Jul 2011
Posts: 475 |
I was also going to ask Red Rock, do you have fluid in the tires? My dad used a Ford 6610 to pull a 5 yard scraper, and he moved alot of dirt.Fluid in the tires and maybe some weight on the front end. I cant tell from the photo if yours has front weights or not. You probably already know this, but just in case, I dont know if your scraper has replaceable cutting blades to the inlet or not, but having good ones does make a difference.
My cousin has a nice rustic cabin on the Sabinal, just 3 or 4 miles west of Utopia.Amazing what there is to hunt out there. Sika,Axis, Fallow,Audad sheep, Spanish Goats. And some other thing that's huge with long spiralled horns. The name escapes me right now though. I'll have to remember the steaks! Thanks for the heads up!
Give a man a fish, and he will eat for a day. Teach a man to fish and he will sit in a boat and drink beer.
|
|
|
|
|
Joined: Jan 2009
Posts: 28,538 Likes: 844
Moderator Ambassador Field Correspondent  Lunker
|

Moderator Ambassador Field Correspondent Lunker
Joined: Jan 2009
Posts: 28,538 Likes: 844 |
|
|
|
|
|
Joined: Oct 2011
Posts: 30
|
|
OP
Joined: Oct 2011
Posts: 30 |
There is nothing in the tractor tires but air and some Slime. And there are no weights on the tractor either. It's not a big deal that I can't scrape the clay with the scraper as the dozer takes care of that just fine. I can use the scraper to move the clay after it has been gouged out by the dozer. Actually, at the rate I do stuff, the box blade suffices just fine for cleaning up after a session on the dozer.
As for the blade on the scraper, it is fairly sharp, and has two cutting edges so it can be flipped over if needed. I will probabaly remove it when the shop is built and I move my bench grinder there so I can sharpen it on site. It's really old and I doubt I can find parts for it, so I'm just using it for more of a dirt carrier and grader right now.
James, I don't hunt anymore, but for a hunter, the Sabinal/Concan area has to be nice. We have seen lots of game while riding the county roads and while floating down the more secluded parts of the Frio. I had no idea that there was such a variety though.
Dave, my tractor is slightly more than a year old and already has 445 hours on it. When I first got it, I was doing about 10 hours a day. I would come home and my butt would be hurting from sitting so long and my neck would be sore from watching behind so much. I never had a loader to play with before. It's the best replacement for a wheelbarrow ever invented. A real back saver indeed.
Red Rock Rancher
|
|
|
|
|
Joined: Jul 2011
Posts: 475
|
|
Joined: Jul 2011
Posts: 475 |
Esshup, I'm not sure, I need to call my cousin and ask.Animals escape from the exotic hunting farms, and the wonderful thing about Texas game laws, (last I knew anyway) they are all open season since they are not native species. Red Rock, have fun! Alot of times the funnest part is building it! The pursuit is sweeter than the catch! When you "get done" you wont know what to do with yourself.
Give a man a fish, and he will eat for a day. Teach a man to fish and he will sit in a boat and drink beer.
|
|
|
|
|
Joined: Jul 2011
Posts: 475
|
|
Joined: Jul 2011
Posts: 475 |
Esshup.... I forgot about google....duh.... I believe it is by Jove a Kudu.
Give a man a fish, and he will eat for a day. Teach a man to fish and he will sit in a boat and drink beer.
|
|
|
|
|
Joined: Oct 2011
Posts: 30
|
|
OP
Joined: Oct 2011
Posts: 30 |
I forgot to post a picture of some of the rocks I have picked up or pushed from different places where I have cleaned up and prepared for building the ponds. This is one of many piles of them. There are a couple of them in here that I drug with the tractor using a chain and it was struggling all the way. Since I took this picture I have moved one with the dozer and I wasn't sure it was going to be able to shove it up the hill from the pond area to this pile. But it did with a lot of grunting and tread slipping. I would guess it weighs well over a ton.  And one last picture of the settling pond area from when we first took ownership of the property. This is looking uphill from about where the northwest corner of it is. Just to the right of picture center is the pine sapling that is near the inlet to the pond. The two large oaks on the right are just behind and to the right of the house location. This is a panorama made from four pictures.  This next picture is the tractor and 5.5 yard scraper that a friend of mine used to scoop out both pond areas and transfer the dirt to our house pad. This is a 100 HP John Deere four wheel drive. It was amazing to watch it pull that scraper through the clay and fill it up in no time at all. He also has a Cat D6 and a fairly large Komatsu track hoe and builds ponds for a living. He has been a good source of info for me and has made several suggestions on my project. I value his opinions very highly as I have seen some of his work and he definitely knows what he is doing. 
Red Rock Rancher
|
|
|
|
|
Joined: May 2011
Posts: 1,752 Likes: 33
|
|
Joined: May 2011
Posts: 1,752 Likes: 33 |
I see a Garfield scraper in that picture. They are good scrapers and built just up the road from me.
|
|
|
|
|
Joined: Oct 2011
Posts: 30
|
|
OP
Joined: Oct 2011
Posts: 30 |
I won't bore you with pictures of the preparation I did before he brought in the scraper. I basically used the box blade to scrape all the sediment off the area and got down to the clay below. After the first day of scraping and hauling dirt, this is what the settling pond area looked like. It is so hard to see depth and size in pictures, but he already had a decent depression gouged out.  At the end of the second day, our house and shop pad had all the dirt we will need, and the settling pond was scraped out enough to give me a good start. He also took a lot of dirt out of the other pond area, so I will have a good starting point on it when I get to that point. The next two pictures are taken from the same point. I was standing next to the pine sapling at the inlet to the settling pond. The first picture is looking uphill to the house pad and the second is looking downhill into the settling pond area.   As you can see, I will have to build a dam on the right side as well as the far end. But first, a lot more dirt needs to come out. Those pictures are coming next.
Red Rock Rancher
|
|
|
|
|
Joined: May 2011
Posts: 1,752 Likes: 33
|
|
Joined: May 2011
Posts: 1,752 Likes: 33 |
The scraper would have worked for what you were doing. We have used them to strip grass off of soil before.
|
|
|
|
|
Joined: Jan 2009
Posts: 28,538 Likes: 844
Moderator Ambassador Field Correspondent Lunker
|
Moderator Ambassador Field Correspondent Lunker
Joined: Jan 2009
Posts: 28,538 Likes: 844 |
RRR, the liquid in the tires, while expensive (I'd use foam rather than Calcium Chloride) helps keeping it from tipping over when turning with a bucket full of dirt, or while picking up an uneven load with the bucket. Habing the box blade on the back does basically the same thing, but the tires lower the center of gravity even more.
Don't forget to cut in and properly compact a core for your dam!
|
|
|
|
|
Joined: Oct 2011
Posts: 30
|
|
OP
Joined: Oct 2011
Posts: 30 |
First I started on the low side near the pipeline right-of-way with the dozer, digging down and out to prepare for the dam trench.  I kept pushing dirt and started moving toward the center a bit. The piles of dirt were getting in the way and making it hard to push more out of the pit, so I spent a good part of a day shoving the dirt piles out into the field and leveling them out more. This picture is before I did that.  So I kept pushing dirt but as I got to the middle, I realized real quick that there is a pretty large area of solid rock in a continuous slab. My little dozer can't do anything but scrape the top of it. The good thing is that I shot levels on everything and the rock slab should be under at least three feet of water when the pond is full. I haven't decided what I will do yet. I'm thinking I will leave it as it is and perhaps make a small island on top of part of it for geese. This next picture is fairly recent and you can see the piles of dirt on the far side have been pushed out and leveled down to about 18 inches in depth and extend in the field about 30 to 50 feet. There is plenty material when the dam building commences. You can see the high spot in the middle that is the rock slab. I have good solid clay on both sides of it and have some pretty deep holes and trenches. The dirt on the right side is extra dirt. No dam is needed there. I still have to dig out the right edge so it won't slope up so slowly.  The next picture is the most current I have for now. We actually had about an inch of rain last weekend. A good bit of it soaked into the parched ground, but some of it made its way into the pond area and you can see the depths a bit more. I still need more rain so the clay is moist enough to start packing in the dam area. This rain soaked about 4 inches of dirt. Everything under it is still bone dry. It is raining as I speak and has been off and on all day, but not in quantity. I'll take all I can at this point. 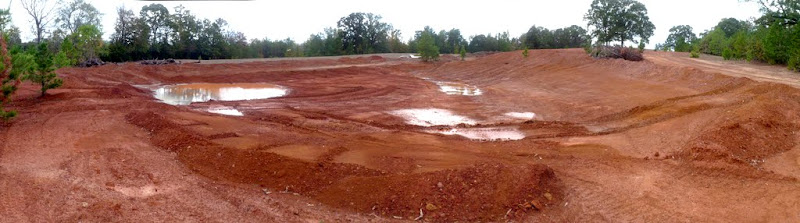 So this is where I stand at this point in time. I'll post more pictures and progress notes as things happen. Can't wait to get back out there and do more. Hope I'm not boring everyone with this. Here is one last picture of my wife and I caught by one of the game cameras as we were cruising the trails in the four-wheeler last March. If you will have a garden next year, you can cut out my picture and use it to keep the crows out of your corn.  
Red Rock Rancher
|
|
|
|
|
Joined: Jan 2009
Posts: 28,538 Likes: 844
Moderator Ambassador Field Correspondent Lunker
|
Moderator Ambassador Field Correspondent Lunker
Joined: Jan 2009
Posts: 28,538 Likes: 844 |
I'm thinking I will leave it as it is and perhaps make a small island on top of part of it for geese. Be careful what you wish for. I believe geese brought some Eurasian Water Milfoil seeds or plant parts to my pond this Spring. I had a few plants that I erased last year, but now I have about 10% of the pond covered with the stuff. I had about 30-50 geese calling the pond home off and on for a few weeks this Spring. The no-vacancy sign is out permanently now.
|
|
|
|
|
Joined: Oct 2011
Posts: 30
|
|
OP
Joined: Oct 2011
Posts: 30 |
esshup, I appreciate the advice. I thought about filling the tires or buying the weights for them back when I first purchased the tractor, but decided not to do so. I don't get in any situations where I can tip sideways, although when I start building the dams I will probably be angled more than I ever have, and may very well opt to do something.
As far as the loader, the box blade is always on the back when I use the loader. I never raise it above the hood when loaded either. So far it has never given me any indication that it wants to tip forward when loaded. But then, I don't do anything fast. I'm almost always in low range and seldom ever get over 1800 RPM on the tach unless I'm mowing. Like I said, I'm in no hurry, and I'm trying to take care of the equipment as much as I can. But any suggestions or advice is well noted. That's one reason I'm here. I listen to anything anyone has to say and appreciate all comments.
Red Rock Rancher
|
|
|
|
|
Joined: Oct 2011
Posts: 30
|
|
OP
Joined: Oct 2011
Posts: 30 |
Wow, that does sound like a problem, esshup. We were only planning to have about three or four farm type geese, but I guess you can't control wild geese if they want to come visiting. Good advice sir. Thanks.
Red Rock Rancher
|
|
|
|
|
Joined: Oct 2011
Posts: 30
|
|
OP
Joined: Oct 2011
Posts: 30 |
While I'm sitting here waiting for the Rangers to win the World Series, I wanted to share something with everyone reading this. Some of you may know about this, but if not, you may be interested. Several months ago, Microsoft released a piece of software that I use quite a bit. It is called ICE,or Image Composite Editor. It is free software you can download here. http://research.microsoft.com/en-us/um/redmond/groups/ivm/ice/It will allow you to make panoramas from two or more pictures. It is extremely easy to use and will not only merge pictures in a horizontal plane, but will also merge multiple planes of pictures to make a panoramic view both horizontally and vertically. You can export the panorama to a jpg image that you can view or edit as desired by any photo editing software you prefer. But, there is something even better about it. It works in conjunction with a web site that Microsoft created called PhotoSynth. If you like, you can publish your panorama to the PhotoSynth web site where it can be viewed in a 3D type viewer. So if you stand in one spot and take overlapping photos as you keep the camera level, and rotate all the way around, you can create a 360 degree panorama in ICE and publish it to PhotoSynth. Then in PhotoSynth you can pan around and see essentially what it would look like if you were standing there where you took the pictures. These published panos can be shared to the world or to only those to whom you want to give access. If you are interested in this, and don't mind downloading the software for PhotoSynth, here are the links to a couple of panos I took. The first is the last pano I took right after the rain last weekend. It shows the settling pond to the right and if you pan to the far left you will see the repaired test dam in the fishing pond area. Here is the link. http://photosynth.net/view.aspx?cid=ed07...0:0&t=False When clicked, it will take you to the website and ask you if you want to load the PhotoSynth software. It is a fairly small download. Once done, and you see the pano, zoom in so that the picture fills the viewing area before panning. It will look more realistic that way. The second is a two level pano that is overlapped horizontally and vertically. It is the Palo Pinto Lake dam west of Ft. Woth, Texas. Make sure you zoom in a lot to get the real effect. Here is the link. http://photosynth.net/view.aspx?cid=2921...0:0&t=FalseI thought these might be helpful to some of you when trying to explain problems or how you did something, etc. It's pretty awesome software, and totally free.
Red Rock Rancher
|
|
|
|
|
Joined: Jan 2009
Posts: 28,538 Likes: 844
Moderator Ambassador Field Correspondent Lunker
|
Moderator Ambassador Field Correspondent Lunker
Joined: Jan 2009
Posts: 28,538 Likes: 844 |
RRR, the weights in the wheels (and filled tires) aren't so much for keeping it from tipping forward, its from tipping sideways when turning with a load in the bucket, or in my balancing act, picking up a motor with a chain around the bucket and having it slip to one side. It got set down rather quickly.........
|
|
|
|
|
Joined: Jan 2006
Posts: 16,055 Likes: 277
Moderator Lunker
|
|
Moderator Lunker
Joined: Jan 2006
Posts: 16,055 Likes: 277 |
I have learned that a tractor without a loader is half a tractor. A loader without 4wd is a waste of money and not even half a tractor. A tractor with a loader and no weight in or on the rear tires is a widow maker. Even with the filled tires, I've sweated bullets on some of the positions that I've gotten myself into. I guess it would be Ok if I always stayed on level surfaces and didn't use it for what I need to get done but....
When I first got my tractor with loader, I tried to pick up big rocks. That was a real character builder and took a while to learn.
It's not about the fish. It's about the pond. Take care of the pond and the fish will be fine. PB subscriber since before it was in color.
Without a sense of urgency, Nothing ever gets done.
Boy, if I say "sic em", you'd better look for something to bite. Sam Shelley Rancher and Farmer Muleshoe Texas 1892-1985 RIP
|
|
|
|
|
Joined: Oct 2011
Posts: 30
|
|
OP
Joined: Oct 2011
Posts: 30 |
Well, I did a little research on filling tires, and went by the John Deere dealership to ask them what they thought. The dealer didn't suggest doing it with water or antifreeze and water because of the rusting of the rim that would occur, but he said he knows a lot of his customers who have. I also found this article on the web http://www.orangetractortalks.com/2009/01/comparing-types-of-liquid-tire-ballast/ that talks about it, and I have decided I am definitely not going to do it. If I decide I need more weight, I will spring for wheel weights instead. So far I have not been sideways on any slope where I was concerned at all with tipping, and I definitely don't do that with a load in the loader. And I have picked up a couple of things with the loader and a chain, but I attach it to both ends of the loader so it won't shift. All that said, I appreciate everyone's comments about the safety factor of added weight in the tires. I am not a risk taker at all and will go out of my way to prevent myself from getting in an unsafe predicament. When I get to the dam building stage, and start grading it with the tractor, I will then determine if I want to add wheel weights or not. I missed answering one question earlier about water holding properties of iron ore. As dense as it is, I can't see how water could get through it, unless there was a crack. I really don't have a situation where I can test it at this time. I have wondered about the large slab of rock in the pond area and if it would leak around it. I'm not sure how I could tell unless maybe I was there when it first got submerged and see if there are any air bubbles rising from the area. It may be a moot point if the solar powered water pump works as advertised. I should be supplying about 3 to 8 gallons per minute depending on the sun and clouds.
Red Rock Rancher
|
|
|
|
|
Joined: Jan 2009
Posts: 28,538 Likes: 844
Moderator Ambassador Field Correspondent Lunker
|
Moderator Ambassador Field Correspondent Lunker
Joined: Jan 2009
Posts: 28,538 Likes: 844 |
RRR, there's a few tire shops around there that use a dense foam to fill the tires. It adds the same amount of weight to the tires as antifreeze or the water, but doesn't rust the rims and they still can dismount the tires if needed.
|
|
|
|
|
Joined: Jun 2008
Posts: 6,980 Likes: 15
Ambassador Lunker
|
|
Ambassador Lunker
Joined: Jun 2008
Posts: 6,980 Likes: 15 |
I've pumped many a gallon of RV antifreeze (propylene glycol based) into tractor tires. It's non toxic, it actually helps keep the rubber fresh, as in not drying out, it won't rust the rims, it's non-flammable, and if you catch it on sale it's cheaper than automotive antifreeze.
If I had my druthers, I would choose liquid ballast over bolt on weights most any day. With the liquid, the tractor itself is not actually supporting the weight, which equates to less wear and tear in the long run.
|
|
|
|
|
Joined: Jan 2009
Posts: 28,538 Likes: 844
Moderator Ambassador Field Correspondent Lunker
|
Moderator Ambassador Field Correspondent Lunker
Joined: Jan 2009
Posts: 28,538 Likes: 844 |
If I had my druthers, I would choose liquid ballast over bolt on weights most any day. With the liquid, the tractor itself is not actually supporting the weight, which equates to less wear and tear in the long run. I never thought about that, but it sure does make sense now!
|
|
|
|
|
Joined: Oct 2011
Posts: 30
|
|
OP
Joined: Oct 2011
Posts: 30 |
Got a question. I know I'm supposed to build a trench for the dam core. The majority of the pond was already excavated before I really started and the left edge is too close to the pipeline right-of-way for me to build a trench any further away from the pond than right on the edge. I'm thinking I only need to dig out the sand back to the width of a traditional core trench, then pack that back with clay and continue building up to the height needed to contain the water. This makes the core actually have a notch that is below the existing terrain, as a core trench does, but it won't be a ditch, so to speak. Please see the two drawings below for a cross-section view of the pond in the area of which I am speaking and tell me if you think I am wrong in my thinking. FYI, the right side of the pond shown on the cross-section here is actually higher than the left side and is solid clay. It requires no dam on that side. the pond is on a hill that slopes toward the dam but also slopes across the pond too.  
Red Rock Rancher
|
|
|
|
|
Joined: Jan 2006
Posts: 16,055 Likes: 277
Moderator Lunker
|
|
Moderator Lunker
Joined: Jan 2006
Posts: 16,055 Likes: 277 |
You are on the right track.
It's not about the fish. It's about the pond. Take care of the pond and the fish will be fine. PB subscriber since before it was in color.
Without a sense of urgency, Nothing ever gets done.
Boy, if I say "sic em", you'd better look for something to bite. Sam Shelley Rancher and Farmer Muleshoe Texas 1892-1985 RIP
|
|
|
|
|
Joined: Jan 2009
Posts: 28,538 Likes: 844
Moderator Ambassador Field Correspondent Lunker
|
Moderator Ambassador Field Correspondent Lunker
Joined: Jan 2009
Posts: 28,538 Likes: 844 |
I agree with what Dave said. excavate as much sand as your property allows, and make sure to knit the clay fill well with the the existing clay.
|
|
|
|
|
Joined: Oct 2011
Posts: 30
|
|
OP
Joined: Oct 2011
Posts: 30 |
Thank you for the quick answers. I started working on this last weekend and have the sand removed and the first 6 inches of clay in place and packed. We got a decent rain yesterday so I should be able to do some more packing this weekend since my clay material should be moist enough. I appreciate your help.
Red Rock Rancher
|
|
|
|
|
Joined: Oct 2011
Posts: 30
|
|
OP
Joined: Oct 2011
Posts: 30 |
Well, almost a year later now, I decided to update this topic and show the latest pictures. I have been piddling with this pond off and on, while doing other things that are more urgent, but enjoying every minute of it. I didn't take any shots of the coring I did on the low side of the pond where I had to remove sandy soil and pack clay in its place, but it went pretty quick. I used the dozer to push all the sandy soil out and into a pile, then used the tractor and box blade to layer in and pack the clay in its place. The weather cooperated nicely and wet the clay soil almost perfectly for packing. After that was done, I went to work on the overflow/drain pipe and main part of the dam. I had no option on the main part of the dam but to clean down to the iron ore slab that was right where I didn't want it to be, then pack clay on it as well as I could. The drain/overflow pipe had to lay right on top of the iron ore slab to get it as low as possible, but I used a pickaxe and gouged out a slot in which to form up and pour a concrete baffle to stop any seepage around the pipe. I went with 4 inch schedule 40 PVC pipe as this is a rather small pond which will have a large spillway. I plan to use the overflow pipe to feed water to the next pond farther downhill, and I will be pumping water into this pond from a 1-1/4 inch water pipe. So that should suffice. Below are pictures of building the baffle. 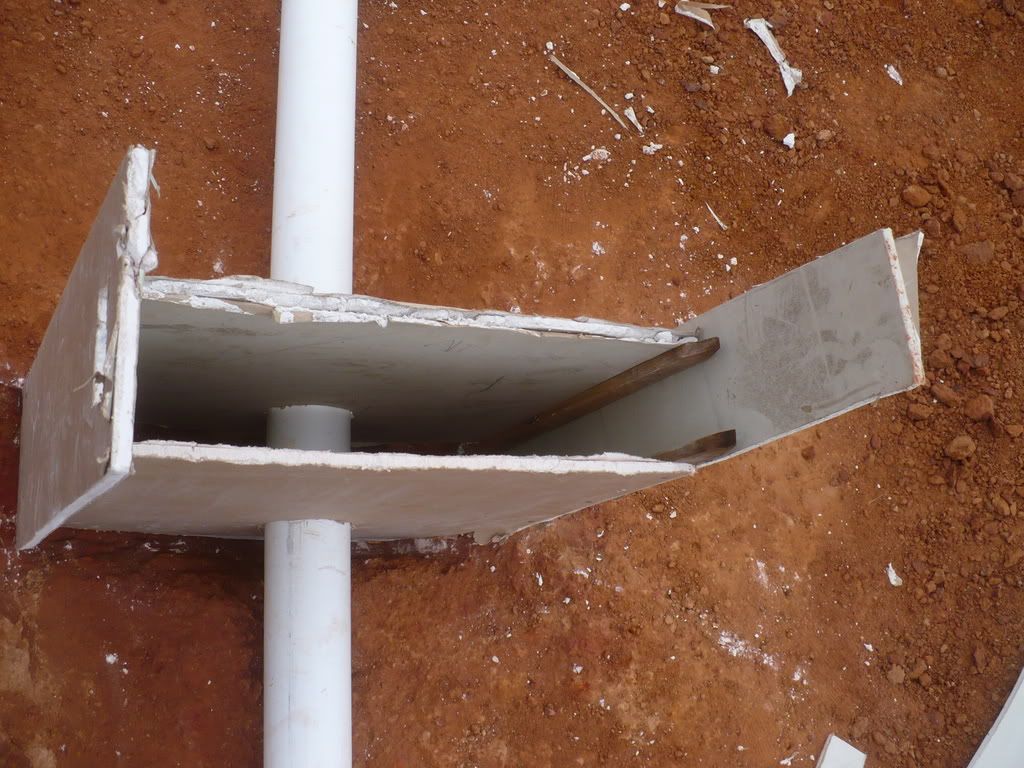 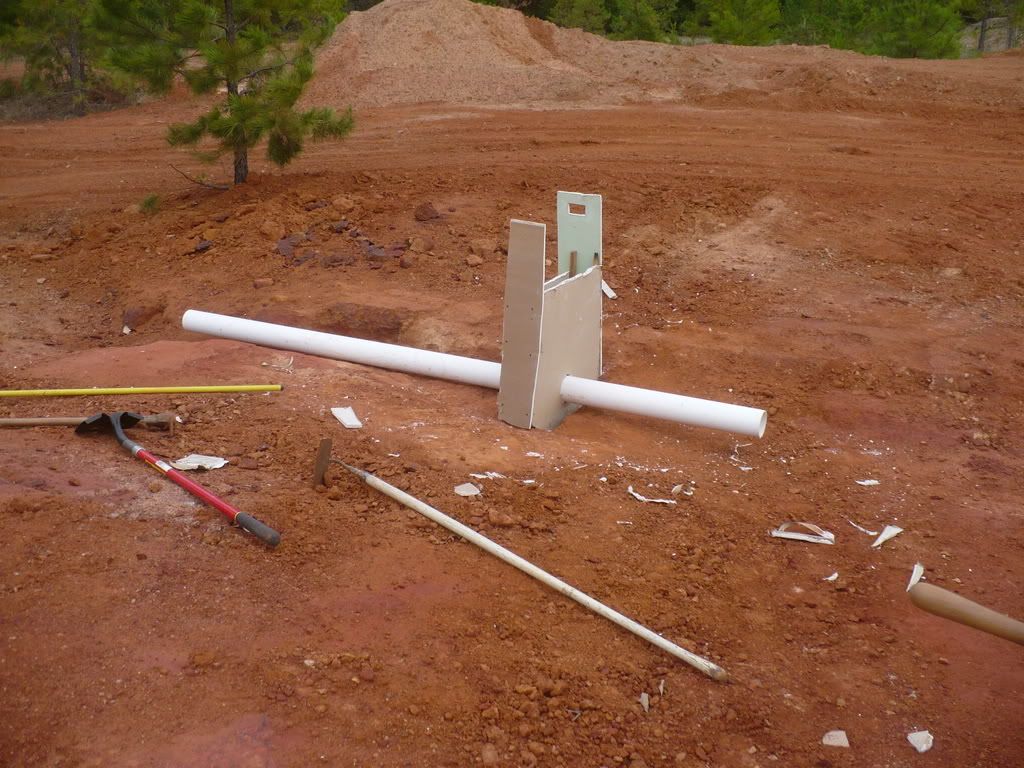 After I poured the concrete into the form and left, it rained a couple of days later and mud built up around it. I removed the form and it looked like this. 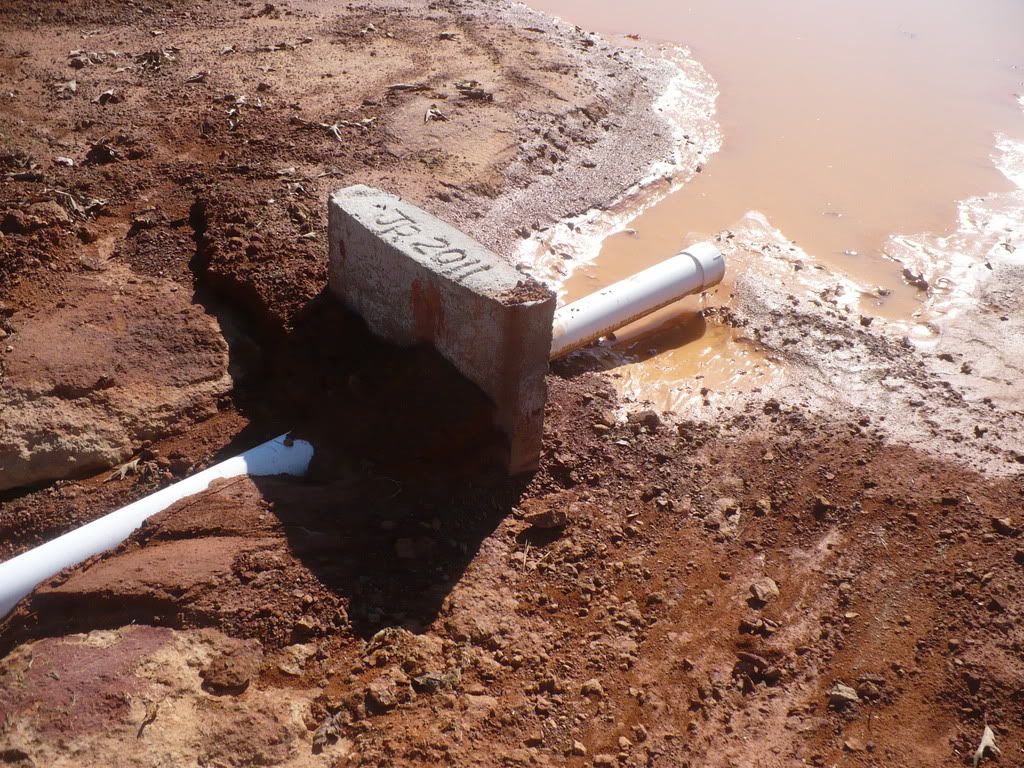 I cleaned up all the mud and then brought in a loader full of the best clay I had and I hand packed and tamped it all around the baffle and pipe until it was high enough to start packing it with the tractor tires. I slowly and carefully packed the clay around the baffle and made sure it was well compacted. I kept building it up layer by layer until it looked like this and the baffle was completely covered with clay.  In the following weeks, I added an extension to the pipe and kept adding clay and packing it with the tractor and box blade. More pictures to come in the next posts.
Last edited by Red Rock Rancher; 09/10/12 11:33 PM.
Red Rock Rancher
|
|
|
|
|
Joined: Oct 2011
Posts: 30
|
|
OP
Joined: Oct 2011
Posts: 30 |
I added the overflow vertical and drain pipe with cap and kept packing dirt on the dam. 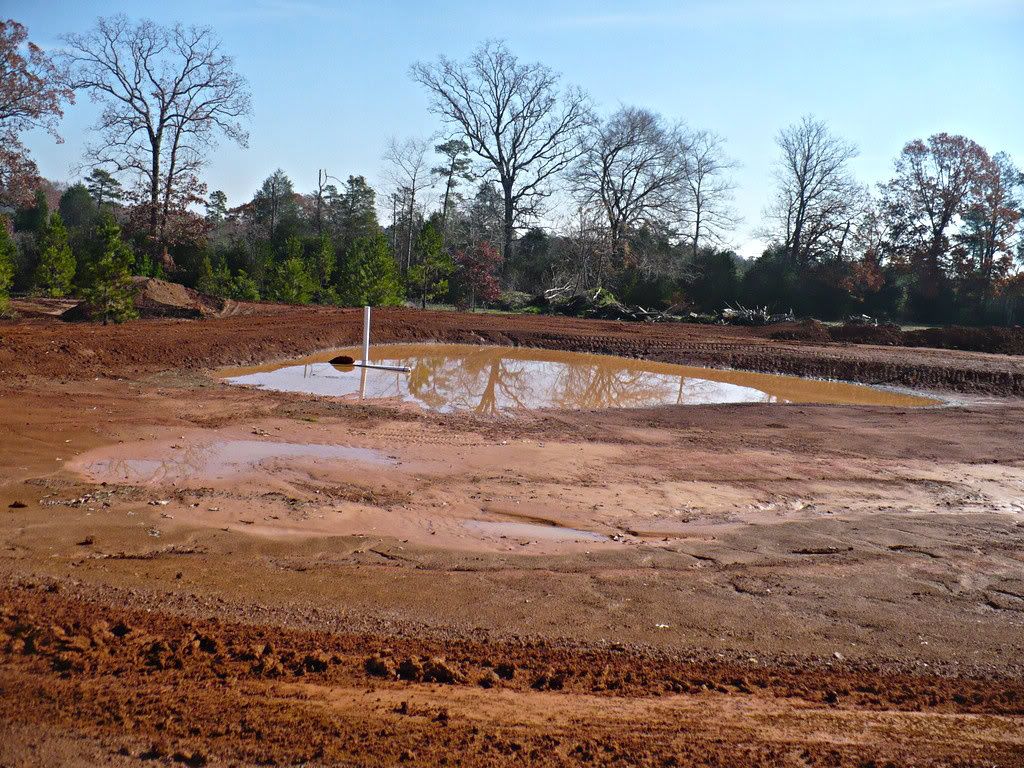 We had some rain and it partially filled up the pond, but not high enough to go over the partially finished dam. 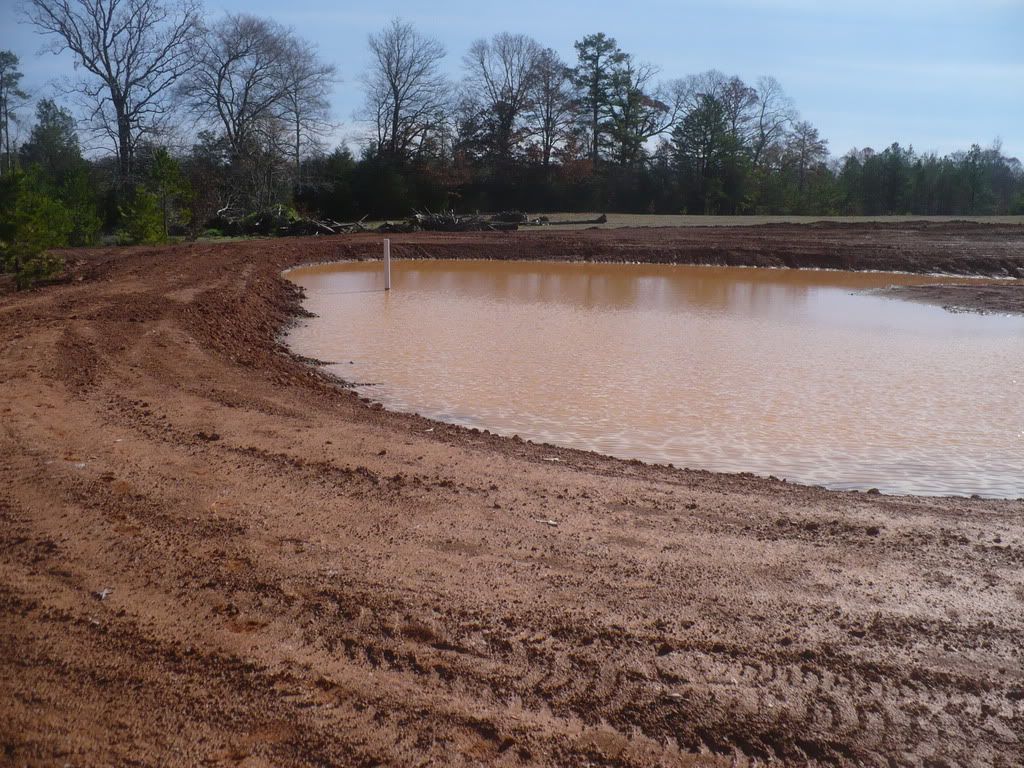 Here is another view showing more of the back side of the dam. 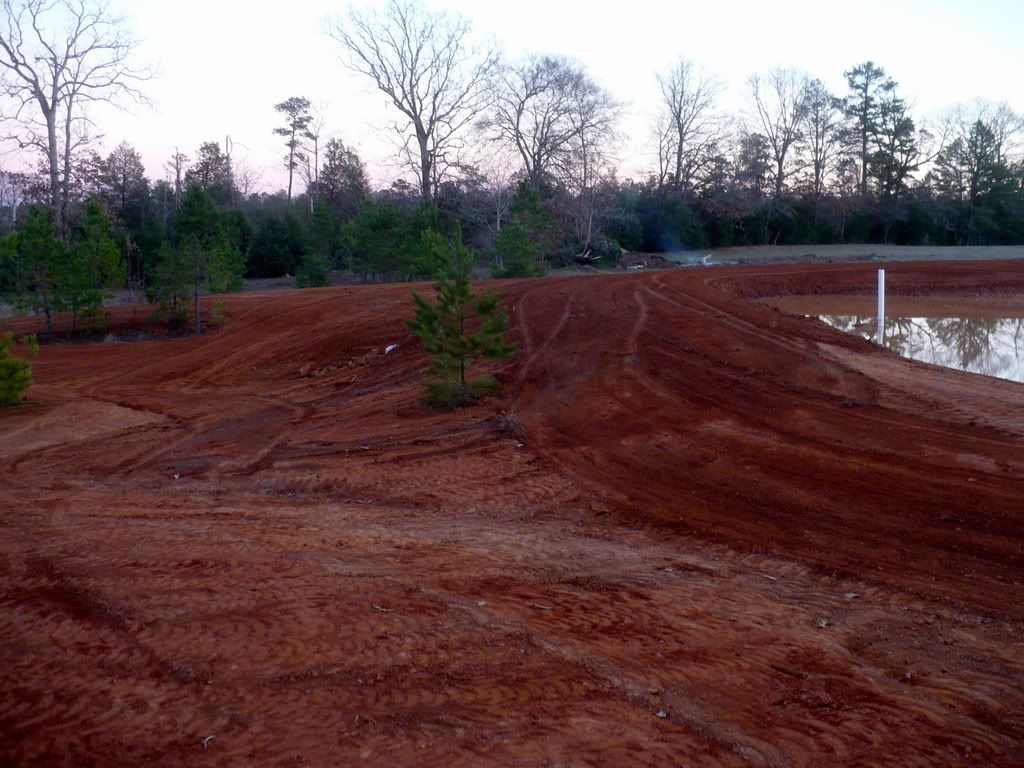 I kept at it, weekend after weekend, slowly building up the dam, one box blade full of dirt at a time. I also scraped out a lot more dirt with the dozer to pile on the dam. It was slow going, but fun for me. And there is still a couple of feet more dirt to add to get it well above the overflow pipe. I also still have to build the spillway. More to come.
Red Rock Rancher
|
|
|
|
|
Joined: Oct 2011
Posts: 30
|
|
OP
Joined: Oct 2011
Posts: 30 |
In the early spring, I got a neighbor that moved into the house next to our property. He was a heavy equipment operator and now supervises. We hit it off really well and have many common interests. He got a fairly large trackhoe to do some work around his place and start building his own pond. One day he asked if he could do anything to help me out while he had the trackhoe. I told him I would really like to deepen the pond a bit but the rock layer was too tough for my dozer. He said he would be glad to rip some of it out for me, so he brought it to the pond and started in on it. He dug all around where the island is, and busted out a good bit of the iron ore, but the trackhoe was even having a time of it, so I told him it was good enough. I now have a deep channel in the middle and all around the island, thanks to him. I offered to pay for his time and fuel, but he said I can do him a favor sometime instead. What a great neighbor. I will make sure he is amply compensated. Below are a couple of pictures, one of the trackhoe at work on the rocks and one of the channel he dug. 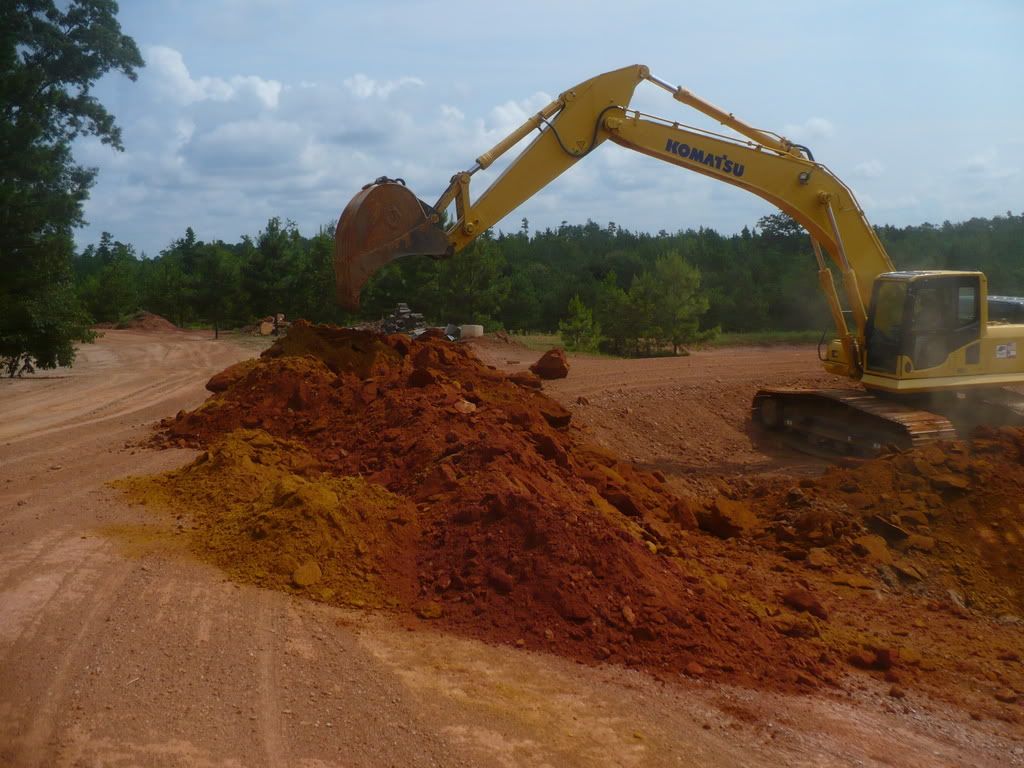 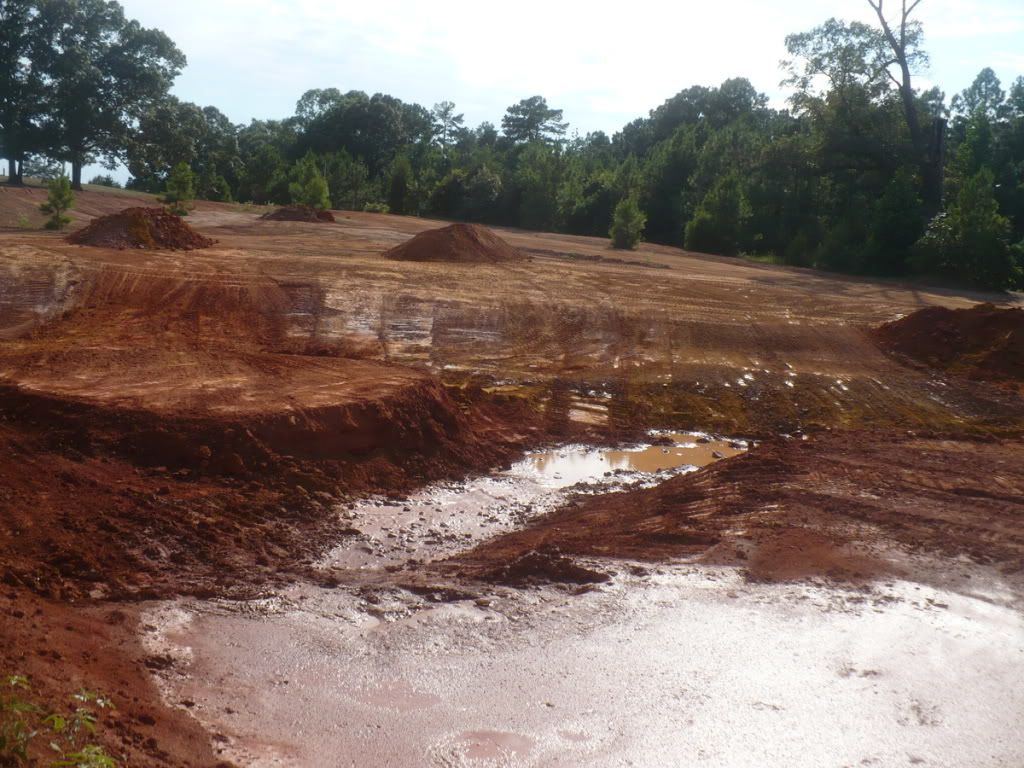
Red Rock Rancher
|
|
|
|
|
Joined: Oct 2011
Posts: 30
|
|
OP
Joined: Oct 2011
Posts: 30 |
In August, we had the water well drilled and electricity run to our temporary power pole. I now have a very nice well with 60 feet of aquifer depth, bottoming out at about 450 feet, and a 3 horsepower submersible pump. They told me I have enough water to run the pump continuously and never run dry. I had initially planned to have a solar powered pump in a second, more shallow well to supply the pond, but the water well folks talked me out of it. They assured me I would not have a lot of luck with the shallow well as it would have tons of iron in it and that would not be good for the submersible pump. They assured me I could run the pump in the house well for a very reasonable amount of money. So I took their advice. A couple of weekends ago, I bought 300 feet of 1-1/4 inch PVC pipe and ran it from the pump to the pond temporarily, on top of the ground. It will be in a ditch later on when I start doing the ditching for the water lines to the house and shop. I turned on the water, took a picture of the pond, and read the electric meter. Here is the way it looked when I started pumping water. 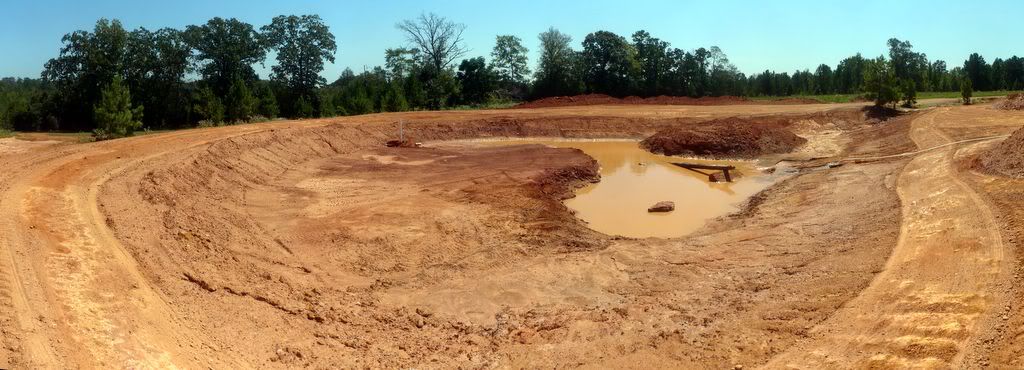 I came back 27 hours later, and about $11.00 worth of electricity later and it looked like this. 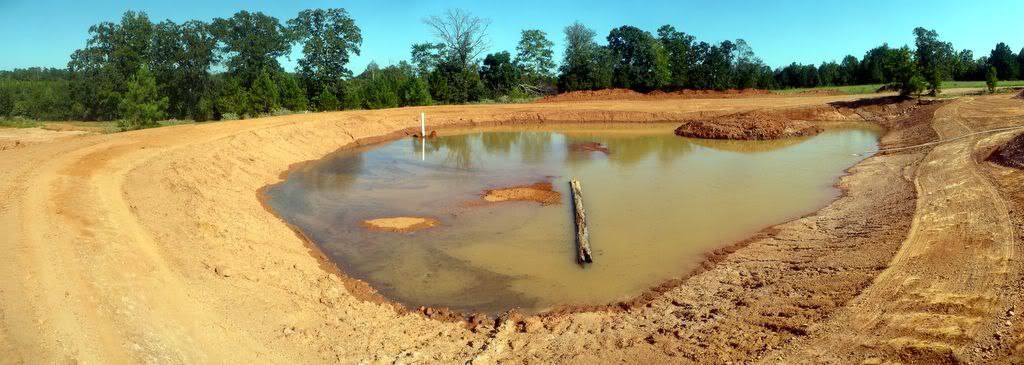 I came back again 21 hours later and turned off the pump and checked the meter again. After approximately $21.00 of electricty altogether, it was up to this level. 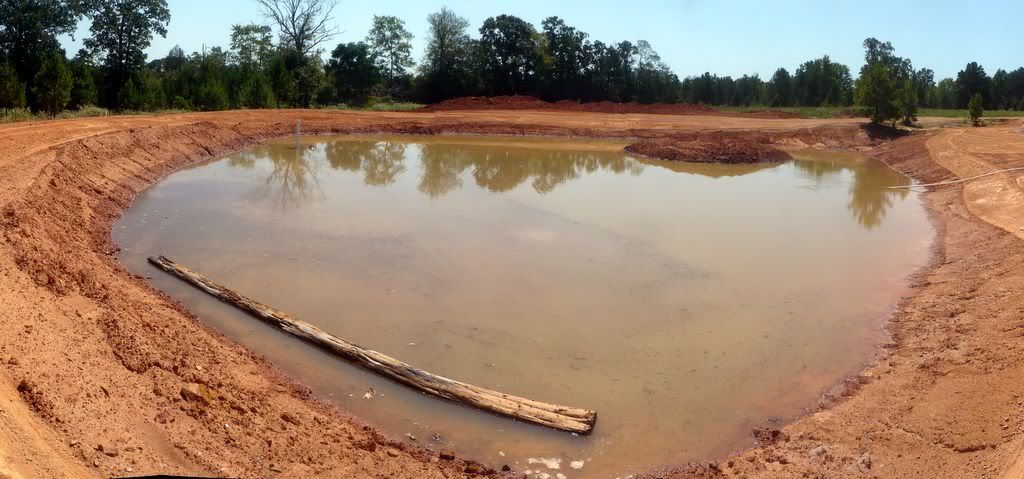 That is where I stand today. I won't be pumping much more in it until I get the dam and spillway finished. I wanted to see how much it will cost to keep it full during drought conditions. If I can pump that much water in it for that little money, it will be kept full all summer with no problem. I spend that much for diesel fuel every weekend. We are about to have our shop built, then a house will hopefully follow around the first of the year, so my pond building fun will be curtailed for a while. I should be able to finish the dam and spillway in the next few weekends though before it gets too busy. It will be nice when I am done scraping dirt and it can green out and not be a big mudhole anymore. I'm going to plant some grass seeds as soon as possible to try to keep the erosion down and help clean up the water running into it during a rain. It will take time, but I can wait. I'll post more as it happens.
Red Rock Rancher
|
|
|
|
|
Joined: Jan 2012
Posts: 904 Likes: 1
|
|
Joined: Jan 2012
Posts: 904 Likes: 1 |
Looks like a great project and sounds as if you've had a good time doing it.
Dale ![[Linked Image from i90.photobucket.com]](http://i90.photobucket.com/albums/k247/jmilczski/Fish/PBSubscribe.gif) "When tempted to fight fire with fire, remember that the Fire Department usually uses water." - anonymous
|
|
|
|
|
Joined: Oct 2011
Posts: 30
|
|
OP
Joined: Oct 2011
Posts: 30 |
Quick question...I have three old tractor tires that were in a pile on the property when we bought it. Is it ok to put one or more in a pond for structure?
Red Rock Rancher
|
|
|
|
|
Joined: Jan 2006
Posts: 16,055 Likes: 277
Moderator Lunker
|
|
Moderator Lunker
Joined: Jan 2006
Posts: 16,055 Likes: 277 |
No problem on the old tires.
It's not about the fish. It's about the pond. Take care of the pond and the fish will be fine. PB subscriber since before it was in color.
Without a sense of urgency, Nothing ever gets done.
Boy, if I say "sic em", you'd better look for something to bite. Sam Shelley Rancher and Farmer Muleshoe Texas 1892-1985 RIP
|
|
|
|
|
Joined: Nov 2006
Posts: 236
Fingerling
|
|
Fingerling
Joined: Nov 2006
Posts: 236 |
I just stumbled accross this thread and I am REALLY enjoying it! I love your do-it-yourself approach! I bet you will get more satisfaction out of that pond knowing that you built it yourself!
|
|
|
|
|
Joined: Oct 2011
Posts: 30
|
|
OP
Joined: Oct 2011
Posts: 30 |
Thanks Dave. I appreciate the info. I wasn't sure if tires would be bad for the water some way.
And thanks RockvilleMDAngler. I do get a lot of satisfaction from doing my own thing. It takes longer than hiring it out, but when you get done, you can look at it and feel proud that you did it yourself. I kind of hated having my neighbor use the trackhoe to dig out the channel in the middle, but my little dozer just couldn't break into the rock shelf.
Once I get moved out there and get all settled into the new house and shop, I will be starting on the new pond that should be about three or four times the size of this little one. Then I can start growing some fish for the enjoyment of catching later on. Hurry up retirement. :-)
Red Rock Rancher
|
|
|
|
|
Joined: Mar 2005
Posts: 21,499 Likes: 267
Moderator Hall of Fame 2014 Lunker
|
Moderator Hall of Fame 2014 Lunker
Joined: Mar 2005
Posts: 21,499 Likes: 267 |
Nice job and report. Thanks for the write up and pics.
What is next on the journey?
Neighbors with equipment would be a good addition to our area.
|
|
|
|
|
Joined: Sep 2012
Posts: 721
|
|
Joined: Sep 2012
Posts: 721 |
Congrats RRR, I enjoy this thread very much and I can relate to alot doing the work and research yourself. I do alot of my own work also and have been involved in everything done on my property. I believe you will enjoy the gratification of being able to look at what you have accomplished. BTW as far as building a house I was my own contractor 3 years ago building my house and it saved me about 61K. Attached is a Pic of the house and one of the ponds I built. house pic
Last edited by Tums; 10/18/12 03:18 PM.
|
|
|
|
|
Joined: Jan 2009
Posts: 28,538 Likes: 844
Moderator Ambassador Field Correspondent Lunker
|
Moderator Ambassador Field Correspondent Lunker
Joined: Jan 2009
Posts: 28,538 Likes: 844 |
Tums: Nice! What's that white stuff???? Don't they roll up the streets and sidewalks when that stuff shows up? 
|
|
|
|
|
Joined: Oct 2011
Posts: 30
|
|
OP
Joined: Oct 2011
Posts: 30 |
ewest, thanks sir. Next on the list is to finish this first pond. It still needs about a foot and a half of dirt on the dam, and then the emergency spillway. I have been so busy preparing the pad and other things to have the shop built that I haven't been able to spend much time on the pond. I have about three feet of dam left before the water tops it, and I'm not expecting that much rain to come all at once. If it does, I'll just have to live with the consequences.
Thanks Turns. That is a beautiful home and pond you built. I thought about doing some of my house too, but I got burned out remodeling one house from a shell to completely finished, and remodeling a bath and kitchen in our current home. I still work a 40 hour week too, so I would have to take a hiatus for a while to be able to get anything accomplished.
We are having a metal home built. It is a kit from a company in Little Rock called Kodiak Steel Homes. It is made of red iron beams and posts with metal studs and joists and rafters. It will have metal siding and roof, so the only wood in it will be our furniture and cabinetry. The price is very reasonable.
The roof and walls are wrapped completely in radiant barrier, with 6 inch insulated outside walls and 6 inch attic insulation, which makes it extremely energy efficient. The guy building our metal shop is a friend and he will do the steel erection on the home. Then we have a general contractor that will finish it from there. Can't wait for the day when I can sit on the front porch with a beer and look down at the pond and watch the deer come up for a drink.
Red Rock Rancher
|
|
|
|
|
Joined: Sep 2012
Posts: 721
|
|
Joined: Sep 2012
Posts: 721 |
Thanks Esshup. We do pretty much shut down, except for the 4X4 mud slingin crew that wants to try that new white slick stuff. LOL
Good deal RRR. I am sure you will like the energy efficency. I went the energy efficent way indoing my home, figuring the price of energy is only going in one direction (up). It is nice having a 2100 sqft living space (3000 overall) home and my last 13 month average monthly electric bill is $148.97 for the house. Again Congrats and I look forward to seeing future picture of you enjoying yours.
Last edited by Tums; 10/22/12 01:47 PM.
|
|
|
Moderated by Bill Cody, Bruce Condello, catmandoo, Chris Steelman, Dave Davidson1, esshup, ewest, FireIsHot, Omaha, Sunil, teehjaeh57 |
|


.gif)