|
Forums36
Topics40,946
Posts557,796
Members18,484
| |
Most Online3,612
Jan 10th, 2023
|
|
|
12 members (Sunil, Justin W, Knobber, FireIsHot, John Folchetti, catscratch, Boondoggle, esshup, shores41, LeighAnn, canyoncreek, Drago),
1,006
guests, and
205
robots. |
|
Key:
Admin,
Global Mod,
Mod
|
|
|
|
Joined: Mar 2005
Posts: 21,490 Likes: 265
Moderator Hall of Fame 2014  Lunker
|

Moderator Hall of Fame 2014 Lunker
Joined: Mar 2005
Posts: 21,490 Likes: 265 |
"4 vent stacks penetrating our new metal roof"
Ugghhhh ! Not a good thing to come home to.
|
|
|
|
|
Joined: Mar 2004
Posts: 1,721
Lunker
|
|
Lunker
Joined: Mar 2004
Posts: 1,721 |
Hey guys just finished the barn. It is not nearly as complicated as yours but I wanted to show you the insulation. It is the blown in type that goes into the walls behind a fabric.
|
|
|
|
|
Joined: Oct 2005
Posts: 6,934 Likes: 2
Ambassador
Field Correspondent Lunker
|
|
OP
Ambassador
Field Correspondent Lunker
Joined: Oct 2005
Posts: 6,934 Likes: 2 |
Hey guys just finished the barn. It is not nearly as complicated as yours but I wanted to show you the insulation. It is the blown in type that goes into the walls behind a fabric. definitely interested; bring it
|
|
|
|
|
Joined: Jul 2009
Posts: 4,318 Likes: 6
Ambassador Lunker
|
|
Ambassador Lunker
Joined: Jul 2009
Posts: 4,318 Likes: 6 |
Bski,
Your the man dude!! Awesome place! You have put a LOT of time in that building. I hope mine can look half as good as yours when I am done. Amazing job man!!
The only difference between a rut and a Grave is the depth. So get up get out of that rut and get moving!! Time to work!!
|
|
|
|
|
Joined: Jan 2005
Posts: 1,239
Lunker
|
|
Lunker
Joined: Jan 2005
Posts: 1,239 |
Hey guys just finished the barn. It is not nearly as complicated as yours but I wanted to show you the insulation. It is the blown in type that goes into the walls behind a fabric. Ditto that. We just had the new house done with the same product. It would appear to be far superior to the traditional bats. The fiberglass is real compact and tight between the wall studs zero air gaps. Hard solid spray foam is better but very pricey.
 The road goes on forever and the party nevers end...............................................
|
|
|
|
|
Joined: Oct 2005
Posts: 6,934 Likes: 2
Ambassador
Field Correspondent Lunker
|
|
OP
Ambassador
Field Correspondent Lunker
Joined: Oct 2005
Posts: 6,934 Likes: 2 |
Can it be done DIY? Do you guys have any websites that refer to the product and/or contractors that you actually used?
I am familiar with the procedure; been around for a long time, but want to see the most recent advancements in product and installation.
|
|
|
|
|
Joined: Jan 2005
Posts: 1,239
Lunker
|
|
Lunker
Joined: Jan 2005
Posts: 1,239 |
Brett here is a link to what they installed in our house. As you will see it totally fills in the space. They stapled a cheese cloth type material on first and then poke a small hole in it to apply the insulation. Not sure it is DIY but might be worth considering. http://insulation.owenscorning.com/homeowners/insulation-products/propink-loosefill.aspx
The road goes on forever and the party nevers end...............................................
|
|
|
|
|
Joined: Oct 2005
Posts: 6,934 Likes: 2
Ambassador
Field Correspondent Lunker
|
|
OP
Ambassador
Field Correspondent Lunker
Joined: Oct 2005
Posts: 6,934 Likes: 2 |
Thanx RockyT
I saw that stuff at Homey today during my daily "lunchtime home center exploration" routine. I also googled the recurring theme of applying "Insulweb", the mesh medium applied to the face of the studs to create the cavity. I like the firm pack and how it seems to fill in most all odd spaces (ie; behind device boxes), but I wasn't impressed by the seemingly similar R value (or sometimes lesser R value) as compared to regular fiberglas batts or rolls. Of course, as we all know, the R rating is based on proper installation at optimum conditions. I gotta check a little bit further on this one. I think we all agree, tho, that closed cell (or even open cell) spray foam is still the king...and priced like the queen.
|
|
|
|
|
Joined: Oct 2005
Posts: 6,934 Likes: 2
Ambassador
Field Correspondent Lunker
|
|
OP
Ambassador
Field Correspondent Lunker
Joined: Oct 2005
Posts: 6,934 Likes: 2 |
This last weekend was a mixed bag o' tricks. We worked on a variety of smaller, misc projects...mostly outside stuff. The biggest player that has my attention right now is handling rain run-off around the gar/apt foundation. Installing the gutters last fall was a huge improvement, but we are still getting splashing from the driven rain hitting the soil. I don't want to continually subject the bottom rows of the new siding to this splashing exposure, so we are incorporating gutter flow control with foundation perimeter control. We started with the uphill side of the structure and cut a trench for the entire 44' length, using the laser to maintain a gentle slope. 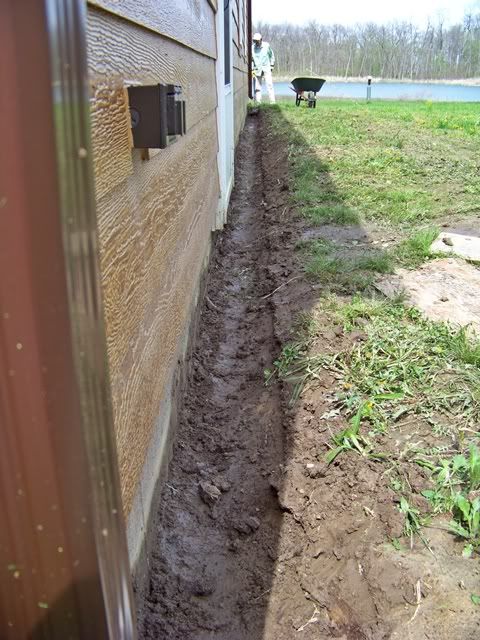 - A heavy guage landscape fabric is laid in, along with perforated 4" drain line. The holes in the perf pipe are set to each side so the bottom of the pipe will be a gutter. 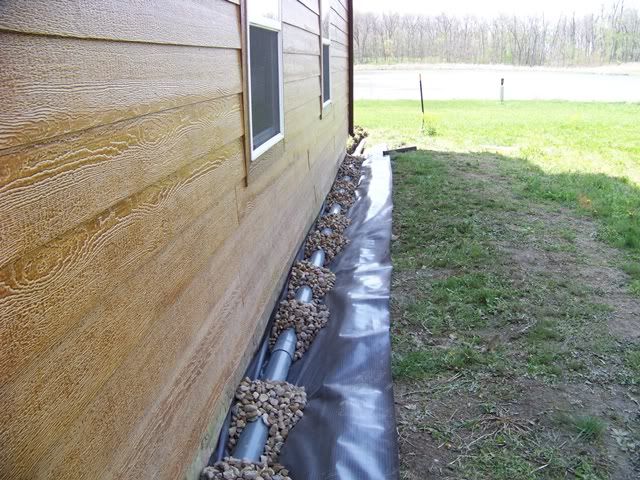 - The gutter at the corner where the soil main exits is a bit awkward, but we manage 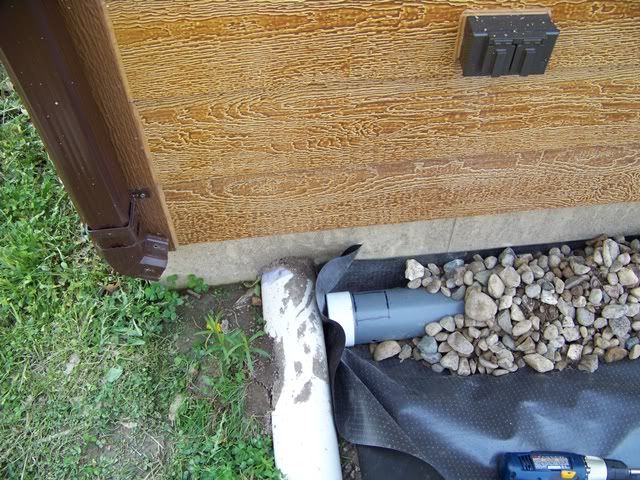 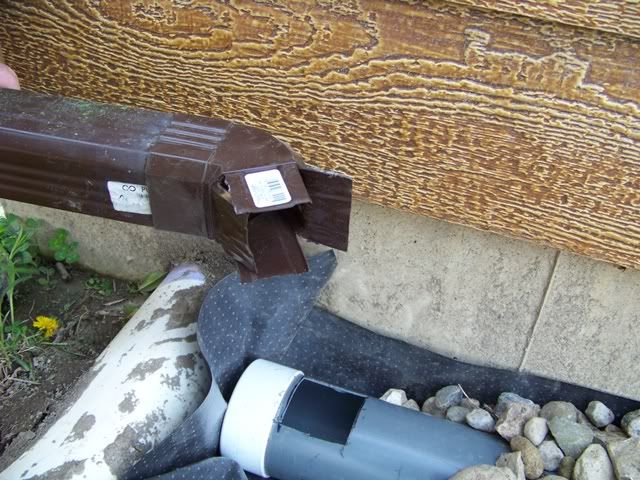 - The gutter downspout at the other end is a straighter shot and gets a similar entry into the drain. River rock is shoveled in to cover it all up and help hold the pipe stable and in place. 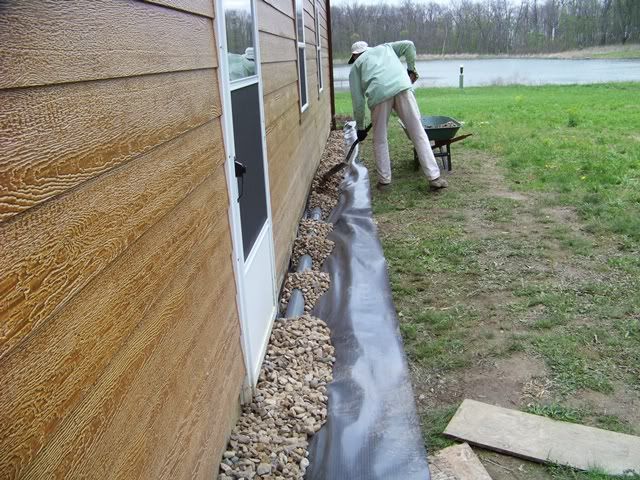 - The exit end disappears underground into a solid drain pipe and pops out about 15 feet away from the foundation, draining out into the yard. - - The backside of the structure is a bit simpler since there are no gutters entering. We start it at that same soil pipe and run it down to the corner. We have to work around the utility stuff. 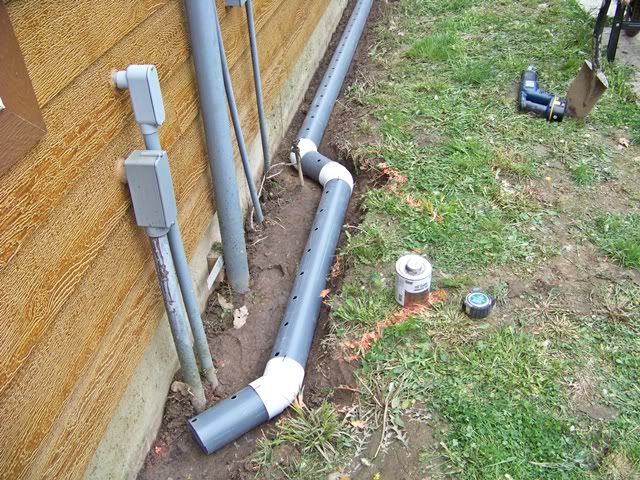 - The perf holes on this pipe are set so that one row is very near the bottom of the trench. There will be no gutter feeding into this portion of the pipe, so we only want to collect whatever run-off will collect into the trench and give it an easy route down a very gentle slope. 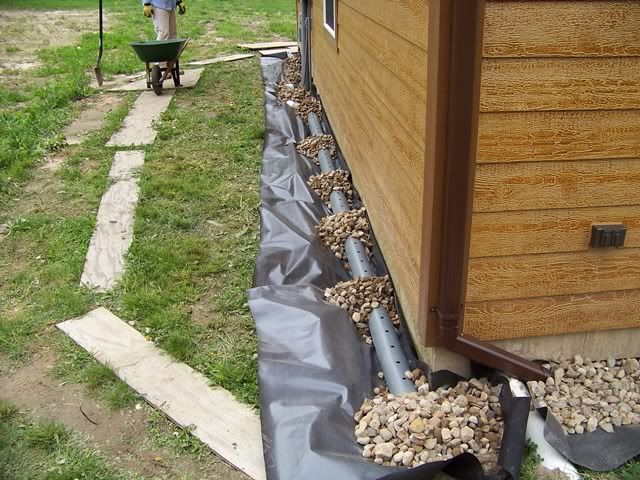 - This is about as far as we got during this trip. This last drain run will turn around the corner and continue along the foundation, also collecting the other 2 gutter downspouts at that side. It will also run out underground and empty further out into the yard. - I gotta get a tractor with an FEL...
|
|
|
|
|
Joined: Oct 2005
Posts: 6,934 Likes: 2
Ambassador
Field Correspondent Lunker
|
|
OP
Ambassador
Field Correspondent Lunker
Joined: Oct 2005
Posts: 6,934 Likes: 2 |
I'm still weighing out the options for finishing the outer edge of the rock trench. The cheapest, and simplest, is the rolls of black plastic landscape edging. Right now, that seems to make the most sense for performance, ease of installation (although it IS a bit of PIMA to put in), and economy. Dski kinda wants landscape timbers. I'm remaining open to ideas since I have a couple of weeks before we will likely get to that point.
|
|
|
|
|
Joined: Jan 2009
Posts: 28,512 Likes: 829
Moderator Ambassador Field Correspondent Lunker
|

Moderator Ambassador Field Correspondent Lunker
Joined: Jan 2009
Posts: 28,512 Likes: 829 |
I think the plastic will be more of a long term solution. The timbers will degrade quicker than the plastic.
Or you could go the lock-together border type blocks, but that's a more expensive option.
a FEL IS nice once you have one. I'd never give it up without a replacement in the wings.
|
|
|
|
|
Joined: Mar 2005
Posts: 21,490 Likes: 265
Moderator Hall of Fame 2014 Lunker
|
Moderator Hall of Fame 2014 Lunker
Joined: Mar 2005
Posts: 21,490 Likes: 265 |
Nice job. Rock , shovel and wheelbarrows -- ouch. Good to see you outside - its spring. Nice lake in the background - btw you recall it�s there to enjoy.
|
|
|
|
|
Joined: Oct 2005
Posts: 6,934 Likes: 2
Ambassador
Field Correspondent Lunker
|
|
OP
Ambassador
Field Correspondent Lunker
Joined: Oct 2005
Posts: 6,934 Likes: 2 |
Lotsa little projects... The list is long, but we keep pickin' away. We are pretty much at the point of running some of the ductwork. Sheet metal is definitely not one of my strong points, but that never stopped me. My opening act was a real booger. I had to run the exhaust vent for the downdraft fan at the cooktop island in the kitchen area. All the stuff inside was pretty simple. The PIMA was getting thru the wall, within the space I had available, and thru the siding, trim, sheathing, and the interior rim board. About 2" of mass to cut thru to create a slot for the vent. It took awhile, but turned out pretty good. 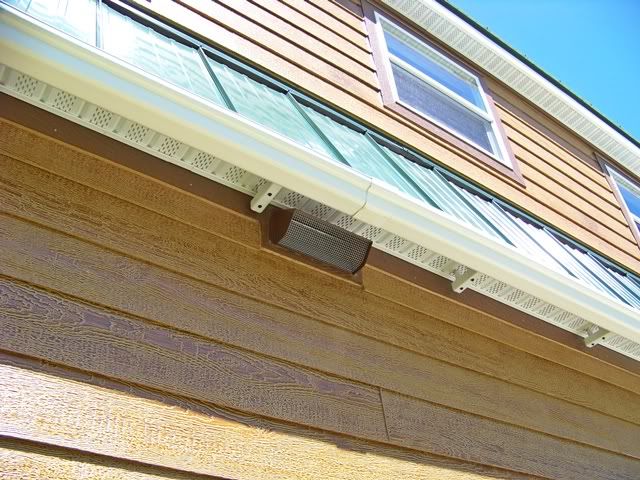 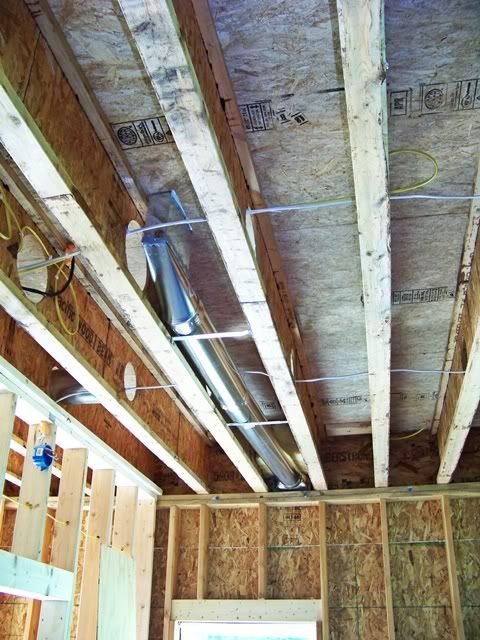 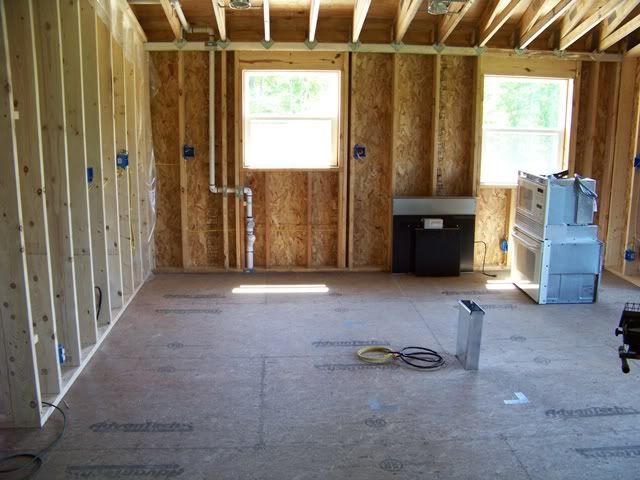 - - I slipped into dream mode for a moment and stood right at the spot where one would be whipping up breakfast at the kitchen island cooktop. 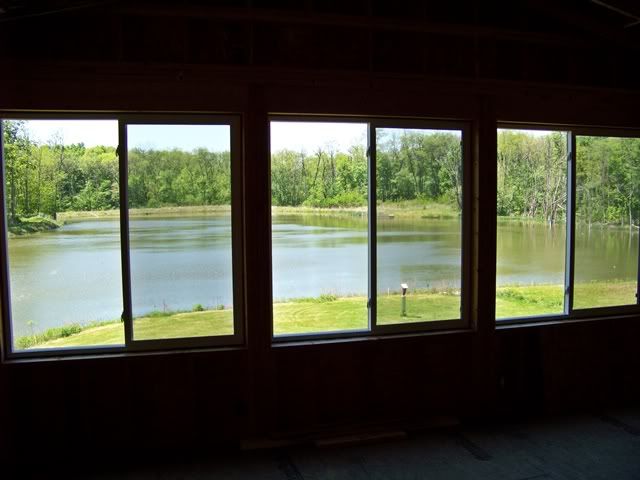 - - We continue to attack all the projects that are part of enclosing and finishing the shop area. It will be our next living quarters, so the priority in this area is high. That being said, there are still a number of other projects that are right near the top of the priority list, even though they don't directly affect completion of the shop area. Stuff like... Any work that is left in the attic area will be miserable as summer kicks in. While the temps are still reasonable, I wanted to get the attic exhaust fan installed and complete. This is a pic from last summer, when we framed in the opening and the aluminum louvers.  - - We installed the fan and mounting flange and wired it up. The fan is attached to a 7/16" thick plastic plate, completely caulked and sealed around the perimeter to repel any driven rain that might get past the aluminum louvers outside. 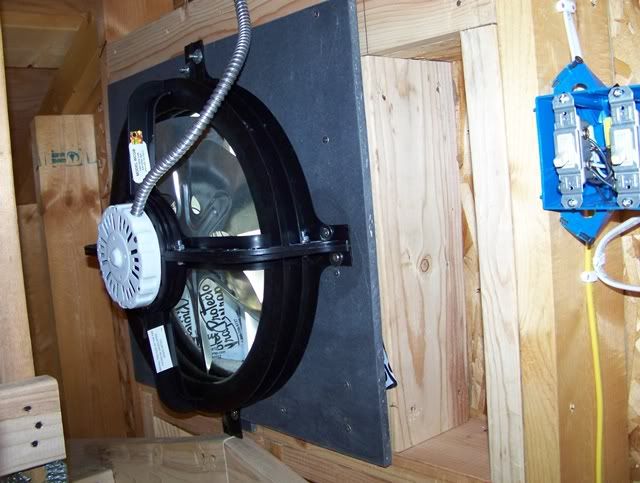 - - The mounting plate is set .375" away from the house framing to allow insertion of a framed screen (to keep out the critters and bugs). (Dopey me...I'll move the thermostat box off to the side to allow sliding the screen down into place) 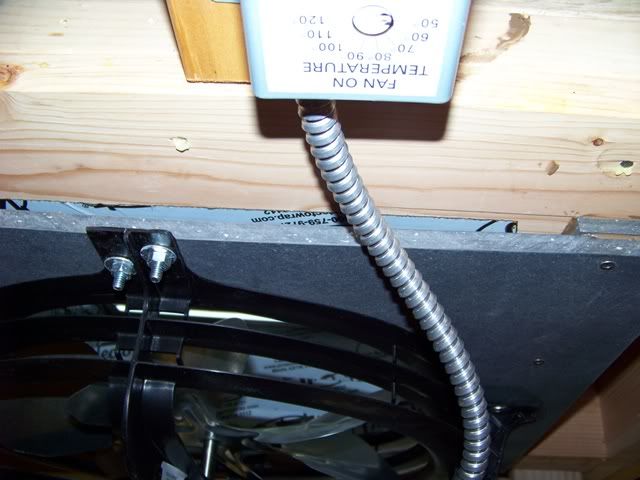 - - Another critical home improvement has been a long time comin'. For 2 years now, we have been using a porta potti located in the corner of our 120 sq ft cabin. Seeing as all the PVC drains are completed, and seeing as we shelled out the big bux last December to have a 1500 gallon septic tank and field installed, it seemed to be a natural next step to install one of the 2 toilets. Last trip, I laid in one 48" sheet of cement board to prepare. Now dry, we set the toilet flange. I planed some plywood to equate the thickness of the tile that will be installed in the future, and laid it down to support the toilet. 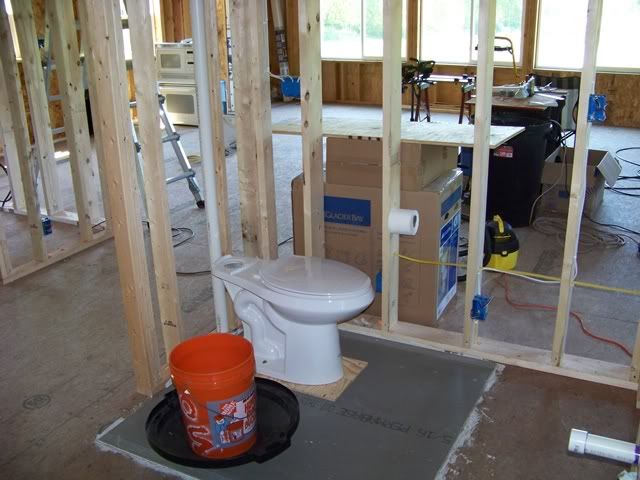 - - We are still trying to refill the piggy bank to pay for drilling a water well. Until then, pond water will have to do.
|
|
|
|
|
Joined: Mar 2005
Posts: 21,490 Likes: 265
Moderator Hall of Fame 2014 Lunker
|
Moderator Hall of Fame 2014 Lunker
Joined: Mar 2005
Posts: 21,490 Likes: 265 |
Hauling that pond water is going to be a chore. You going to keep the porta for a while?
|
|
|
|
|
Joined: Oct 2005
Posts: 6,934 Likes: 2
Ambassador
Field Correspondent Lunker
|
|
OP
Ambassador
Field Correspondent Lunker
Joined: Oct 2005
Posts: 6,934 Likes: 2 |
Jury's out on that one (prolly on a pee break)...
We use a pail for #1 in the 120 sq foot love nest, but we both agree that moving other business to a "different environment" would be a major improvement.
Use of a porta potti is not that big of a deal. The issues arise when it comes time to empty it....often.
|
|
|
|
|
Joined: Jul 2006
Posts: 7,615 Likes: 5
Ambassador
Field Correspondent Lunker
|
|
Ambassador
Field Correspondent Lunker
Joined: Jul 2006
Posts: 7,615 Likes: 5 |
More great progress.
Jeez the photo looking out the windows is the money shot. Beautiful view provided by the Ski's.
JHAP
~~~~~~~~~~
"My mind is a raging torrent, flooded with rivulets of thought cascading into a waterfall of creative alternatives."
...Hedley Lamarr (that's Hedley not Hedy)
|
|
|
|
|
Joined: Oct 2005
Posts: 6,934 Likes: 2
Ambassador
Field Correspondent Lunker
|
|
OP
Ambassador
Field Correspondent Lunker
Joined: Oct 2005
Posts: 6,934 Likes: 2 |
We're into the sheet metal ductwork. This is kinda new for me, so it's movin' kinda slow. This, plus most of the work is 9-1/2 feet overhead and executed from atop a ladder. - The plan from the beginning was to use the factory cutouts in the engineered I-joists to run the main trunk line. We loosely installed all the pieces for an 18" x 8" main trunk down the center of the building when we installed the I-joists. - (flashback) 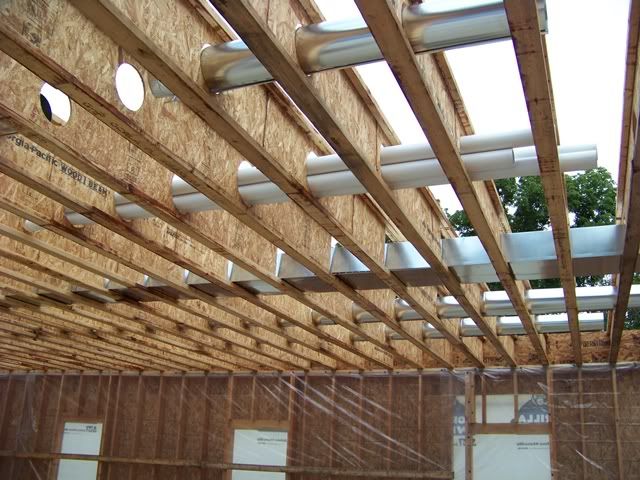 - Now, all these months later, it's time to start snapping, assembling, and cutting sheet metal to make it all work. We continue to stay focused on all the work that is in the ceiling of the shop area so we can insulate and drywall that zone and use it for living space. When we get this phase completed, we can move in and keep on rolling to finish the rest of structure. - The shop ceiling area houses 5 vent feeds upstairs and 4 more ceiling registers that will feed down into the shop. It also has the downdraft vent for the kitchen island cooktop, but that run was installed a couple weeks ago. We have most all of it laid out and ready to make final connections. Then, the whole mess has to line up with the take offs that run over and down into the mechanical room to hook up with the furnace (yes, I said furnace; see the notes at the bottom of this post). 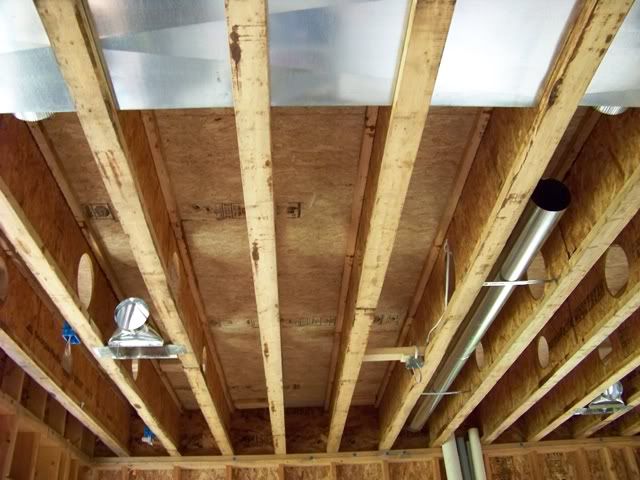 - - 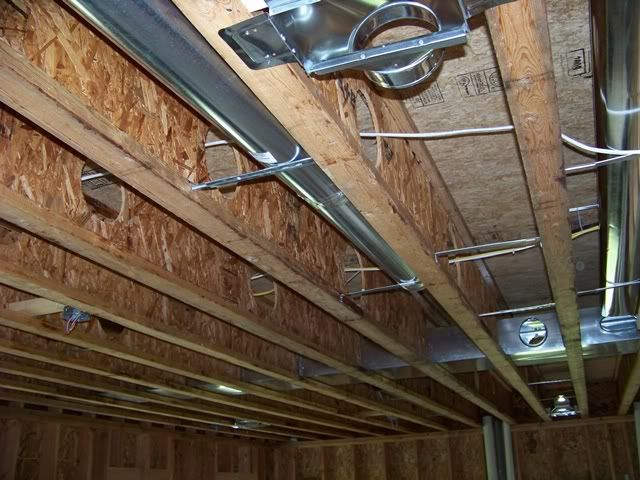 - - We have chosen to use baseboard registers. (pic taken upstairs) 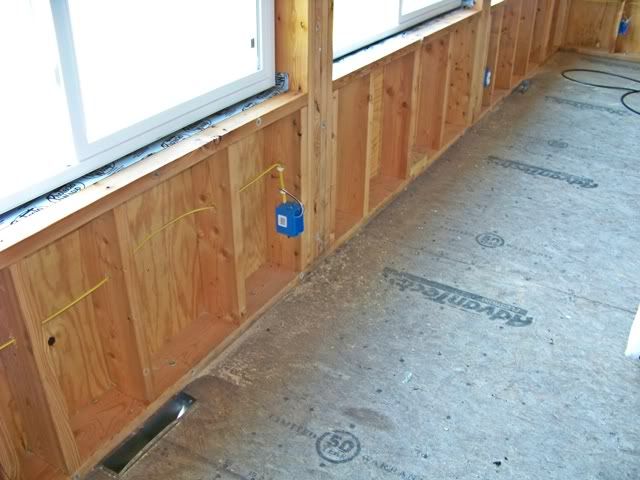 - - The only registers that won't be baseboard are the toe-kick registers (kitchen sink area and 2 bath vanities) 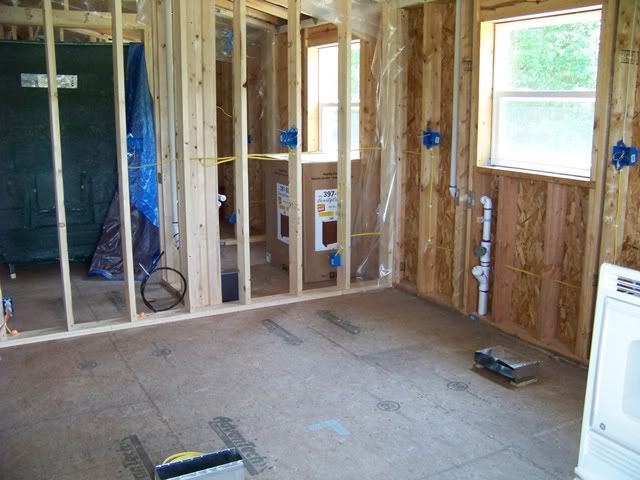 - - This last shot is the biggest pain we have to deal with. We managed to install the 2 takeoffs into the main trunk last week (left 2 bays as we look up to the ceiling of the mechanical room). These 2 feeds into the main trunk will have ducts run toward the mech room and sent down to the furnace. The third bay on the right will be the cold air return, soon to be assembled/installed. It's all gonna be pretty tight and crammed in there; I have my fingers crossed. 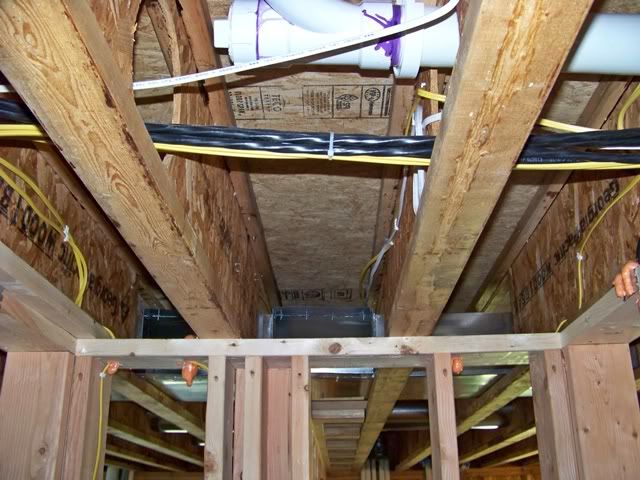 I did say furnace. My original plan was to use geothermal for this structure. I have fussed, fought, and ran the numbers and geothermal gets nixed. I all comes down to economics. Most of the decision comes as a result of knowing that this is a part time home. When we are not there, nothing will be used. Payback would likely occur far too many years down the road. There are a number of other issues that point us in the same direction. The good news is that I have a pal in the trades and he is not only helping me with the calculations and sizing of the ductwork, but he will get me into the high efficiency furnace and central air at wholesale costs.
|
|
|
|
|
Joined: Jul 2009
Posts: 3,505 Likes: 3
Ambassador Field Correspondent Hall of Fame Lunker
|
Ambassador Field Correspondent Hall of Fame Lunker
Joined: Jul 2009
Posts: 3,505 Likes: 3 |
Amazing detail, Brettski. I envy your willingness and ability to tackle a job of this magnitude and do it in an absolutely first rate manner. Love the updates! Good luck on keeping the flow going!
|
|
|
|
|
Joined: Jul 2006
Posts: 7,615 Likes: 5
Ambassador
Field Correspondent Lunker
|
|
Ambassador
Field Correspondent Lunker
Joined: Jul 2006
Posts: 7,615 Likes: 5 |
I couldn't have said it any better than Todd! This is great project to watch!
JHAP
~~~~~~~~~~
"My mind is a raging torrent, flooded with rivulets of thought cascading into a waterfall of creative alternatives."
...Hedley Lamarr (that's Hedley not Hedy)
|
|
|
|
|
Joined: Jul 2009
Posts: 4,318 Likes: 6
Ambassador Lunker
|
|
Ambassador Lunker
Joined: Jul 2009
Posts: 4,318 Likes: 6 |
Yeah it is awesome. Looking good Brettski!!!!
The only difference between a rut and a Grave is the depth. So get up get out of that rut and get moving!! Time to work!!
|
|
|
|
|
Joined: Mar 2005
Posts: 21,490 Likes: 265
Moderator Hall of Fame 2014 Lunker
|
Moderator Hall of Fame 2014 Lunker
Joined: Mar 2005
Posts: 21,490 Likes: 265 |
Epic endeavourer for sure. Well done - well done indeed !!!
|
|
|
|
|
Joined: Oct 2005
Posts: 6,934 Likes: 2
Ambassador
Field Correspondent Lunker
|
|
OP
Ambassador
Field Correspondent Lunker
Joined: Oct 2005
Posts: 6,934 Likes: 2 |
When we started the siding last spring, I never in my wildest dreams thought that the entire job would take some 4 - 5 months to complete. I'm getting the same feeling with the HVAC sheet metal, but on a smaller scale. - Having every thing crammed up in between the floor joists will pay back nice dividends later in appearances, but getting there is a real bear. Compound that with the fact that I have very limited sheet metal work exposure...and all the work is 9-1/2 feet overhead. We had 2 custom fittings created at my supply house; $50 apiece. Jeesh...maybe I should just try to make them myself....NOT. As it turned out, the fab shop made 'em wrong the first time around. Then, they missed a very tight deadline to re-fabricate correctly. In the end, amidst much aggravation on my part, they gave them to me for gratis and an apology. We spent WAY too much time putting this stuff together, but it turned out pretty nice and I've got it caulked up pretty tight. - - looking up from the mechanical room; the 2 main feeds out to the main trunk 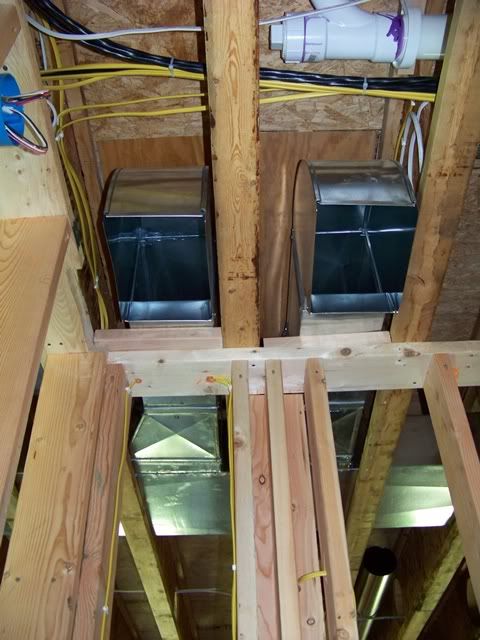 - - This one really bummed me out, but it had to be done. There was absolutely no way for me to bend/twist/scrape my arms around the ductwork from below to install and effectively caulk the main trunk feeds....so.....I had to open up the 2nd floor. It broke my heart to cut open these holes, but it is a good decision and affords access to do a good job. It will help ease insulation installation, too. I'll do a good job corkin' it back up. Looking down at the 2nd floor subfloor. 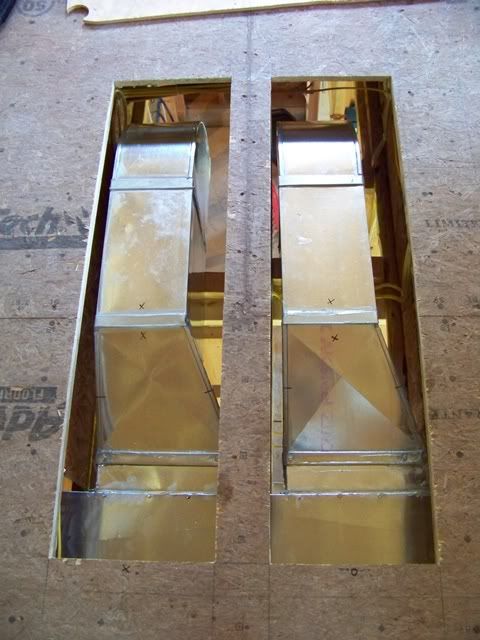 - - And, finally....all the main trunk work is done over the shop area. All the take-offs are installed and ready to feed over to the register boots....next trip. 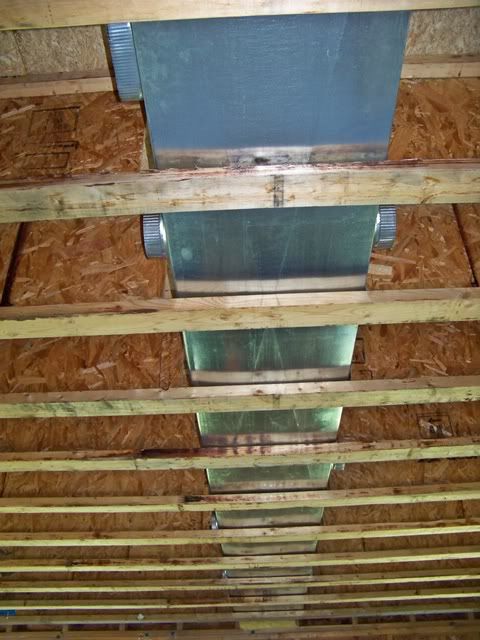
|
|
|
|
|
Joined: Jul 2009
Posts: 4,318 Likes: 6
Ambassador Lunker
|
|
Ambassador Lunker
Joined: Jul 2009
Posts: 4,318 Likes: 6 |
Looks great Ski!! You sure have come a looooooong ways on that place dude! You inspire me every time I look at your place!!!
The only difference between a rut and a Grave is the depth. So get up get out of that rut and get moving!! Time to work!!
|
|
|
|
|
Joined: Oct 2005
Posts: 6,934 Likes: 2
Ambassador
Field Correspondent Lunker
|
|
OP
Ambassador
Field Correspondent Lunker
Joined: Oct 2005
Posts: 6,934 Likes: 2 |
pretty much done with the ductwork over the shop area... - - One of the issues with burying all the ductwork into the framing and behind the drywall is access to the dampers to adjust and even out the airflow. I asked my pal in the trades and he told me to put them at the very end of each branch, just in front of the register. This way, I can reach into each register opening and adjust the damper from within the duct. No, it's not ideal but it works and is better than no damper at all. This also means that I won't be able to tighten up the damper hardware over time, so I made a couple of changes in the design by removing the adjusting arm and adding washers and a locknut.  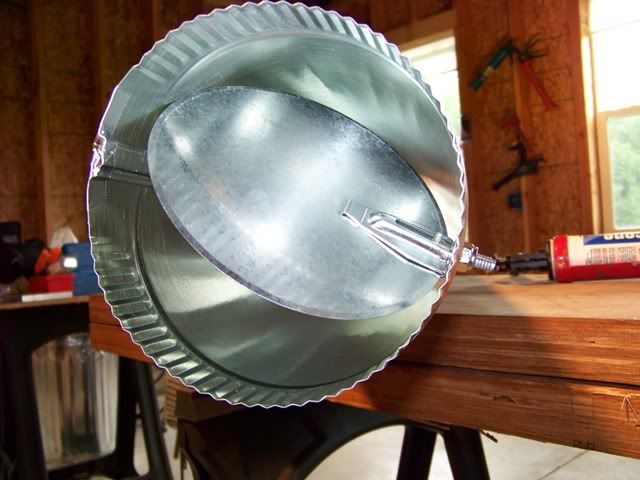 I'm using 2-1/4 x 12" register boots upstairs, so Dski's arms may have to be called into action during adjustments. - - 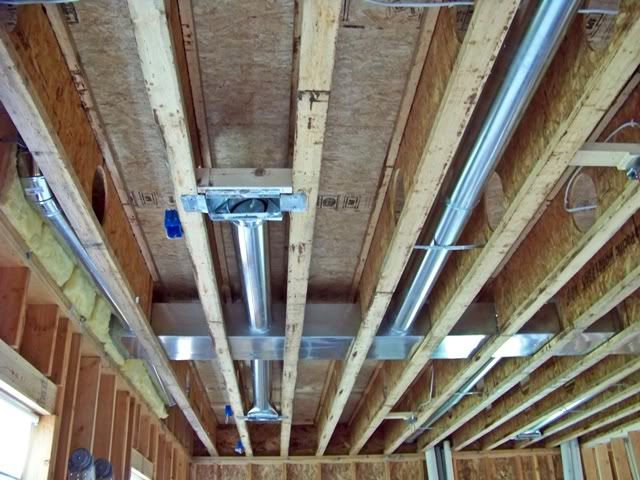 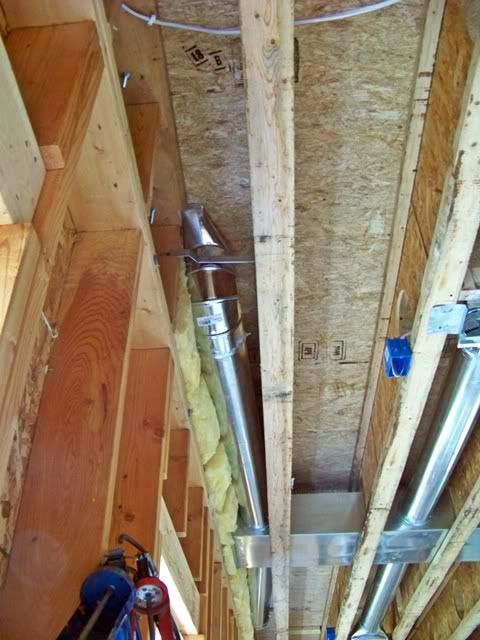 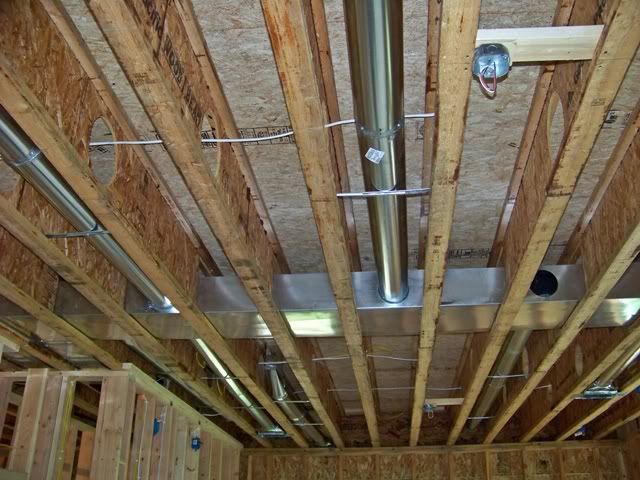 (ooops....one too many holes in that last pic...gonna have to patch it)
|
|
|
|
|
Joined: Oct 2005
Posts: 6,934 Likes: 2
Ambassador
Field Correspondent Lunker
|
|
OP
Ambassador
Field Correspondent Lunker
Joined: Oct 2005
Posts: 6,934 Likes: 2 |
Next trip will be to pull some coax, speaker wire, and other low voltage wiring to boxes strategically located within the same area. With that complete, we can shift our focus to insulation and then drywall to button up the shop.
-
What is the PB concensus on low voltage wiring types? My first thought was the normal phone lines along with a run of Cat5e or Cat6. I ran it by another pal (kind of a computer geek) and he dismisses phone line as a waste of wire, saying that I should just use 1 or 2 runs of Cat6.....that I can use some of those wires for phones should it ever be needed.
I'm open to thoughts or ideas.
|
|
|
Moderated by Bill Cody, Bruce Condello, catmandoo, Chris Steelman, Dave Davidson1, esshup, ewest, FireIsHot, Omaha, Sunil, teehjaeh57 |
|


.gif)


![[Linked Image from i108.photobucket.com]](http://i108.photobucket.com/albums/n22/arvomaki/misc/I_subscribe.gif)


