|
Forums36
Topics40,985
Posts558,202
Members18,513
| |
Most Online3,612
Jan 10th, 2023
|
|
|
1 members (blueyss),
598
guests, and
159
robots. |
|
Key:
Admin,
Global Mod,
Mod
|
|
|
|
Joined: Apr 2004
Posts: 705
Lunker
|
OP

Lunker
Joined: Apr 2004
Posts: 705 |
I had a wood board & batten pole barn built 2 years ago and decided not to put windows in on the ground level since I'm only there about once a week. A guy at work had windows replaced and gave me a bunch of double paned window sashes. I was going to install them in the barn having some as fixed windows and some hinged. Any ideas on how to do it? Windows.... 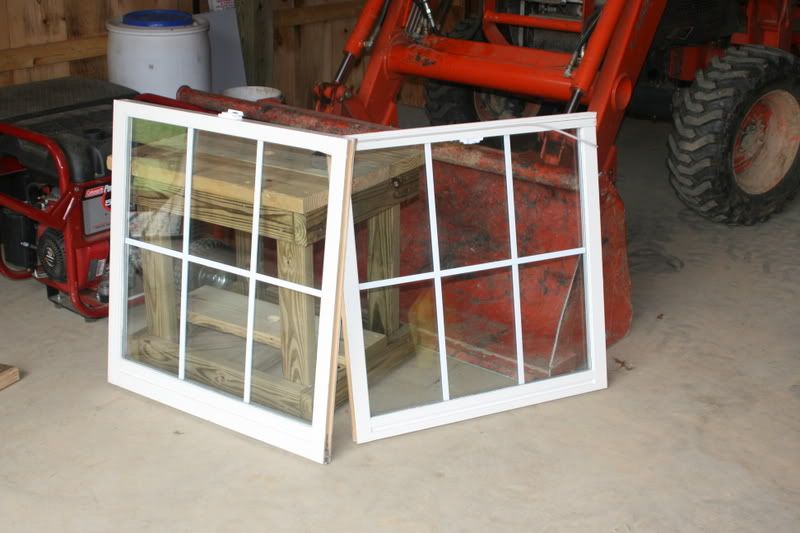 Inside barn wall.... 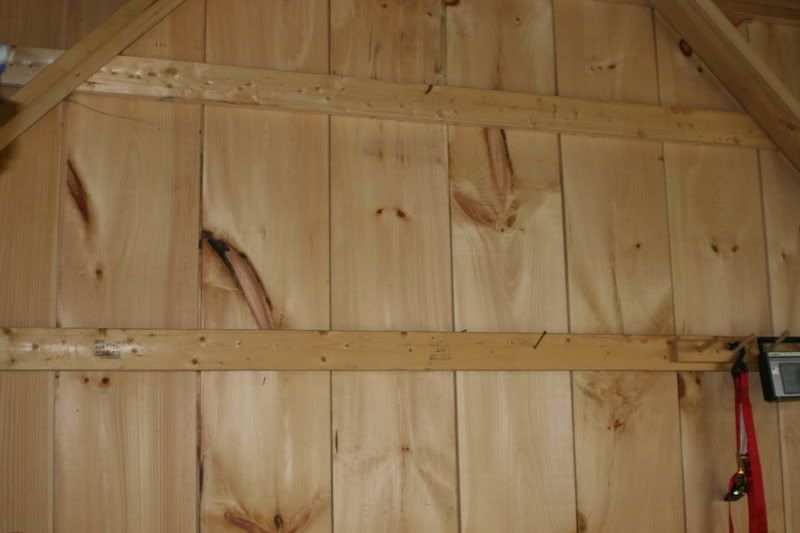
Last edited by RobA; 10/17/08 10:43 AM.
|
|
|
|
|
Joined: May 2004
Posts: 13,982 Likes: 280
Moderator Lunker
|
|
Moderator Lunker
Joined: May 2004
Posts: 13,982 Likes: 280 |
Rob:
Give the craftsmen here (we definitely have several) a few days to tell you an elegant way to accomplish mounting the windows. If they don't manage that, I'll tell you how an old pole barn hack like me would do it.
"Live like you'll die tomorrow, but manage your grass like you'll live forever." -S. M. Stirling ![[Linked Image from i.pinimg.com]](https://i.pinimg.com/736x/ed/b5/e7/edb5e7f935843b996cf52be593c9ebd2--smoothie-smooth-collie.jpg)
|
|
|
|
|
Joined: Oct 2005
Posts: 1,285 Likes: 1
Lunker
|
|
Lunker
Joined: Oct 2005
Posts: 1,285 Likes: 1 |
RobA, you can probably get the original hardware from the window's manufacturer. The jamb and other trim would be available at just about any home improvement store.
Could you possibly post a picture of the outside of the building? I'm seeing one at my place in the future.
 "The greatest enemy of knowledge is not ignorance, it is the illusion of knowledge." Stephen W. Hawking
|
|
|
|
|
Joined: Apr 2004
Posts: 705
Lunker
|
|
OP
Lunker
Joined: Apr 2004
Posts: 705 |
I'll be putting windows in the front and back. The front (before being stained) .... 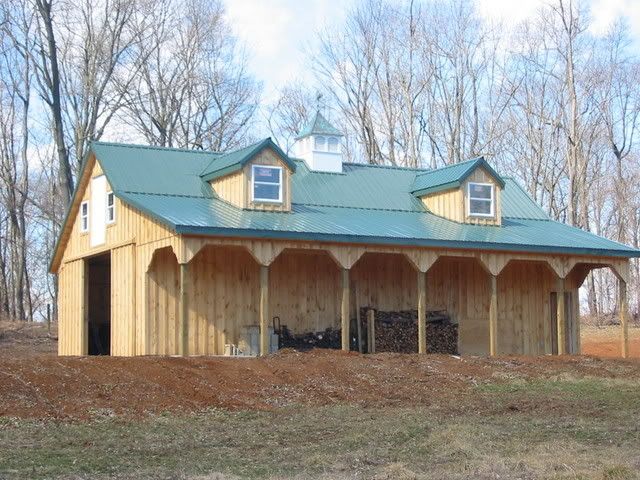 The side and back (while it was being stained)..... 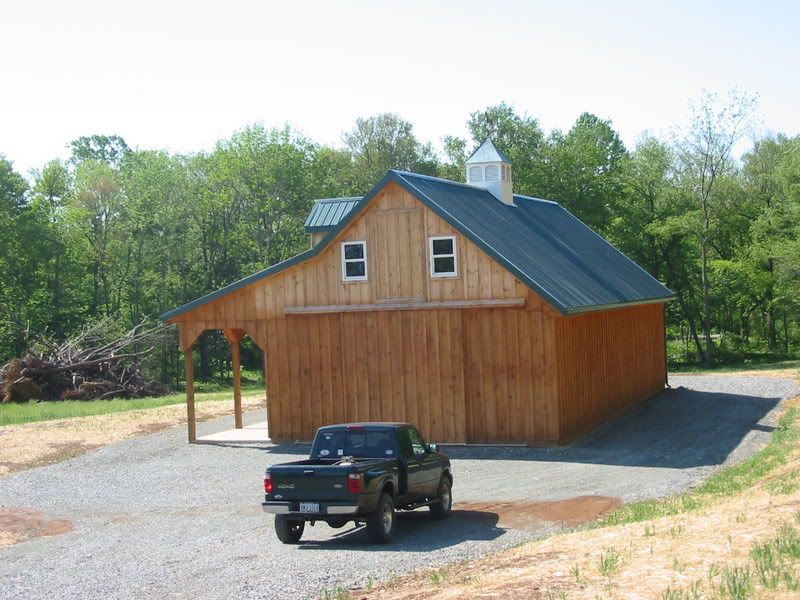
|
|
|
|
|
Joined: May 2004
Posts: 13,982 Likes: 280
Moderator Lunker
|
|
Moderator Lunker
Joined: May 2004
Posts: 13,982 Likes: 280 |
They'll look really good underneath that porch.
"Live like you'll die tomorrow, but manage your grass like you'll live forever." -S. M. Stirling
|
|
|
|
|
Joined: Oct 2005
Posts: 1,285 Likes: 1
Lunker
|
|
Lunker
Joined: Oct 2005
Posts: 1,285 Likes: 1 |
That's almost exactly the barn I want build, just with a little wider porch close enough to fish in the pond from.
Did the builder use attic frame trusses or did he build rafters and install floor joists for the upper level? I'm still debating on whether to use oak or cedar for the board and batten siding. It will be painted since my house is barn red.
"The greatest enemy of knowledge is not ignorance, it is the illusion of knowledge." Stephen W. Hawking
|
|
|
|
|
Joined: Apr 2004
Posts: 705
Lunker
|
|
OP
Lunker
Joined: Apr 2004
Posts: 705 |
The builder used attic frame trusses. Wood is eastern white pine - and the borer bees love it.
|
|
|
|
|
Joined: May 2004
Posts: 13,982 Likes: 280
Moderator Lunker
|
|
Moderator Lunker
Joined: May 2004
Posts: 13,982 Likes: 280 |
I hate those carpenter bees. We never saw them here more than 20 years ago. Now I have to use treated lumber for every building that's not fully enclosed.
"Live like you'll die tomorrow, but manage your grass like you'll live forever." -S. M. Stirling
|
|
|
|
|
Joined: Apr 2004
Posts: 705
Lunker
|
|
OP
Lunker
Joined: Apr 2004
Posts: 705 |
On the positive side they sure do go when you hit with a them with a tennis racquet!!
|
|
|
|
|
Joined: Aug 2003
Posts: 544
Lunker
|
|
Lunker
Joined: Aug 2003
Posts: 544 |
Just keep a caulking gun handy with silicone caulk, entomb them inthe holes while they are inside. I also use a double string weed wacker to deal with bees, as well as a shop vac and raid. I hate bees that don't make honey.
|
|
|
|
|
Joined: Oct 2005
Posts: 6,934 Likes: 2
Ambassador
Field Correspondent Lunker
|
|
Ambassador
Field Correspondent Lunker
Joined: Oct 2005
Posts: 6,934 Likes: 2 |
OK RobA....you know the drill. Cool cribs like this new barn get a custom post in the Human Habitat thread so we can all use it for reference when it's OUR turn to build one. Get going, Mister!
-
(edit; lotsa pics, inside and out)
Last edited by Brettski; 10/17/08 05:27 PM. Reason: incomplete beratement
|
|
|
|
|
Joined: Apr 2004
Posts: 705
Lunker
|
|
OP
Lunker
Joined: Apr 2004
Posts: 705 |
Aw, shucks. Really? OK, I'll put something together. But the barn sure would be nicer if I could put some windows in... 
|
|
|
|
|
Joined: Oct 2005
Posts: 6,934 Likes: 2
Ambassador
Field Correspondent Lunker
|
|
Ambassador
Field Correspondent Lunker
Joined: Oct 2005
Posts: 6,934 Likes: 2 |
Here's my take on the window thing, RobA.
Yep, you could put together something with these sashes and get them installed. In order to do so will require some fairly simple carpentry. Prepare the sash by removing all the hardware. Cut a hole right into the wall that is about 1/4" wider and taller than the out/out of the sash. Cut 1 x 4 stock to create a flat picture frame that will lay over the hole you cut; the frame is 3.5" wider and taller than the hole you created and the corners are 45 degree cuts (classier than butt joints). Put the frame pcs to the side.
Pre-drill 5/32" dia holes thru the wall (around the window hole). The holes will allow 1.250" stainless steel screw to reach thru the wooden wall boards without the threads to grab. They should be about 1" from the edge of the hole and 6" apart. Stay 2" from each corner (so they don't split the picture frame you're going to attach with them)
Go outside, clean off any splinters from the holes and the cut edge of the window hole. Apply a 1/4" wide bead of caulk, using the drilled holes as your guide; connect the dots all the way around. I only use polyurethane caulk. It blows silicone away AND it's paintable. It also takes a couple of days to set up, but the result is awesome. It's the quality caulk used for underwater marine installations. It's slow setup time allows for plenty of time to complete a project. Silicone (depending on temps and humidity) will usually start to skin at 15 minutes.
-
OK, this part is your decision. It is the installation of the flat picture frame. The quickest way is to get 8 clamps and another set of helping hands. Start with the bottom/horizontal frame piece. We are going to attach it to the outside of the barn at the window hole. Select the side that will attach to the barn and draw a pencil line in the center of the 3.5" width, from one end to the other. One person inside and one person outside (with a level, 24" wide would be perfect). Set the piece against the wall, mooshing down the caulk. The goal is to set the centerized pencil line even with the bottom edge of thw wall hole. The caulk will likely ooze out at the outside perimeter; don't touch it...let it be. The ooze at the inside will cover the pencil line, so use paper towels and wipe it away. If you use polyurethane, it sticks to EVERYTHING and requires acetone to remove...and this only works when it hasn't cured. The point; be kinda careful and have a trash can close by for the paper towels. It takes about a week to get it completely off your fingers. It's not dangerous and your friends will admire your weekend warrior look.
Have the outside set of hands use the level to set even. The level trumps the pencil line. The inside person has the job of using a ruler to make sure the exposed 45 degree corners at both ends are equi-distant from the vertical cuts in the wall hole. apply 2 clamps firmly. The last 3 pcs don't really need anything more than a good eye, some manual adjustments, and 2 clamps per pc. Go outside with a pc of scrap 1 x 4 x 8 or 12" to use as a buffer when you need to tap the frame pieces to make it look just right and perfect. Keep the tapper board away from the gooshy caulk.
When you like the setting of the 4 boards, go inside with a drill driver and set it to slow speed. REMEMBER: the thickness of the wall + frame is 1.5"....we don't want to go thru it! Using the 1.250" screws, run them in one at a time until the head JUST BARELY sets below the wood surface. Remove the clamps. The screws are somewhat structural, but the poly caulk is an killer adhesive....KILLER. In 1 week, removal of the picture frame piece will result in pulling off the entire wall section (kidding...but not really).
You can leave the caulk goosh as is on the outside perimeter, or use you finger to run a cove. Your call; probably leave it.
OK, inside we go.
This part is pretty obvious for permanent set windows. I would run another bead of caulk all the way around the inside of the picture frame, and keep it 1/2" away from the inside perimeter. Your goal is to get a gish of caulk all the way around the sash on the outside. You will run this gish with your finger to create a small, subtle, cove.
Before doing this, you have to decide how deluxe (or basic) you want the interior side to look. I did a couple of small barn windows in my garage and just used small blocks of wood (maybe a pc of 1 x 4 x 6" long), tilted it so one end pushed on the window and the other end rested on the inside of the wall. One screw thru the center of the block and into the 1.5" thick (wall + picture frame) wood section (don't run it too far and thru to the outside). Like earlier, the blocks are really nothing more than holders while the poly caulk sets. After a week, you can take them off.
One note: You may have to adust the amount of the picture frame that overlaps into the interior of the wall hole. You don't want the picture frame to cover too far on the sash frame. This adjustment will affect the length of the picture frame pieces AND their relation to the wall hole coverage. In fact, you want to get the "step" look; sorta like the interior trim on a passage way door frame or window frame.
|
|
|
|
|
Joined: Feb 2007
Posts: 343
Lunker
|
|
Lunker
Joined: Feb 2007
Posts: 343 |
On the positive side they sure do go when you hit with a them with a tennis racquet!! I'm glad to see I'm not the only one who uses tennis racquets strickly for this purpose.
Does the name Pavlov ring a bell?
|
|
|
|
|
Joined: Oct 2005
Posts: 6,934 Likes: 2
Ambassador
Field Correspondent Lunker
|
|
Ambassador
Field Correspondent Lunker
Joined: Oct 2005
Posts: 6,934 Likes: 2 |
I recall an exhilirating round of bat-mitton in a old northwoods lodge when I was a kid. The owner gave us tennis rackets and $1 for every bat we took down as they clambered out of the wall and flew about inside the lodge. I seem to recall making 26 bucks that night.
|
|
|
|
|
Joined: Jul 2005
Posts: 4,596 Likes: 36
Lunker
|
|
Lunker
Joined: Jul 2005
Posts: 4,596 Likes: 36 |
Rob, from a time perspective it would be easier to to just buy a couple of inexpensive vinyl windows to install. I used to do inside sales at a window manufacturer so I am very familiar with how windows are built. If you have lots of time you could build window frames from 1x4's, make sure the sill has slope for water drainage. You will also need to fabricate some brick mold for the exterior trim on the window frame. You should also line the interior of the frame you build with 1/4 round material or some other type of "stop" for the sash to rest against. You will also want some sort of weather stripping for the sash to rest against. Here is a link to the section cuts of a wood double hung window for some ideas if you want to go that way. http://www.windowtech.cc/pdf/Sections/Double%20Hung/DH%20Wood/DH%20Wood%20C3000%20Dim_Sec.pdfHere are a few window terms you should familiarize yourself with. RSO - Rough Stud opening - this is the wall framing, usually made of 2x4s or 2x6s, that a window gets installed in. Typically these are 1/2" to 3/4" larger than the window frame. Windows that are installed square, level, and plumb have the fewest issues in the long term. Brick Mold - this is the exterior trim on a wood window that covers the framing or jambs (head jamb and side jambs) that ties into the sill and sub sills of the window frame on the exterior side. Nail fin - this is primarily used for installing aluminum clad windows or vinyl windows that have no brick mold. After the windows are installed the house siding is installed and this covers the nail fin. If it were me I would buy a couple of vinyl windows, cut your openings, install the windows from the exterior using the nail fin. Do not nail the vinyl nail fin tight to wood as these two materials have different expansion and contraction rates and nailing it tight could could crack the vinyl during cold weather. Use flashing around the window to keep water and wind out. Then attach 1x4 knotty pine around the exterior of the window to match the rest of the building and to cover up the nail fin and flashing. You might not need to do framing in the interior of the building doing it this way. If you go the vinyl window route I would try to get the same type that you already have installed in the building. Different manufacturers use different whites in their vinyl, there are blue whites, yellow whites, etc. that may not look as good if they are off a shade compared to the other windows in your building. My best guess if that a 2' x 4' vinyl DH would only run $150ea. or less. Feel free to ask questions, I know way more about windows than I can write in this single post.
|
|
|
|
|
Joined: Oct 2005
Posts: 6,934 Likes: 2
Ambassador
Field Correspondent Lunker
|
|
Ambassador
Field Correspondent Lunker
Joined: Oct 2005
Posts: 6,934 Likes: 2 |
Good post, Shorty. I may be asking to tap your window expertise knowledge bank for some future projects...if'n ya don't mind.
-
I fully agree with your thought to just go to complete vinyl window units, but thought that RobA was lookin' for a low-cost way out. He could pinch a couple of pennies by using single hung, too.
|
|
|
|
|
Joined: Apr 2004
Posts: 705
Lunker
|
|
OP
Lunker
Joined: Apr 2004
Posts: 705 |
Good info guys, thanks. Brettski, you're right about me wanting an inexpensive and easy way to do this. I took a stab at making a window jamb tonight. I like the idea of having a unit that could be installed in a rough opening. Sort of like the windows used in new construction that have a flange. Cut a rough opening, slide unit in, caulk it and screw it in place. I used 2x4's for the frame, 1x3 barn wood for the flange and hinged the top of the window to the top of the jamb. It turned out OK but I think I need to use 1x4 instead of 1x3 for the flange so that I have more wood to attach the unit to the barn. If I go with this design I'll use jack studs to help support the unit. Outside view... 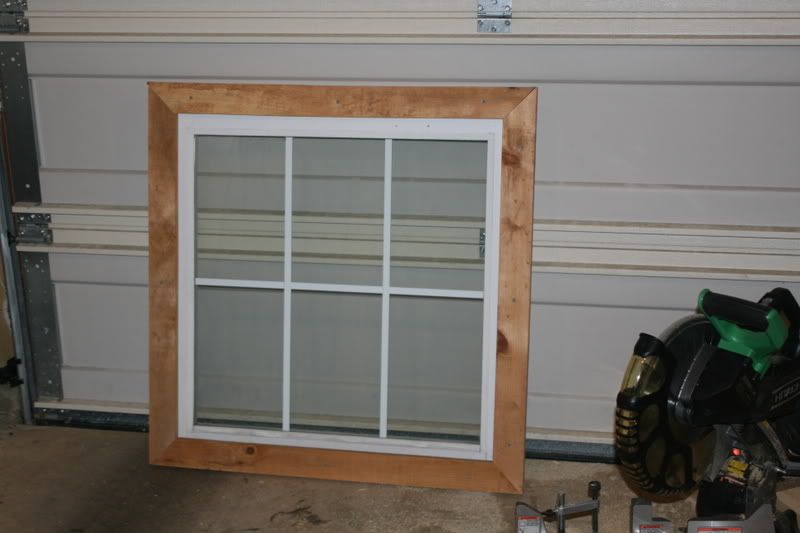 Inside view (tough to see but there is a 'flange' there)... 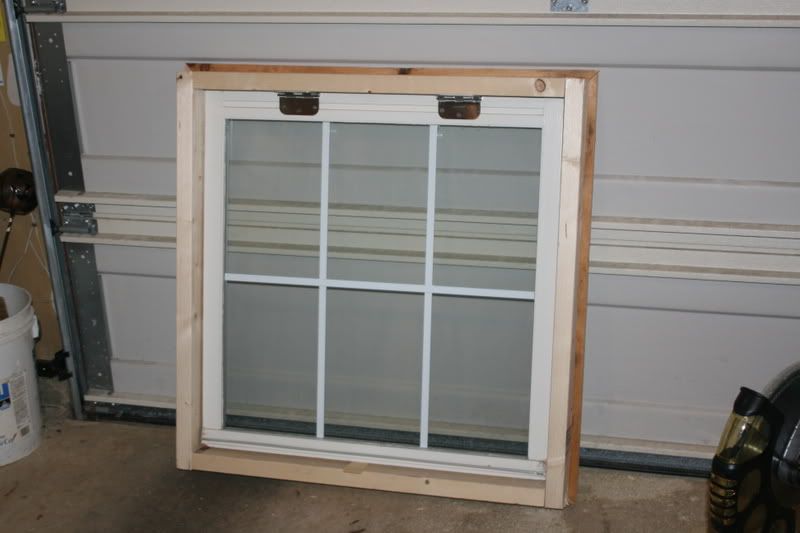
|
|
|
|
|
Joined: Oct 2005
Posts: 1,285 Likes: 1
Lunker
|
|
Lunker
Joined: Oct 2005
Posts: 1,285 Likes: 1 |
Looks good Rob. I don't think you need jack studs since pole barn walls are non load bearing.
"The greatest enemy of knowledge is not ignorance, it is the illusion of knowledge." Stephen W. Hawking
|
|
|
|
|
Joined: Apr 2004
Posts: 705
Lunker
|
|
OP
Lunker
Joined: Apr 2004
Posts: 705 |
Looks good Rob. I don't think you need jack studs since pole barn walls are non load bearing. I was going to use jack studs to help support the weight of the window unit. I figured it would only "cost" a few pieces of scrap 2x4 for each window.
|
|
|
Moderated by Bill Cody, Bruce Condello, catmandoo, Chris Steelman, Dave Davidson1, esshup, ewest, FireIsHot, Omaha, Sunil, teehjaeh57 |
|


