|
Forums36
Topics40,969
Posts558,042
Members18,507
| |
Most Online3,612
Jan 10th, 2023
|
|
|
10 members (Ibanez540r, Boondoggle, Sunil, esshup, Jason D, Angler8689, Sryously, ghdmd, JoshMI, Bill Cody),
879
guests, and
319
robots. |
|
Key:
Admin,
Global Mod,
Mod
|
|
|
|
Joined: Oct 2005
Posts: 6,934 Likes: 2
Ambassador
Field Correspondent Lunker
|

Ambassador
Field Correspondent Lunker
Joined: Oct 2005
Posts: 6,934 Likes: 2 |
The female side of a PVC glue fitting is tapered, so the further you insert the male pipe (cut it out Theo), the more resistance you get from the female side (I mean it, Theo). I'm sure you already know this.
When the 2 pc of the connection are just pushed together you are not likely all the way to the bottom of the female side, so less overlap. This in of itself is not a big deal for your application. What I have often seen (and experienced) is that the relative ease with which you pushed them together will not be the same ease when you REALLY need to pull them apart. Whether it's an accummulation of minerals from the water, or the 2 pc of PVC swelling at a different rate, it always seems to be a bear to pull apart when you need it.
-
My thought was to glue in a 12" piece of pipe into the female elbow. Then install a rubber coupler between this new nipple and the intake pipe.
|
|
|
|
|
Joined: Oct 2005
Posts: 6,934 Likes: 2
Ambassador
Field Correspondent Lunker
|
|
Ambassador
Field Correspondent Lunker
Joined: Oct 2005
Posts: 6,934 Likes: 2 |
|
|
|
|
|
Joined: Oct 2005
Posts: 1,285 Likes: 1
Lunker
|
|
Lunker
Joined: Oct 2005
Posts: 1,285 Likes: 1 |
I'm getting a little off track but here's some thoughts  Gate valve  Gate valves are expensive but they are far less likely to clog.
 "The greatest enemy of knowledge is not ignorance, it is the illusion of knowledge." Stephen W. Hawking
|
|
|
|
|
Joined: May 2004
Posts: 13,975 Likes: 277
Moderator Lunker
|
|
Moderator Lunker
Joined: May 2004
Posts: 13,975 Likes: 277 |
GW, you might try sealing the circumference of the joint and covering the exposed screws with silicone bathtub seal (RTV) when it is exposed and dry. The stuff holds up well in the weather and will peel off pretty easy when you want to disassemble.
If this idea makes no sense, it's Brettski's fault for getting me all excited.
"Live like you'll die tomorrow, but manage your grass like you'll live forever." -S. M. Stirling ![[Linked Image from i.pinimg.com]](https://i.pinimg.com/736x/ed/b5/e7/edb5e7f935843b996cf52be593c9ebd2--smoothie-smooth-collie.jpg)
|
|
|
|
|
Joined: Apr 2007
Posts: 2,287
Lunker
|
|
OP
Lunker
Joined: Apr 2007
Posts: 2,287 |
Theo, what if I lightly oiled the pvc before applying the RTV to avoid excessive adhesion that might make removing it more time consuming (while lightning cracks around my head)? If the sealant stays somewhat flexible might it not self seal when the vacuum begins?
Ryan, I still don't understand the Y connectors. Are they to function like a clean-out in a waste pipe?
B-ski, I'll think about sanding the fitting. Do you think it would possibly allow more air into the system?
|
|
|
|
|
Joined: Oct 2005
Posts: 6,934 Likes: 2
Ambassador
Field Correspondent Lunker
|
|
Ambassador
Field Correspondent Lunker
Joined: Oct 2005
Posts: 6,934 Likes: 2 |
Are we talking 6" or 8" on the pipe?
-
Sanding out the ID of the fitting is a PIMA. You might have an easier time sanding down the OD of pipe itself. It doesn't take alot of stock removal to get a fit that slides freely.
-
Yes, you will likely increase the potential for more air. I gotta tell ya, I see the rubber coupling as the fix-all, end-all. Those things are very stout. The rubber for the 6" coupling is easily .312" thick. To me, the caulk thing is a quick n' cheezy temporary fix until you can do it correctly.
|
|
|
|
|
Joined: May 2004
Posts: 13,975 Likes: 277
Moderator Lunker
|
|
Moderator Lunker
Joined: May 2004
Posts: 13,975 Likes: 277 |
GW, I'm sure oiling would keep it from sticking and sealing. Cured RTV should hold any pressure a siphon develops (I'd trust it for 2 atmospheres) and the stuff is easily cut with a penknife, so worst case you'd cut the fillet off the joint and spend 5 minutes scraping off the residue.
It may not work for you, but I guarantee you will be able to remove it easily. It's the putty equivalent of duct tape - versatile and non-destructive..
"Live like you'll die tomorrow, but manage your grass like you'll live forever." -S. M. Stirling
|
|
|
|
|
Joined: May 2004
Posts: 13,975 Likes: 277
Moderator Lunker
|
|
Moderator Lunker
Joined: May 2004
Posts: 13,975 Likes: 277 |
To me, the caulk thing is a quick n' cheezy temporary fix until you can do it correctly. Agreed in principle, but if caulking with RTV works ... ? If it doesn't work, go to plan B (B for better).
"Live like you'll die tomorrow, but manage your grass like you'll live forever." -S. M. Stirling
|
|
|
|
|
Joined: Apr 2007
Posts: 2,287
Lunker
|
|
OP
Lunker
Joined: Apr 2007
Posts: 2,287 |
I think B-ski is just partial to rubber and straps. 
|
|
|
|
|
Joined: Jan 2005
Posts: 469
Lunker
|
|
Lunker
Joined: Jan 2005
Posts: 469 |
This is all very good info. We had a frog-floater of a rain last week, so I went down to see my 12" siphons working. The air vents were 5-6 inches under water. I was disappointed at the flow. It looked like the 1st video GW posted. I believe I have the same problem he did because I only have a 22 1/2 degree elbow at the discharge end and air is running back up the pipe. I have the same gurgling sound too. Fortunately, I have a couple of 45 degree elbows left over. I will put them on and report back.
Hey Moe, I'm trying to think but nuthin's happening!
|
|
|
|
|
Joined: Apr 2007
Posts: 2,287
Lunker
|
|
OP
Lunker
Joined: Apr 2007
Posts: 2,287 |
Jersey, my pond builder originally installed a 45 degree elbow on my steep discharge pipe (6"). He gave me another 45 elbow and about 4 feet of pipe. He suggested that I use a short piece of pipe to connect the second 45 and then try adding about 3 feet of pipe to the new elbow so that the outlet is significantly higher. If that automatically starts the siphon I can experiment with cutting the final piece shorter.
How big is your pond? Once the siphon started I could tell that one 6" pipe is plenty for my little pond.
|
|
|
|
|
Joined: Oct 2005
Posts: 1,285 Likes: 1
Lunker
|
|
Lunker
Joined: Oct 2005
Posts: 1,285 Likes: 1 |
I used to install pneumatic grain conveyors using 4,5 and 6" mill pipe. If we need a flexible joint, we would use Goodyear sandblasting hose w/4pc galvanized clamps made for that purpose. It is thick, tough and stiff and seems well suited for GW's intake pipe extension.
GW the Ys were just a thought I had that would allow easy access in case of a plug.
As far as the traps go, look under your kitchen sink. There should be a trap there as with all other connections to wastewaster pipes. The idea behind it is to keep the sewer gas from exchanging with the air in your house (so your house doesn't stink) while still allowing water to flow freely. It's purpose is not to "trap" lost jewelry. The same principal applies to your siphon systems. The trap helps keep air from entering the system at the discharge.
"The greatest enemy of knowledge is not ignorance, it is the illusion of knowledge." Stephen W. Hawking
|
|
|
|
|
Joined: Apr 2007
Posts: 2,287
Lunker
|
|
OP
Lunker
Joined: Apr 2007
Posts: 2,287 |
I learned about P-traps from a shower that never got used. Every few months I got an odoriferous reminder to pour some water into the drain. 
|
|
|
|
|
Joined: Oct 2005
Posts: 1,285 Likes: 1
Lunker
|
|
Lunker
Joined: Oct 2005
Posts: 1,285 Likes: 1 |
I learned the hard way too. We moved into our house and never used one of the showers. We thought something died in that room, it took awhile but we finally figured it out too.
"The greatest enemy of knowledge is not ignorance, it is the illusion of knowledge." Stephen W. Hawking
|
|
|
|
|
Joined: Apr 2007
Posts: 2,287
Lunker
|
|
OP
Lunker
Joined: Apr 2007
Posts: 2,287 |
We got almost an inch of rain yesterday on top of saturated ground so the outlet mods got tested. The only change I made was to add a one foot piece of pipe to the existing 45 and then one additional 45 elbow on that. The result was that the siphon started perfectly as soon as the water reached the top of the pipe. I still had a garbage bag around the unglued joint secured with a bungee cord from the other day. I could hear it sucking some air but it wasn't enough to prevent a siphon from starting. It doesn't seem very critical to have an air tight seal because when the drain goes into a siphon the joint is submerged already. It still kept siphoning even after the water level went down the 3 inches below full pool, where the vent opening is. I still want to lose the double 90's on the back side and replace them with a single 45. I'll need to bury more of the outlet pipe to do that but I wouldn't think that would matter. The current pipe follows the 2/1 slope of the dam and after switching to a 45 it would look like this: 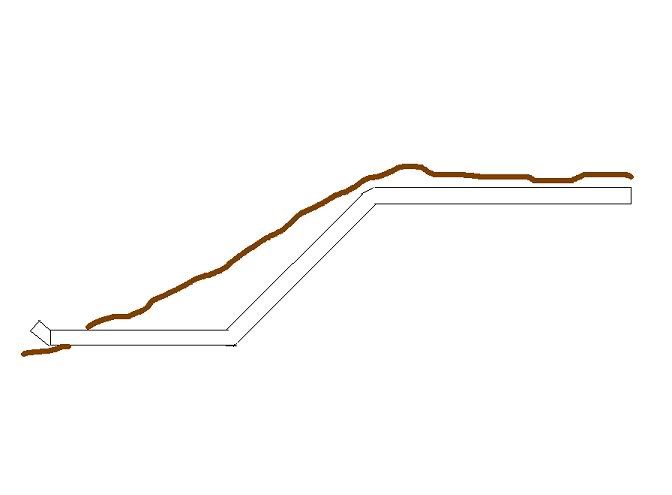 Any thoughts?

|
|
|
|
|
Joined: Oct 2005
Posts: 1,285 Likes: 1
Lunker
|
|
Lunker
Joined: Oct 2005
Posts: 1,285 Likes: 1 |
Personally, I think I would PVC cement the connections on the intake side and if you ever need to remove it, just saw the pipe off leaving enough to reconnect with a rubber joint.
You could use two 22.5 degree elbows to form a "jiffy joint" and then you wouldn't have to dig as deep into your dam to bury the pipe.
It may also be wise to pour a decent sized chunk of concrete below where the outlet comes out of the ground then anchor the discharge to it to reduce the risk of the joints breaking over time.
"The greatest enemy of knowledge is not ignorance, it is the illusion of knowledge." Stephen W. Hawking
|
|
|
|
|
Joined: Jan 2005
Posts: 469
Lunker
|
|
Lunker
Joined: Jan 2005
Posts: 469 |
GW,
6 acres with 320 acres of watershed. One of these days, I'll be glad I have 2 12" siphons.
Hey Moe, I'm trying to think but nuthin's happening!
|
|
|
|
|
Joined: Apr 2007
Posts: 2,287
Lunker
|
|
OP
Lunker
Joined: Apr 2007
Posts: 2,287 |
I recently learned that my little pond has more watershed than I had thought. The good news is that I believe my 6" pipe is up to the challenge.
Ryan, thanks again for the feedback.
|
|
|
|
|
Joined: Jun 2005
Posts: 14
Lunker
|
|
Lunker
Joined: Jun 2005
Posts: 14 |
GW: I started the pond dam piping thread that asked when the syphon action started working. My outlet pipe is exactly as you drew it on your Feb. 27 post in this thread. Last Monday my 10 inch automatically started to syphon during a long heavy period of rain. I had recently repaired by damaged spillway and was worried it would be damaged again. No problem. The sypone stopped the rise of water in about 15 minutes and brought it down over the next two hours even though 75 acres of watershed was draining into this 2 acre pond. The syphon stopped by itself at the point the vent pipe lost its water coverage. There is no question that the volume of water moved by the syphon action is tremendous. I think my emergency spillway problems are solved. I hope Jersey's two 12 inch sypons start when needed.
Rockcreek
|
|
|
|
|
Joined: Apr 2007
Posts: 2,287
Lunker
|
|
OP
Lunker
Joined: Apr 2007
Posts: 2,287 |
Sounds great rock creek. I have to amend my statement about the siphon being up to job in my pond though. About a week ago we got 2.5 inches of rain overnight and when I woke up the water was going over the (emergency) spillway. The siphon had started but just couldn't handle the flow. When I got to the pond it was about 6 inches from breaching the dam and rising fast. I grabbed my shovel and started digging out the spillway. I moved about a yard of wet clay until the outflow was more than a foot deep and about 4 feet wide. I stopped the rising water when it was close to 3 inches from the top of the dam. Of course the dam is too new to have anything growing on it and it was very soft. Between digging out the spillway and the inflow slowing down I saw that the level was finally dropping. I walked down the dam and I saw that the heavy flow over the spillway was cutting into the back of the dam pretty heavily. I had lost about 5 feet and the slope was vertical in the worst place. I grabbed the shovel again and started moving the clay back into the trench I had made in the spillway. Naturally it's harder to stop the flow than to increase it.  I decided to play beaver and started placing large branches across the flow and then filling in the spaces with the best clay. After maybe a half hour of this I managed to stop the water. I walked over to the siphon and closed the vent valve. I drained the pond down about 2 feet below full pool. Since this was the second time I had to labor to save the dam in the past few weeks I was tired of it. The pond came back up to full pool within a few days anyway. I think the watershed for this pond is pretty big. I plan on removing the four 90 degree elbows on my siphon and replacing them with four 22.5's. Now that the emergency spillway is a little drier I'm going to widen it and put that dirt on top of the dam. I noticed that most dams around here are only about 1 foot higher than the emergency spillway and I want more.
|
|
|
|
|
Joined: Apr 2008
Posts: 94
Lunker
|
|
Lunker
Joined: Apr 2008
Posts: 94 |
6" Overflow Pipe - GW how big is your pond?
What type of incoming flow - spring and/or runoff?
How much incoming flow?
|
|
|
|
|
Joined: Apr 2007
Posts: 2,287
Lunker
|
|
OP
Lunker
Joined: Apr 2007
Posts: 2,287 |
wivell, my pond is a little less than 1/2 acre I think. There are some small ground water springs that didn't run for the last 2 years because of the drought. The springs kept my pond full for that past month while some of my neighbor's ponds dropped a few inches. I'm embarrassed to admit it, but I still don't know for sure what the size of the watershed is. It may be 30 acres or even a little more. Here's a video of the flow coming into the pond through the 20 inch culvert after 3 or 4 inches of rain. At the time the water was about halfway up the opening of the pipe. There is about 6 - 8 acres that run directly into the pond without passing through the pipe.  The 6 inch siphon moves a lot of water after it gets primed. My pond was at full pool when we got 4 inches of rain 2 days ago and the siphon kept up with the inflow for most of the day. When we hit the 3.7 inch mark the water started going over the emergency spillway. I had to leave the property shortly after that, but from what I can tell by the leaves and sand the emergency spillway didn't run very long. I don't suppose that it's unreasonable to have water going over the spillway after getting a 4 inch rain, so I don't fault the pond builder for sizing the pipe at 6 inches. In a conversation with the builder I mentioned that I might want to install an 8 inch pipe myself, but that I didn't expect him to do it. I explained to him that I think most people would be fine with the system he installed, but that I was probably more fussy than most about water going over the spillway (because of outside fish migrating into my pond). When he heard my preference he insisted on installing the larger pipe himself. Anyone who gets a pond builder like the one we found is very lucky.
|
|
|
Moderated by Bill Cody, Bruce Condello, catmandoo, Chris Steelman, Dave Davidson1, esshup, ewest, FireIsHot, Omaha, Sunil, teehjaeh57 |
|