|
Forums36
Topics40,963
Posts557,999
Members18,505
| |
Most Online3,612
Jan 10th, 2023
|
|
|
6 members (Jward87, Freunb02, Harrison55, Boondoggle, Bigtrh24, FishinRod),
1,309
guests, and
307
robots. |
|
Key:
Admin,
Global Mod,
Mod
|
|
|
|
Joined: Oct 2005
Posts: 6,934 Likes: 2
Ambassador
Field Correspondent Lunker
|
OP

Ambassador
Field Correspondent Lunker
Joined: Oct 2005
Posts: 6,934 Likes: 2 |
Last summer, just before my contractor packed up the equipment after completing the pond excavation, we spent a couple hours crossing T's and dotting I's on the project. One of the numerous responsibilities I accepted was installation of something that he called a hooded inlet. I gave him the same quizzacal look that I am sure he has become accustomed to. He told me it is nothing more than a horizontal plate that extends out beyond the top of the pond side of the primary spillway pipe. It's main purpose is to prevent a vortex or whirlpool when the pipe is full and handling extreme water volume. A vortex would detract from the water volume that the pipe can handle. He gave me a brief description of the fundamentals, knowing that I would likely over-engineer it anyway. I hope I didn't let him down. - - So, last weekend, D-ski and I head on out to set some support poles for the hood. I had some of the 1" dia aluminum round stock left over from the dry hydrant intake support, so I pre-fab'd a temporary wooden frame at home to cradle them. We rounded off the tops of the aluminum poles, pre-drilled the hardware bracket holes in them, and bolted a 5" long stainless steel bolt thru the very bottom of each rod. This SS bolt will set up in the concrete we poured, stabilizing the rod securely after cure. A clamshell posthole digger and spade shovel are used to create two postholes in the clay. 180# of sakrete and pond water. 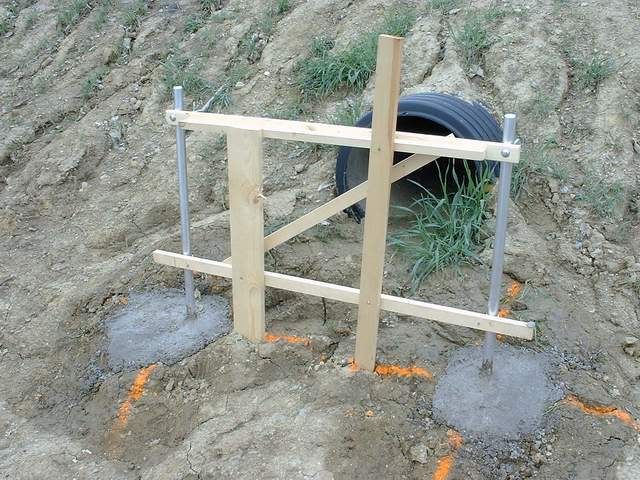 - - One week later, we go back with the balance of the hood parts for final installation. The stakes and wooden frame are removed; the 1" aluminum support poles are very sturdy. I pre-fab'd a section of 1/4" x 1.500" x 24" bar stock, rolled it to the exact dimension of the O.D. of the spillway pipe, drilled 3 mounting holes in it, and painted it. It was installed with three 1/4" galvanized bolts, the heads of the bolts inside the pipe to minimize flow restriction and possible snags. 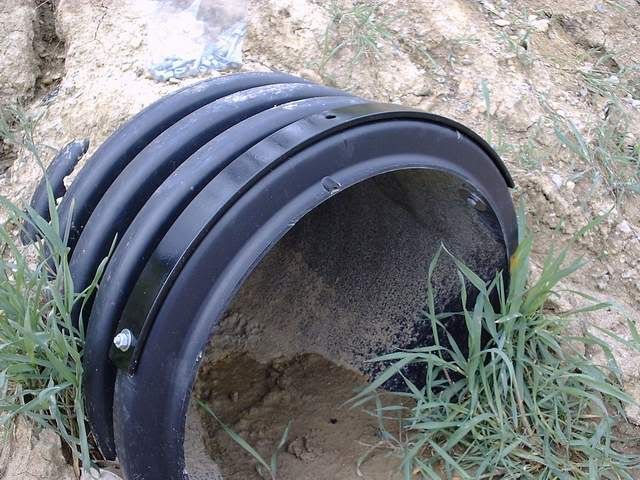 The plastic pipe itself is not very structurally sound, but this stout bracket with it's 3 points of attachment should provide the support I seek. SS fender washers were installed beneath the bolt heads at the inside of the pipe to distribute the torque when I snugged up the bolts. - - Finally, a pc of galvanized perforated angle iron was stretched and bolted between the aluminum support poles. The hood itself is a pc of carbon steel, 1/8" x 30" wide x 32" long. It is also primed and painted. The third bolt at the top/center of the circular bracket on the spillway pipe also goes thru the hood. 3 more bolts at the other end of the hood go thru the perforated angle. 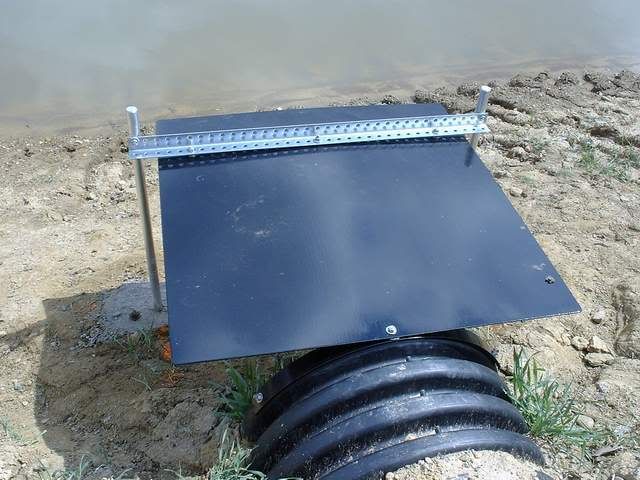 - - Before I install and crank down the 3 bolts at the perforated angle, I put 2 SS washers on the center bolt between the angle and the hood plate. This will allow moisture to dry and dissipate better, minimizing the potential of corrosion. At the two outside bolts, I install 5 SS washers for the same reason AND it deflects the hood plate so rain and moisture will shed better. 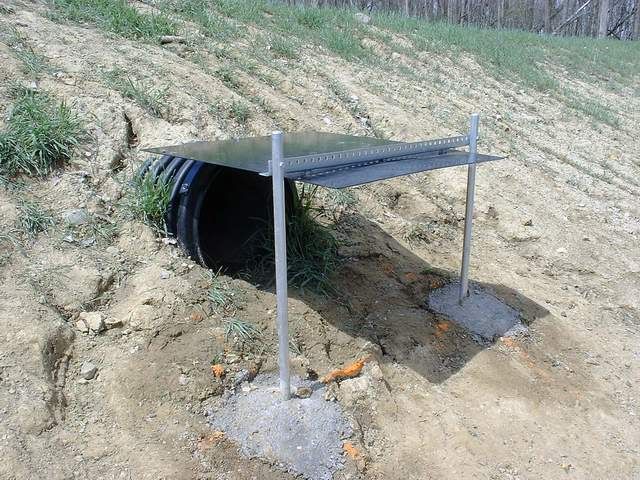 - - Lastly, we were dissatisfied with the quality of the erosion preventative vegetation surrounding the spillway area, so I fired up the small 8" cultivator and chewed up the surrounding soil. We fertilized and seeded heavily with perennial rye, then covered it with burlap (Thanks for the tip on Dayton Burlap , Cecil  ) 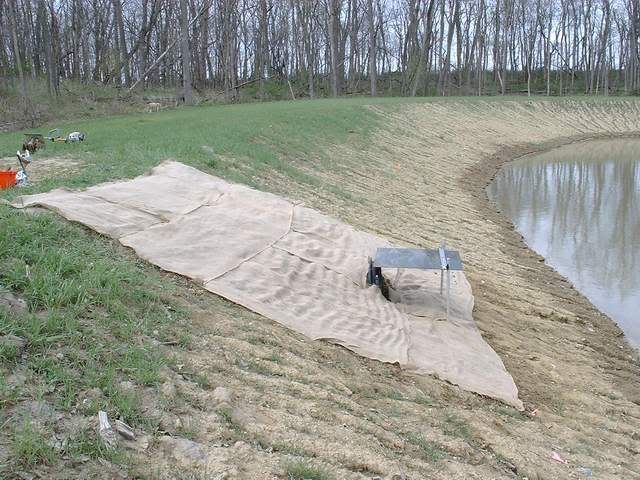 - - About this time, Ed Eitel will check in and diplomatically share inuendo on my oversights. If I goofed, Ed, tell me quick...the water, she be comin'!  - - Anybody else wanna kick in, please do. When ya think about it, this is a critical little doo-dad. I guess that there are ways to cut the actual spillway pipe at an angle, thus creating the hood. I'm linkin' this thread to my PB forum anthology, so any help and tips may be useful to those that follow.
|
|
|
|
|
Joined: May 2004
Posts: 13,975 Likes: 277
Moderator Lunker
|
|
Moderator Lunker
Joined: May 2004
Posts: 13,975 Likes: 277 |
I don't have my copy with me to check, but I think Lusk talks about this concept in Perfect Ponds. The example shown was a vertical drain pipe, with a large vertical flat piece of steel bisecting the opening. Purpose was identical - to prevent water from swirling around while draining.
Besides maximizing the water flow, it also prevents the vortex from eroding dirt near the pipe.
"Live like you'll die tomorrow, but manage your grass like you'll live forever." -S. M. Stirling ![[Linked Image from i.pinimg.com]](https://i.pinimg.com/736x/ed/b5/e7/edb5e7f935843b996cf52be593c9ebd2--smoothie-smooth-collie.jpg)
|
|
|
|
|
Joined: Feb 2006
Posts: 347
Lunker
|
|
Lunker
Joined: Feb 2006
Posts: 347 |
I see hooded inlets on all the ponds that the government assists with in the area. But they appear simpler then your creation.
To Dam or not to dam  That isn't even a question That isn't even a question
|
|
|
|
|
Joined: Mar 2004
Posts: 229
Lunker
|
|
Lunker
Joined: Mar 2004
Posts: 229 |
Brettski,
I would pull the sides down and attach to the pipe.
Then it should work real well.
|
|
|
|
|
Joined: Oct 2005
Posts: 6,934 Likes: 2
Ambassador
Field Correspondent Lunker
|
|
OP
Ambassador
Field Correspondent Lunker
Joined: Oct 2005
Posts: 6,934 Likes: 2 |
It's been 6 weeks since we fertilized, seeded heavily with perennial rye, and covered with burlap. The resulting growth appears good, but most of it has not pushed thru the burlap and it doesn't appear that it will. 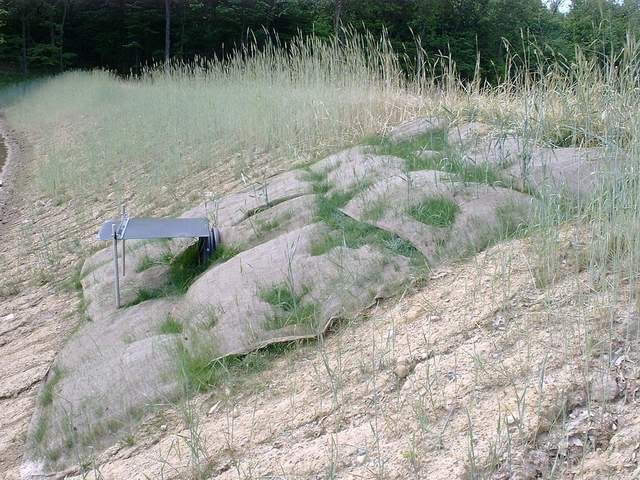 This is a first for me, so I wasnt' prepared to see this. Is this normal? Just leave it alone? There is this rationalizing drive to try to work the burlap off of the stuff that poked thru and remove it, but I know that is not the normal procedure. What now...nothin'?
|
|
|
|
|
Joined: May 2004
Posts: 234
Lunker
|
|
Lunker
Joined: May 2004
Posts: 234 |
B-ski, Are the plants turning yellow and trying to grow in a prostrate (not prostate) fashion under the burlap? The burlap could be such a tight weave, that it may be tough for small seedlings to penetrate. You may want to take a sharp knife and cut slits in the burlap to expidite things? 
|
|
|
|
|
Joined: Oct 2005
Posts: 6,934 Likes: 2
Ambassador
Field Correspondent Lunker
|
|
OP
Ambassador
Field Correspondent Lunker
Joined: Oct 2005
Posts: 6,934 Likes: 2 |
*** fast-forward from May '07 to Jan '08 *** Well, we did carefully remove all the burlap last May and it wound up being the best move. By the time we did so, some of the grass underneath was already choking out and beginning to turn yellow. We kept it watered and it came out pretty good in the long haul. - Actually, tho, the reason for reviving this thread was more related to some recent banter on the What if my Spillway Pipe is Clogged? thread. The conversation twisted slightly (go figger) to trash racks or guards at the intake of spillway pipes. I gotta thank our PB forum pal Rockytopper (aka; previous reigning Kook King) for pushing the issue. He finally broke thru the fog and convinced Theo and me (and perhaps others) to install some type of trash guard on the intake of the spillway pipe. Even though it was the middle of January in the midwest, we had just had a stretch of inordinately warm weather, so the ground was not frozen solid. This is what I did. - - The hooded inlet just after installation last May '07 (for reference) - - Here we are, 8 months later, and I'm preparing for my January project. I pre-cut some more galvanized angle and added pre-cut lengths of #3 (3/8" dia) epoxy coated rebar. I also selected an installation day that followed a short string of warm weather days. Too bad that the actual installation occurred during a cold front that provided 5 degree temps and -20 wind chill.  I decided to install only vertical members for this trash guard, so I spaced them 3" apart. I drilled out every 3rd hole in the angles to allow the rebar to pass through with some slop. The rectangular framework was bolted to the existing cross member that supports the hood. There is also a stainless bolt into the dual wall pipe itself to support the back end of the new frame. I added 2 pc of vertical angle pounded into the soil at each side of the spillway pipe and bolted to the trash guard frame. 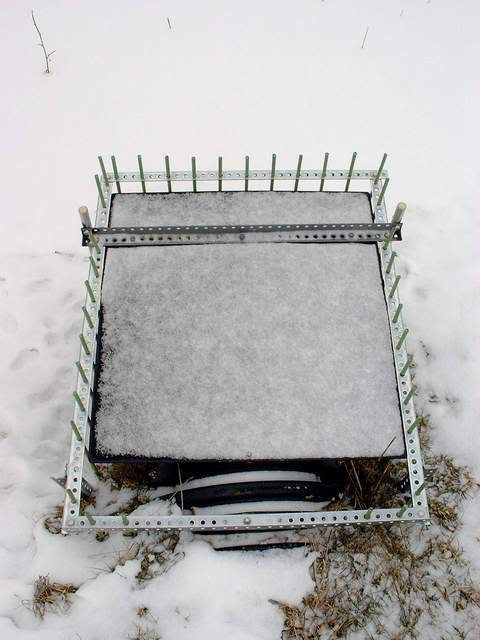 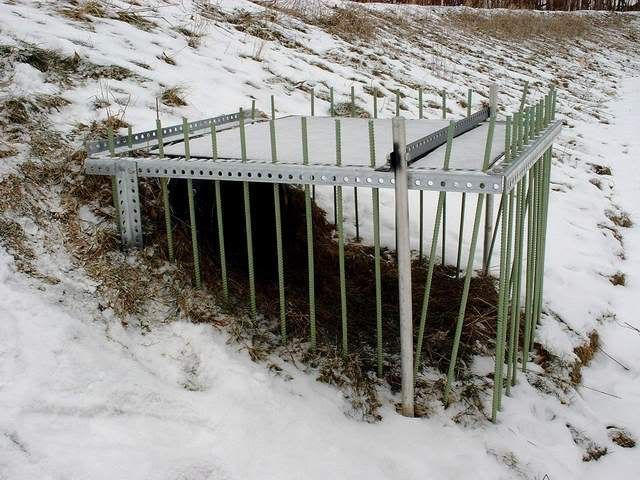 - - The rebar is 15" - 18" deep into the soil. I had to lean and adjust the bars that entered the soil around the concrete piers that anchor the 1" aluminum hood-support poles. Overall, I think it qualifies as temporarily permanent. - 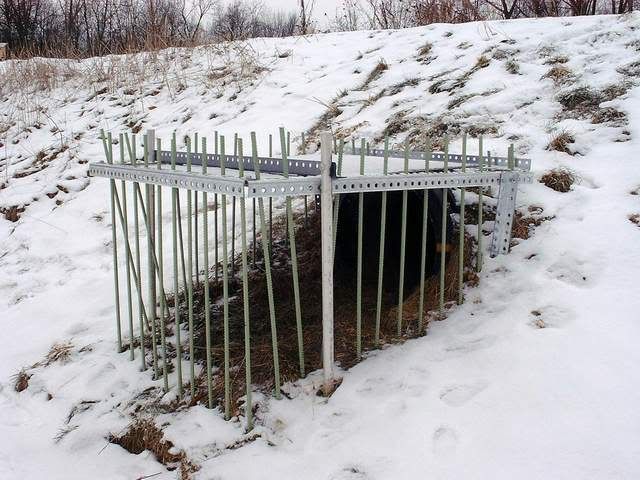 - I am now ready to hand in my report to Mr. Topper and await my final grade.
|
|
|
|
|
Joined: May 2004
Posts: 13,975 Likes: 277
Moderator Lunker
|
|
Moderator Lunker
Joined: May 2004
Posts: 13,975 Likes: 277 |
Do I see Patrick McGoohan's face peering out of the darkness from behind the rebar?
I still have to get a guard put on my new spillway pipe, but I been busy. And I'm still over 3 feet below full pool. But when it goes on, it won't look as good as Brettski's.
Last edited by Theo Gallus; 01/26/08 08:52 PM. Reason: Full Disclosure
"Live like you'll die tomorrow, but manage your grass like you'll live forever." -S. M. Stirling
|
|
|
Moderated by Bill Cody, Bruce Condello, catmandoo, Chris Steelman, Dave Davidson1, esshup, ewest, FireIsHot, Omaha, Sunil, teehjaeh57 |
|


