|
Forums36
Topics41,010
Posts558,491
Members18,529
| |
Most Online3,612
Jan 10th, 2023
|
|
|
8 members (catscratch, Boondoggle, cjschuhmann, andrew davis, Angler8689, Waxaholic, Bigtrh24, highflyer),
1,251
guests, and
485
robots. |
|
Key:
Admin,
Global Mod,
Mod
|
|
|
|
Joined: Sep 2009
Posts: 13
Lunker
|
OP

Lunker
Joined: Sep 2009
Posts: 13 |
I discovered the PB site a few days ago when searching for some information about stocking a pond. Wow! I'm loving all of the information and things I've been reading about. It's fascinating! I wanted to contribute my recent experience. I've added several photos since they're usually a welcome addition (I like pictures). My family and I live on 57 acres in South-Central Kentucky. We love the area and enjoy our "homesteading" adventure. One of my big projects is building a house (I blog about it at Cedar Ridge Farm, in case anyone is interested). We moved here in 2003, and one of the things we've wanted to do is build a pond. We've had the site in mind, but we haven't had the funds to make it happen until this summer (we don't do debt). The intended purposes for the pond are swimming, some fishing, irrigation, and to add beauty. It's located near the house I'm building. So, we'll be right next to it and able to enjoy it year-round. 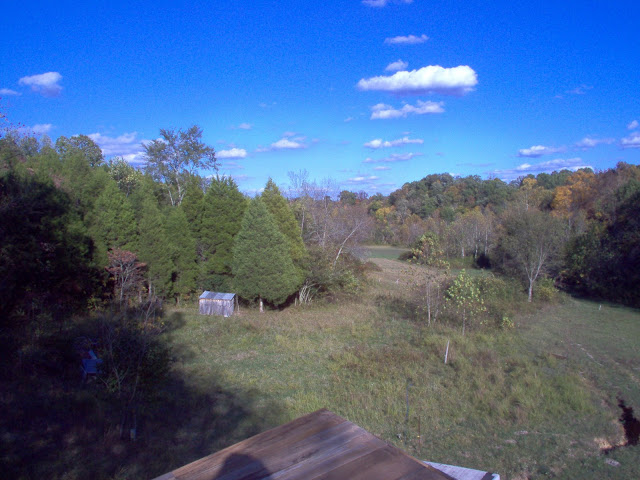 This is the site for the pond a couple of years ago. I was standing on the roof of the house I'm building when I took this photo. 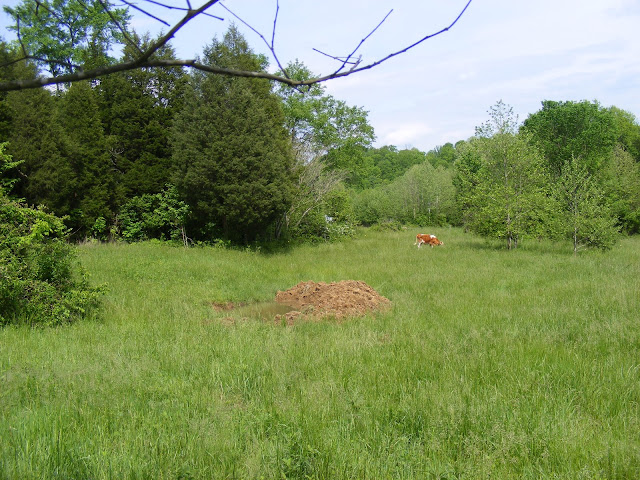 Here's another photo of the site taken this spring. I dug a small hole (about 9' x 4') with a borrowed backhoe to test for clay. There was clay, and the hole held water all summer. I had a couple individuals come out from NCRS a couple of years ago for an evaluation of the pond site. They were less than helpful. Based upon their records for the soil in the area, they gave me a 50/50 chance of a pond there holding water. They did say that whoever I got to build the pond would be able to tell once he started. They didn't do much more than get out of the car and talk to me for a few minutes. After we'd had a bit more dry weather in August, I talked with and then hired a local guy to come in with his trackhoe and dump truck to make the pond. I didn't find PB until the job was just about finished. He originally estimated that it would take 3 days to dig the pond and build the dam. It didn't work out that way, though.  Here he is shortly after beginning the excavation. He was moving the top soil behind the dam location so that it could be pulled back up onto the outside of the dam later. It was shortly after this point that we realized the project wasn't going to be as simple and quick as we both hoped. There were some major pockets of top soil. We're talking like 6 or 7 feet of it. Neither of us expected that. Apparently, over the last several hundred years, a lot of material has washed down off the ridge above and settled here. He said that if I was closer to the main road (I'm glad I'm not, though), I could've gone into business selling top soil.  Here's another view of the site after he scraped off the sod and a foot or two of top soil.  In this photo, he had started digging out the extra top soil in order to get to the clay. He loaded the dump truck and stock piled the dirt behind the far end of the proposed dam (you can see some piles near the trees to the back right). There was good clay under there, thankfully. In some places the clay wasn't too deep. In other places, there were seams of top soil in between ridges of clay. He might dig three feet into clay and still have top soil adjoining it at that depth. I had wanted to make the pond as large and deep as possible. But, with the cost of the project increasing with each day required to move more top soil, I decided to move the dam back a bit, making the pond a little smaller. It will have right at 1/4 acre of surface area instead of 1/3 acre that it would've had as originally planned. It will be 12-13 feet deep on the far end, though. We didn't take all of the top soil out. I'm considering borrowing my friend's backhoe again and taking a bit more out on the shallower end. He dug down to good clay for the dam, allowing a good core trench. After he built the dam up a few feet, he had to move clay from another area of the pond:    I was happy with digging down for clay for the dam because that made the pond deeper. 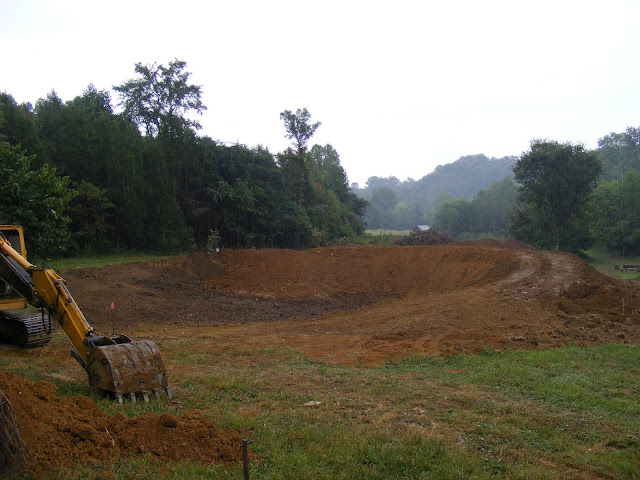 After a week's worth of work, this is what things looked like. We were pretty much done, and I was just about out of money. There were only a couple of things left to do: install the overflow pipe and emergency spillway and build up shape the back side of the dam. You can see in this photo that the slope on the back side was a bit extreme. 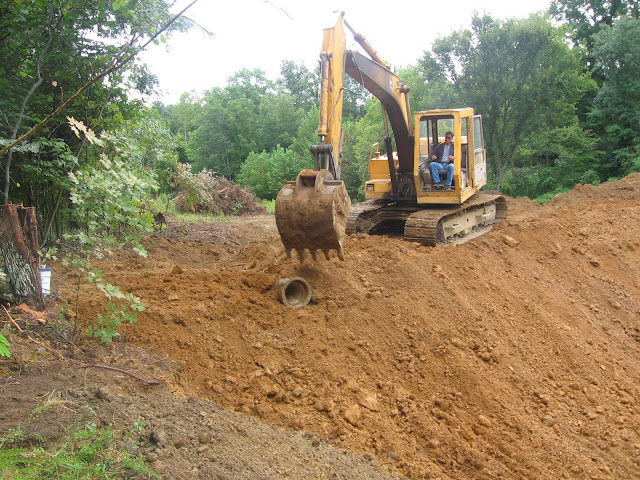 We used a 12" concrete culvert that was here on our farm for the overflow. This should be sufficient over 90% of the time. The watershed for the pond is about 8 acres of hillside. There is another 12" culvert under one of my drives through which the water has been flowing when it rains, draining into a small creek. It has handled the water quite well. We also cut an emergency spillway near the overflow pipe for those times when we get a goose-drowner. The water coming into the pond will mostly come out of a fairly level draw between the hill sides.  With one more day of work, he was able to move the stockpiled top soil and put it on the outside of the dam. I'm glad we had it to put there.  As you can see in these photos, it is rough and was not packed down. The dam itself was well-packed, but the top soil added to the back slope on the last day of work was not. If he'd had a dozer, he would have run over it. I'm going to let it settle over the winter, and then disk and drag it in the spring before seeding it with grass. I would like to broadcast a cover crop on it this fall, though. I'm wondering if there are any advantages to winter rye over wheat or vice versa. Any suggestions? I have a few more photos in a Picassa photo album if you're interested. I'll post more as I continue working on the pond. I'm building a dock and hopefully a beach area. It'll be great to see it begin to fill up when we start getting some rain this fall. I look forward to learning more from everyone on this site. Thanks already for what you've contributed and what I've been able to glean already. I'm glad to have found this site. I am open to all comments and/or suggestions about my project. mudburn
|
|
|
|
|
Joined: Dec 2008
Posts: 119
Lunker
|
|
Lunker
Joined: Dec 2008
Posts: 119 |
Mudburn, thanks for posting all the pics. I would not wait to get something on those slopes. As steep as they are they will erode badly. I have recently planted winter peas on slopes very similiar to those on my pond and have been pleased but we have not had a big rain fall event since then. The peas add green manure when disced in and since they are a legume they fix nitrogen. In your case an anual rye with the peas is probably a good idea. If it is in the budget I would sod it but I could not afford it when I dug mine, now a few dozen tractor hours later the banks are starting to come around to what I want but have a long ways to go. Good luck
|
|
|
|
|
Joined: Nov 2005
Posts: 773 Likes: 1
Lunker
|
|
Lunker
Joined: Nov 2005
Posts: 773 Likes: 1 |
Great job of documenting your pond construction. It sounds like you overcame a pretty big suprise with all that topsoil!!!!
How did you compact the soil on the dam? I know most dams are very poorly compacted with bull dozers spreading out the soil in lifts and then driving over the soil with the tracks again and again, to get some level of compaction. But in your pics, it looks like the dirt was all piled up at once and then smooothed out on top. If dirt sits long enough, it will compact under it's own weight, but this usually takes a few years, depending on the soil type and moisture in it. Just piling and spreading dirt creates more of a sponge then a barrier to hold water.
The finished picture also shows a nice, smooth bowl of for the bottom of the pond. Fish like some variation. Holes are nice for some fish, as are trenches and mounds. If you don't want to risk punching through the clay on the bottom with a hole or trench, then building up is a good idea. Logs, concrete, rock and stumps all work great.
Are you going to build a dock? I have one on my small pond, but didn't put it in at first. Then after messign around with the plants and bugs along the shoreline for two years, I changed my mind. In my case, the water was way down from a two year drought and I was able to get into the pond and build it while it was very low. Unfortunately, I made the same mistake on my big pond and didn't build a dock. I'm going to build a floating dock on that pond. Just fishing along the shoreline is fine, but I have allot of snakes, fire ants and biging bugs in my area, so dealing with that has made it less enjoyable to fish the shoreline then I had thought it would. It's more money, time and effort to do it now that the pond is full, but that's just what I have to deal with by not doing it right the first time.
Eddie
|
|
|
|
|
Joined: Jul 2006
Posts: 7,615 Likes: 5
Ambassador
Field Correspondent Lunker
|
|
Ambassador
Field Correspondent Lunker
Joined: Jul 2006
Posts: 7,615 Likes: 5 |
Hello mudburn and welcome to pond boss. Great first post! Also interesting blog. Between you and Lassig we have some great projects to follow along with!
JHAP
~~~~~~~~~~
"My mind is a raging torrent, flooded with rivulets of thought cascading into a waterfall of creative alternatives."
...Hedley Lamarr (that's Hedley not Hedy)
|
|
|
|
|
Joined: Nov 2004
Posts: 1,074
Lunker
|
|
Lunker
Joined: Nov 2004
Posts: 1,074 |
Welcome aboard.
You did a lot without much help.
Keep us posted.
|
|
|
|
|
Joined: Sep 2009
Posts: 13
Lunker
|
|
OP
Lunker
Joined: Sep 2009
Posts: 13 |
Mudburn, thanks for posting all the pics. I would not wait to get something on those slopes. As steep as they are they will erode badly. You're welcome for the photos. It's nice to be able to see a bit what's being talked about. I'll get some rye or something seeded soon. I don't want erosion. The backsides of the dam are made of lots of top soil, and as I mentioned, this part wasn't packed in -- it'll need to settle. We just got 1.5 inches of rain today. There was no erosion because the top soil soaked up all the rain. That also means it's too soft to walk on, but that'll change soon as it dries out. If it is in the budget I would sod it but I could not afford it when I dug mine, now a few dozen tractor hours later the banks are starting to come around to what I want but have a long ways to go. Good luck Sod isn't in the budget. I'll be seeding it with some perennial grasses in the spring. The slope is such that I ought be be able to disk it and then seed it. Hopefully, the cover crop will keep things from washing away and eroding during winter/spring rains. mudburn
|
|
|
|
|
Joined: Sep 2009
Posts: 13
Lunker
|
|
OP
Lunker
Joined: Sep 2009
Posts: 13 |
Thanks for the comments, Eddie. I loved reading about Lake Marabou. It's beautiful and incredible!
The clay for the dam was compacted with the track hoe. He put on about a foot of clay at a time and then walked it pretty good. Almost all of the clay was at a nice level of dryness -- there was a bit that was wetter from the section he had to dig it out. He let it sit for a day before working it in. That parts on the top of the dam, actually. The back side of the dam is composed of many yards of top soil. The last bit that was added to make the back slope manageable wasn't compacted though. It'll have to settle over winter. That shouldn't affect the business part of the dam (I hope).
There are several different levels on the bottom of the pond right now. The deepest is in the corner of the dam at about 12 feet. Under the overflow it steps up to about 9 feet. There is another step up toward the end nearest the house to about 6 feet and sloping toward the house. This part I actually want to dig out a bit more before the pond fills up, mainly along one side of the pond. The slope there is too gradual. I'm hoping to address the situation with a backhoe this week. It was an oversight on my part that left it as it currently is. I'll add some more variation and some structure. There are a lot of ideas on here about doing that.
I am building a dock. I've put the first four posts in. They are true 6x6 Easter Red Cedar posts that I milled. They each have about 150 pounds of concrete at their base, and I'm going to brace them to one another. These posts are in the middle of the pond. The other posts I'll set soon, but should have a little breathing time before it fills up. The dock will extend about 24' from the shore. I had thought of a floating dock, but something more stable will be nice.
We had 1.5 inches of rain today, so there is some water in the deepest part of the pond. I'm guessing nearly 2 feet, but I didn't wade through the mud to measure it. It's been kind of dry the last few weeks, so it took a while before there was much runoff.
mudburn
|
|
|
|
|
Joined: Sep 2009
Posts: 13
Lunker
|
|
OP
Lunker
Joined: Sep 2009
Posts: 13 |
I spent some time working on the dock a few days ago. I also used the grader blade on my tractor to take a little soil off of the shallow end. When I shot the water line on the shallow end of the pond, I realized I hadn't paid enough attention earlier while the guy was working on the construction. The slope and depth on a couple edges for several feet were not what I wanted. Just looking at it, I didn't realize that the water would be as low on the edge as it will be. 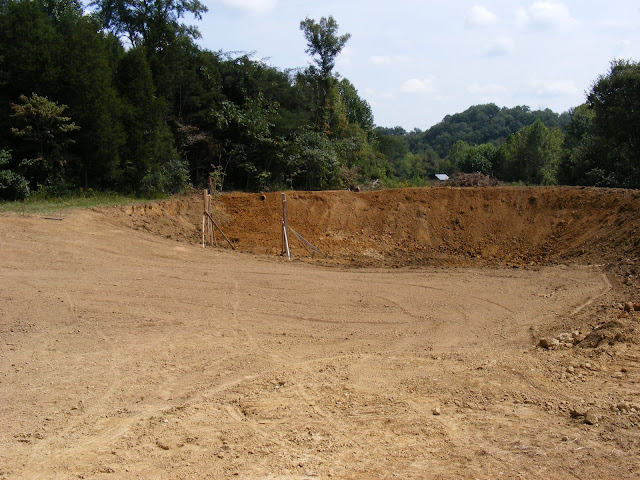 In this image you can see the shallow end and the beginning of my dock construction. At the edge of the smoothed area, the bottom drops down several feet. I'm placing the dock between the deep end of the pond and the shallow end. I thought this would be an ideal location. The four posts that are set in the photo are 6x6 eastern red cedar I milled. 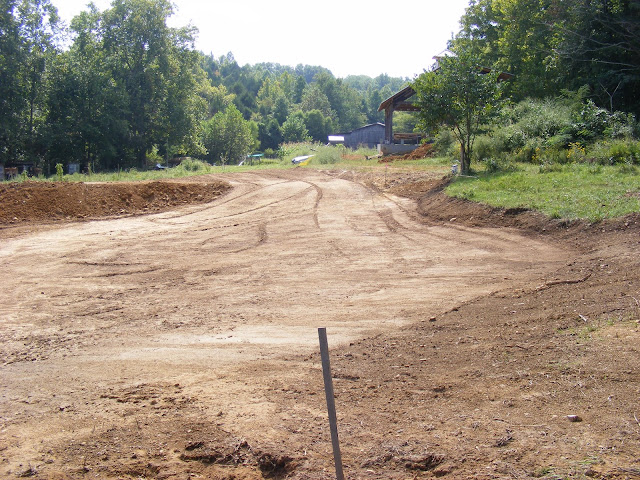 This photo looks the other direction across the shallow end. The line I cut with the blade denotes the approximate water level. I am currently working on increasing the depth along this edge (photos below).  I set four more posts for the dock yesterday. These weren't milled. The two on the left will not be in the water. Overall, it will be about 36 feet long.  This photo shows how the dock will have a slight dog leg in it. I think it will be aesthetically pleasing. It also made it possible to set the middle posts in more solid ground. I'm going to use some oak 4x6s for framing on top of the posts once I cut them off at the correct level. 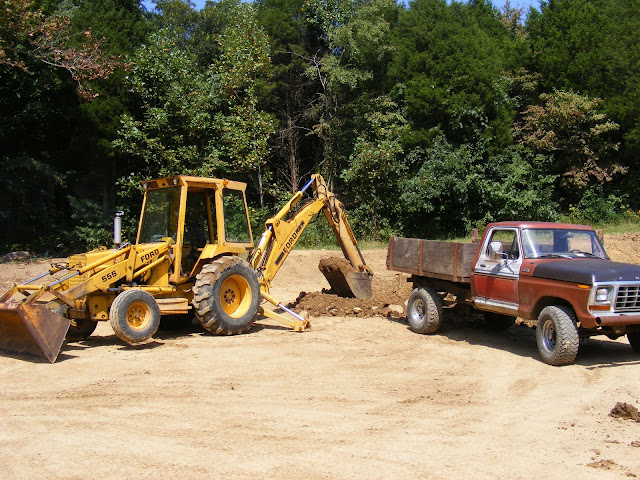 Today I was able to begin using a backhoe to deepen the area of the pond that I want to be deeper. The backhoe belongs to a friend of mine who is generous enough to let me use it. The truck is my 1979 F250 4x4. 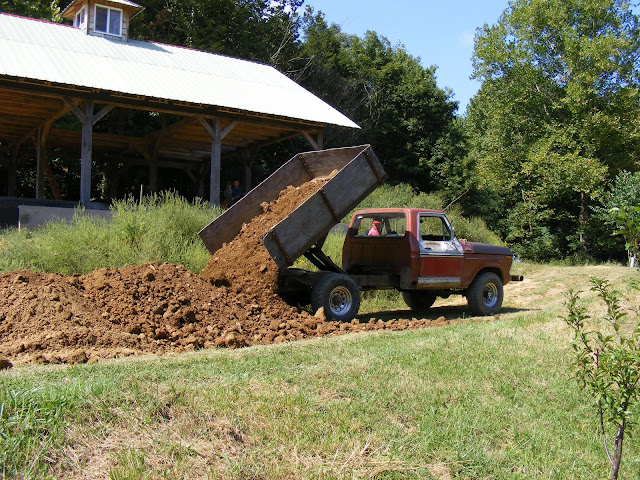 This is a feature that makes this truck very handy. I can load up to 2 tons of material in it. That only takes 6 or 7 shovels full with the backhoe.  I moved most of the dirt I dug out this afternoon to the front of my house in order to feather out the slope in front. There's a lot more to move in the next couple of days.  This is what I was able to get done this afternoon. I dug it down about 2.5 feet. I'll need to extend this out toward the middle, of course. I'm leaving a ridge under the dock, maybe with a couple shallow channels cut through it. I'm also thinking about other structure to create during this process. 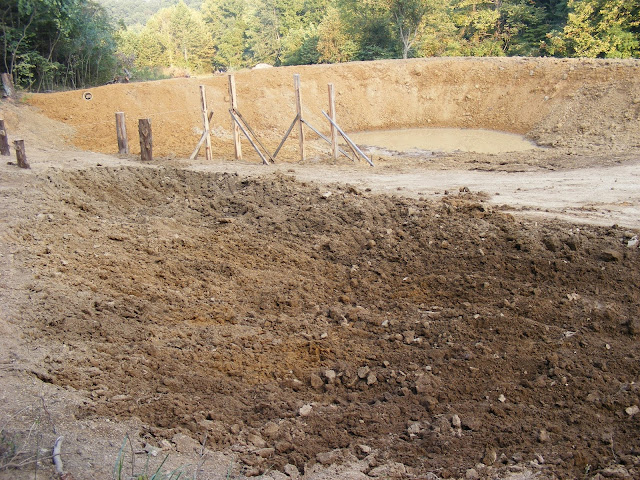 This view shows the pool of water from our rain earlier in the week. You can also see that although I got down to clay in one part of this excavation, I'm also still digging out top soil. I'm not going to remove all of it. I'll add more updates as I continue to work. mudburn
|
|
|
|
|
Joined: Nov 2004
Posts: 1,074
Lunker
|
|
Lunker
Joined: Nov 2004
Posts: 1,074 |
Thanks for the update---Just guessing you are on vacation ---it looks like you are getting a lot of work done on the pond---
good work
|
|
|
|
|
Joined: Sep 2009
Posts: 13
Lunker
|
|
OP
Lunker
Joined: Sep 2009
Posts: 13 |
Actually, I'm not on vacation. My paying job is teaching a university class online part time. This allows me to stay home with my family and work on things here. I took a substantial pay cut when we moved here, but it's worth it.
mudburn
|
|
|
|
|
Joined: Oct 2005
Posts: 6,934 Likes: 2
Ambassador
Field Correspondent Lunker
|
|
Ambassador
Field Correspondent Lunker
Joined: Oct 2005
Posts: 6,934 Likes: 2 |
Hey mudburn! Great project!
I see very little freeboard over the primary spillway. Your ratio of drainage to pond size would concern me in a significant rain event with the freeboard that I see in the photos. Are there plans to raise the top/dam?
|
|
|
|
|
Joined: Sep 2009
Posts: 13
Lunker
|
|
OP
Lunker
Joined: Sep 2009
Posts: 13 |
Hey mudburn! Great project!
I see very little freeboard over the primary spillway. Your ratio of drainage to pond size would concern me in a significant rain event with the freeboard that I see in the photos. Are there plans to raise the top/dam? Thanks for the comment, Brettski. There currently are no plans to raise the dam height, but I will make plans if it's necessary. The dam was constructed to have 12" to 18" of freeboard above normal water level. I will recheck the level to assure that the dam allows the proper amount of freeboard. The primary drain is a 12" culvert with an emergency spillway. My choice of the 12" culvert is based upon watching water during the last few years drain through the area where the pond was constructed. All of it has been channeled through another 12" culvert identical to the one installed on the pond. However, I will recheck things, especially paying attention to the freeboard over the primary and emergency spillways. mudburn
|
|
|
|
|
Joined: Jul 2006
Posts: 7,615 Likes: 5
Ambassador
Field Correspondent Lunker
|
|
Ambassador
Field Correspondent Lunker
Joined: Jul 2006
Posts: 7,615 Likes: 5 |
Great photos and narrative!
JHAP
~~~~~~~~~~
"My mind is a raging torrent, flooded with rivulets of thought cascading into a waterfall of creative alternatives."
...Hedley Lamarr (that's Hedley not Hedy)
|
|
|
|
|
Joined: May 2008
Posts: 87
Lunker
|
|
Lunker
Joined: May 2008
Posts: 87 |
For the fishing part of your project, structure my man, sturcture, while it is still empty. WAY easier.
|
|
|
|
|
Joined: Sep 2009
Posts: 13
Lunker
|
|
OP
Lunker
Joined: Sep 2009
Posts: 13 |
I've read a bit about structure, and in terms of the contour of the bottom, we'll have some structure. Where I'm adding the dock, for instance, is on a ridge on either side of which the water level drops a few feet. I'm going to add some other things like concrete blocks and things for cover as well. I'll try to show some of the structure in some photos later. If there are any specific suggestions regarding structure, let me know. My biggest concern right now has to do with Brettski's question about freeboard. I didn't specifically double-check things behind the builder regarding the height of the dam and the water level. I should have. Things are not as I want them. I shot the lines today, and I do need to add some height to the dam in places -- about 10" at the lowest. Once I add, the dam height will be 19" above regular water height and at least 10" above the emergency spillway height. I'm going to tackle that at the beginning of the week. So, Brettski, thanks for the question because it prompted me to check what I already should have checked. It'll be a whole lot easier to take care of it now than later. The bright side of everything is that I get to be a lot more involved in the construction of this pond than I otherwise would have.  mudburn
|
|
|
|
|
Joined: Jan 2009
Posts: 28,604 Likes: 861
Moderator Ambassador Field Correspondent  Lunker
|
Moderator Ambassador Field Correspondent Lunker
Joined: Jan 2009
Posts: 28,604 Likes: 861 |
Good eyes Brettski! Mudburn, it looks like the pond is coming along nicely.
|
|
|
|
|
Joined: Oct 2005
Posts: 6,934 Likes: 2
Ambassador
Field Correspondent Lunker
|
|
Ambassador
Field Correspondent Lunker
Joined: Oct 2005
Posts: 6,934 Likes: 2 |
I forget the dimensional relationships regarding spillway pipe/emergency spillway/freeboard, but I think it's something like:
The emergency should begin to load when the principal spillway pipe is full + 6 more inches. Then the top of dam should be 24" min about the fully loaded emergency. Does that sound correct?
|
|
|
|
|
Joined: May 2004
Posts: 13,997 Likes: 285
Moderator Lunker
|

Moderator Lunker
Joined: May 2004
Posts: 13,997 Likes: 285 |
I think you need Planck's Constant and the acceleration from local gravity in there somewhere.
"Live like you'll die tomorrow, but manage your grass like you'll live forever." -S. M. Stirling ![[Linked Image from i.pinimg.com]](https://i.pinimg.com/736x/ed/b5/e7/edb5e7f935843b996cf52be593c9ebd2--smoothie-smooth-collie.jpg)
|
|
|
|
|
Joined: Jul 2006
Posts: 7,615 Likes: 5
Ambassador
Field Correspondent Lunker
|
|
Ambassador
Field Correspondent Lunker
Joined: Jul 2006
Posts: 7,615 Likes: 5 |
Great off to Wikipedia again:
"The Planck constant (denoted h), also called Planck's constant, is a physical constant used to describe the sizes of quanta in quantum mechanics."
Say what?
Is that anything like the sizes of guana in guano?
JHAP
~~~~~~~~~~
"My mind is a raging torrent, flooded with rivulets of thought cascading into a waterfall of creative alternatives."
...Hedley Lamarr (that's Hedley not Hedy)
|
|
|
|
|
Joined: Jan 2006
Posts: 16,068 Likes: 280
Moderator Lunker
|
|
Moderator Lunker
Joined: Jan 2006
Posts: 16,068 Likes: 280 |
Either that or some other kind of BS.
It's not about the fish. It's about the pond. Take care of the pond and the fish will be fine. PB subscriber since before it was in color.
Without a sense of urgency, Nothing ever gets done.
Boy, if I say "sic em", you'd better look for something to bite. Sam Shelley Rancher and Farmer Muleshoe Texas 1892-1985 RIP
|
|
|
|
|
Joined: Sep 2009
Posts: 13
Lunker
|
|
OP
Lunker
Joined: Sep 2009
Posts: 13 |
I have the USDA/NRCS "Ponds -- Planning, Design, and Construction" publication. Reading the section on spillway design is confusing. Must be the part involving Planck's constant.  Based upon my reading of it, though, I don't need a primary spillway based upon the size of my pond and the watershed. However, I've put one in. Based upon the calculations I've done (these could be wrong -- I'll keep checking), my primary spillway (12" pipe) will handle a 10 year/24 hour rain event in my neck of the woods (also a 25 year event and a 50 year, if I've figured correctly). I'm going to have an emergency spillway just in case. I'm working on raising the height of the dam to provide more freeboard, though. I brought it up a bit today and will add more tomorrow. mudburn
|
|
|
|
|
Joined: Sep 2009
Posts: 13
Lunker
|
|
OP
Lunker
Joined: Sep 2009
Posts: 13 |
I'm tired. I worked the last two days adding height to the dam. The most tiring part yesterday was associated with the stress of driving my truck, my tractor, and a backhoe on top of the dam. I especially don't like when the backhoe leans to the side and when I got it into some of the soft topsoil on the back slope. I decided I didn't need it up there. The method that seemed to work well for me was to load clay into my truck from a couple different places in the floor of the pond. Then, I drove this onto the dam and dumped it where I wanted it, spreading it out some as I dumped. After several loads, I switched to the tractor and blade to move the material where I wanted it and to pack it some more (the truck tires were doing a pretty good job of packing). After getting enough clay built up, I took a few loads of top soil to put on top and spread that around. It went fairly well. 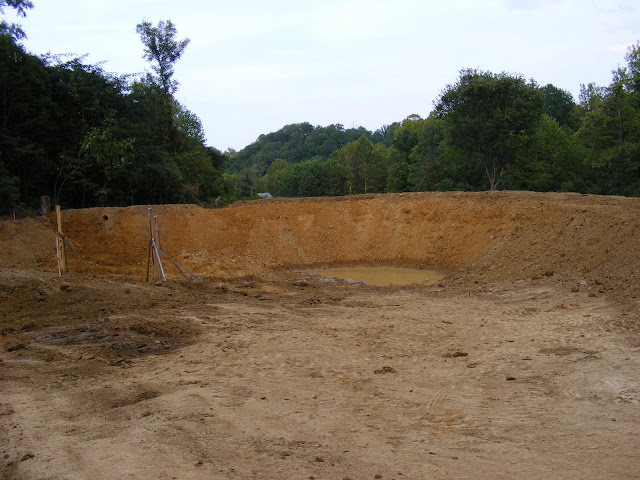 This is how it looks now. I added enough material to put the top of the dam two feet above the primary spillway (the 12" culvert). This also allowed more freeboard above the emergency spillway, which is a good thing. 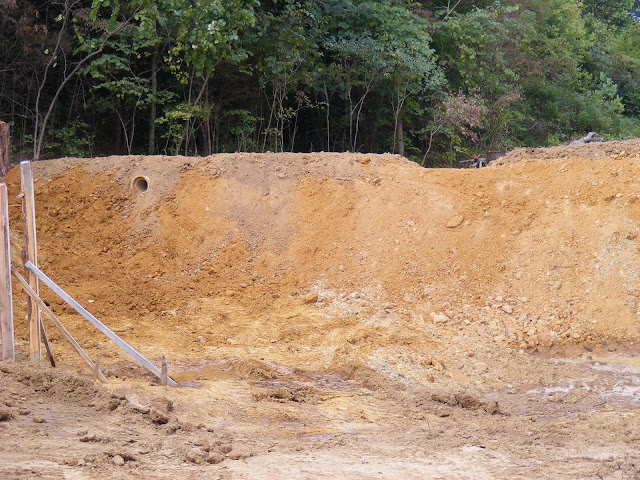 A little closer look. The section I built up looks darker because of the topsoil I added. Digging clay and soil out of the pond bottom helped to add some more structure there. There is a fair bit of variation on the bottom. 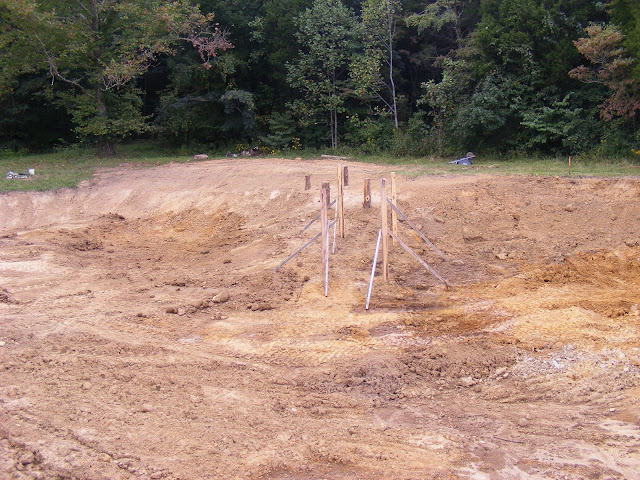 This is a view looking toward the dock from the dam. I was trying to show how the dock is on a ridge with drop offs on either side. There's also another elevation change going into the shallow end of the pond. 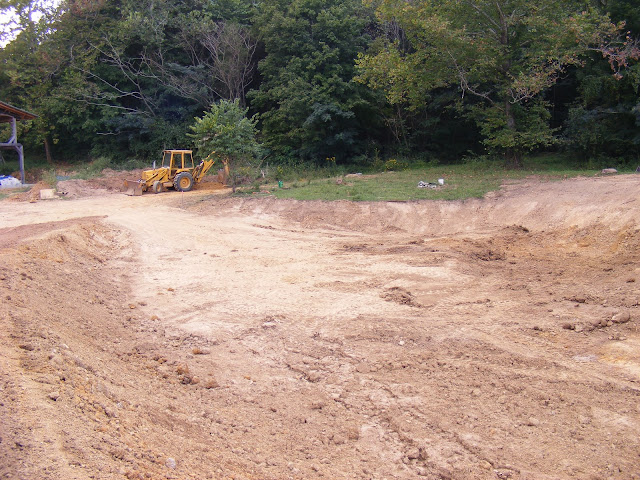 Looking a little to the left toward the shallow end. I'm going to make a small beach toward the house where I've been driving in and out of the pond hauling material.  This photo looks past the pond from below the dam toward some of my fields. mudburn
|
|
|
|
|
Joined: Nov 2004
Posts: 1,074
Lunker
|
|
Lunker
Joined: Nov 2004
Posts: 1,074 |
You are going to love it when it is all done.. Good work
|
|
|
|
|
Joined: Sep 2009
Posts: 13
Lunker
|
|
OP
Lunker
Joined: Sep 2009
Posts: 13 |
Thanks, Otto. I'm looking forward to having it all done and being able to enjoy swimming and fishing in it with my family.
Today, I broadcast fescue seed on the dam and other areas with bare dirt. It was raining lightly while I worked, making the ground a bit slippery and muddy, but the rain should also help the seed to sprout. I was going to put out some rye for a cover crop over the winter, but decided to go ahead and get the "real" grass started since it's still early enough. I may have to rework a few areas, but if it gets a good start this fall, most of it will be done.
mudburn
|
|
|
|
|
Joined: Nov 2004
Posts: 1,074
Lunker
|
|
Lunker
Joined: Nov 2004
Posts: 1,074 |
If You have any water in the pond you can buy a small pump that will run 2 sprinckler heads....Easy to move---light weight
That will take the luck out of the grass planting.
|
|
|
Moderated by Bill Cody, Bruce Condello, catmandoo, Chris Steelman, Dave Davidson1, esshup, ewest, FireIsHot, Omaha, Sunil, teehjaeh57 |
|