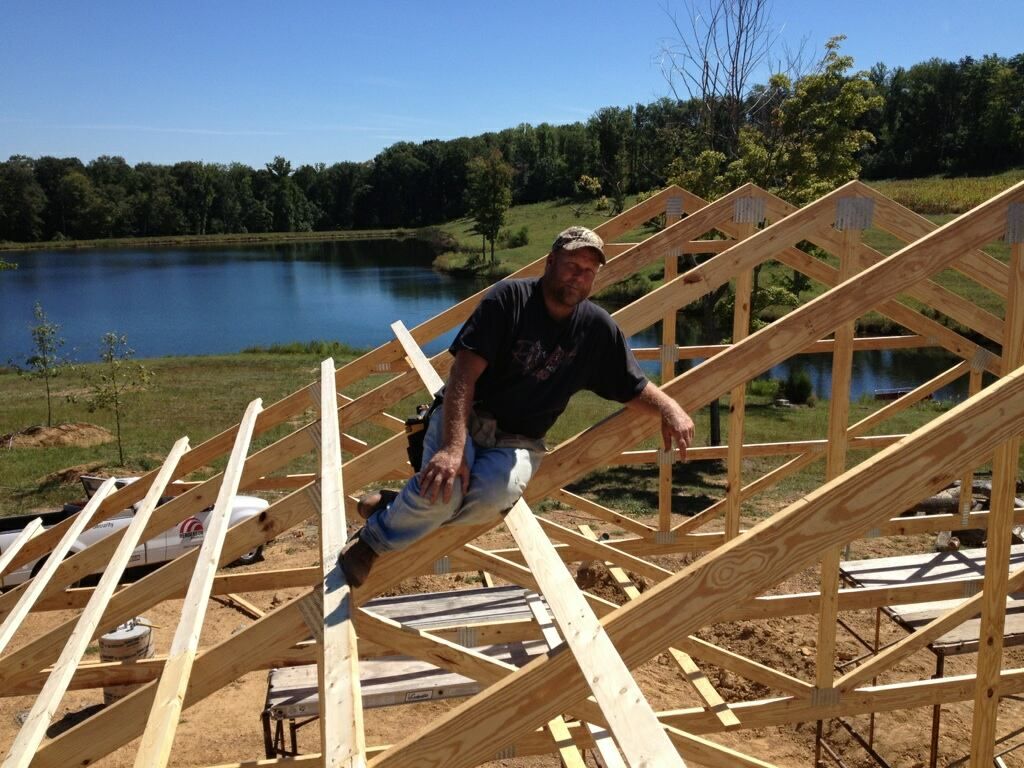
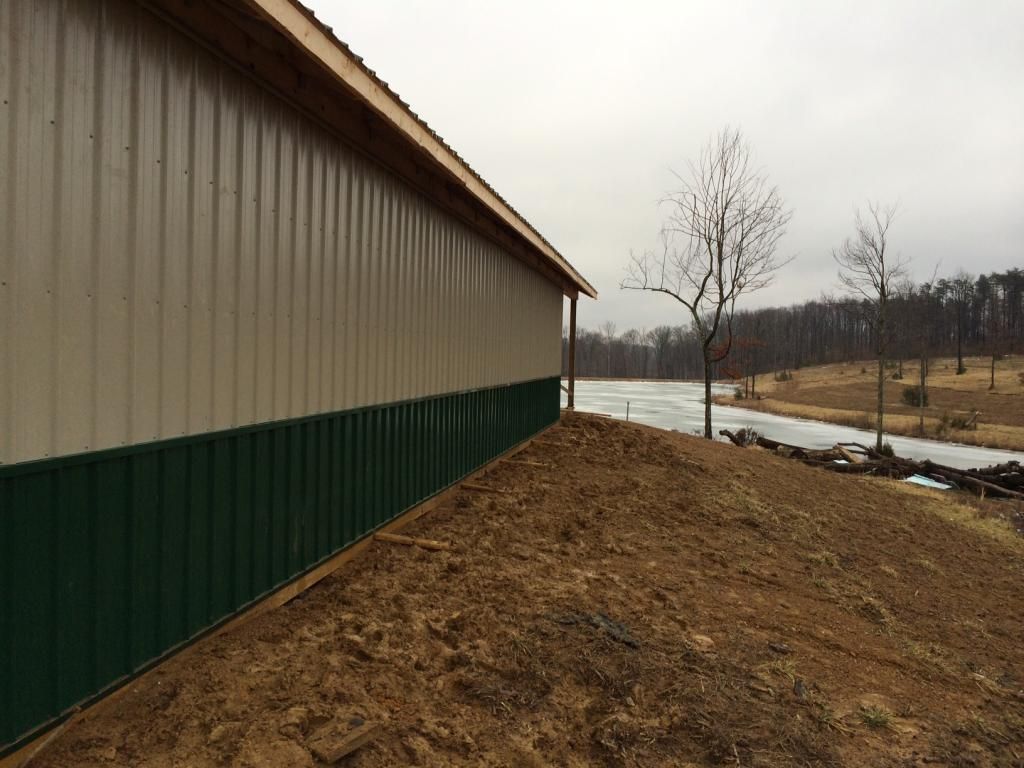
Finally Starting on the Pole Barn.
Cool! I have plans to start one in the near future. Post some pics as you progress. BTW, that's a beautiful pond/background.
R&R, you're a better man than me. It would be hard to get any work done with a view like that. Very nice.
SOooo very nice!!!!
Add on a walk out balcony to enjoy that view

I hope your home sits right next to that beautiful view.
What an awesome landscape you have!!!
Nice! Is this your first structure on a future home site? If so, it'll certainly come in handy.
Sweet pond!
Beautiful place ! I hope you are not building that barn by yourself.
Mobilus, Will try and post updates and pic's been hectic trying to get this project going.Thanks
Al, That's what motivates me to complete.Thanks
FNC, Thanks
LL, Home comes later. Man's gotta have his priority's in order. Thanks
GW, Its been three years in the making. Thanks
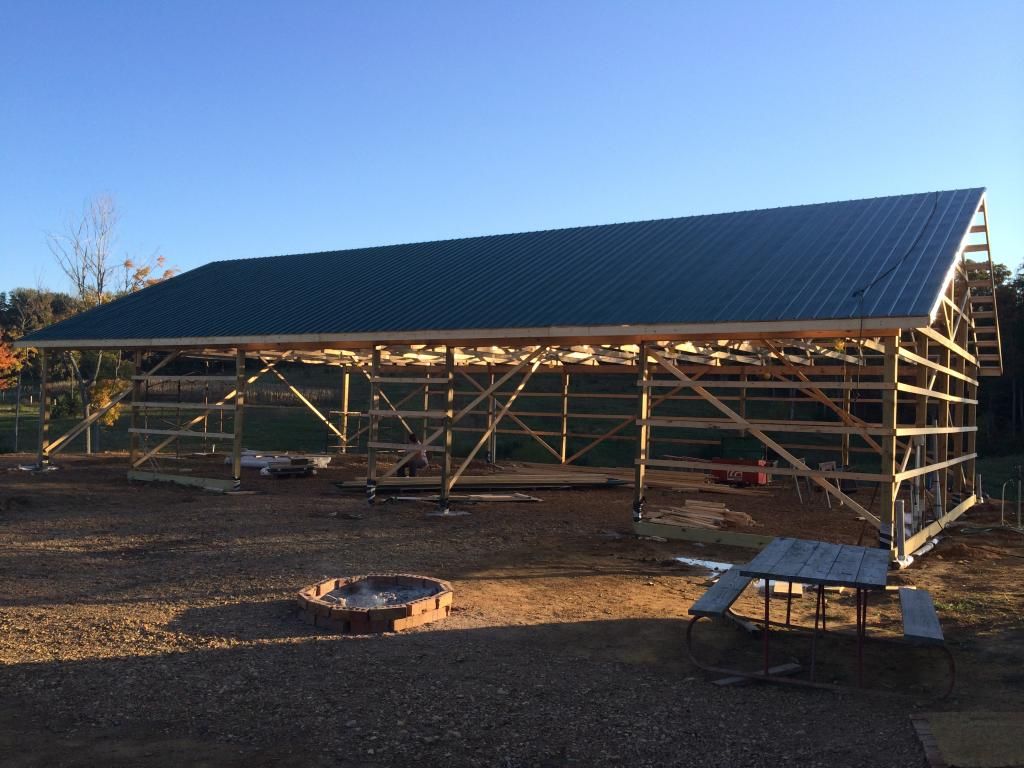
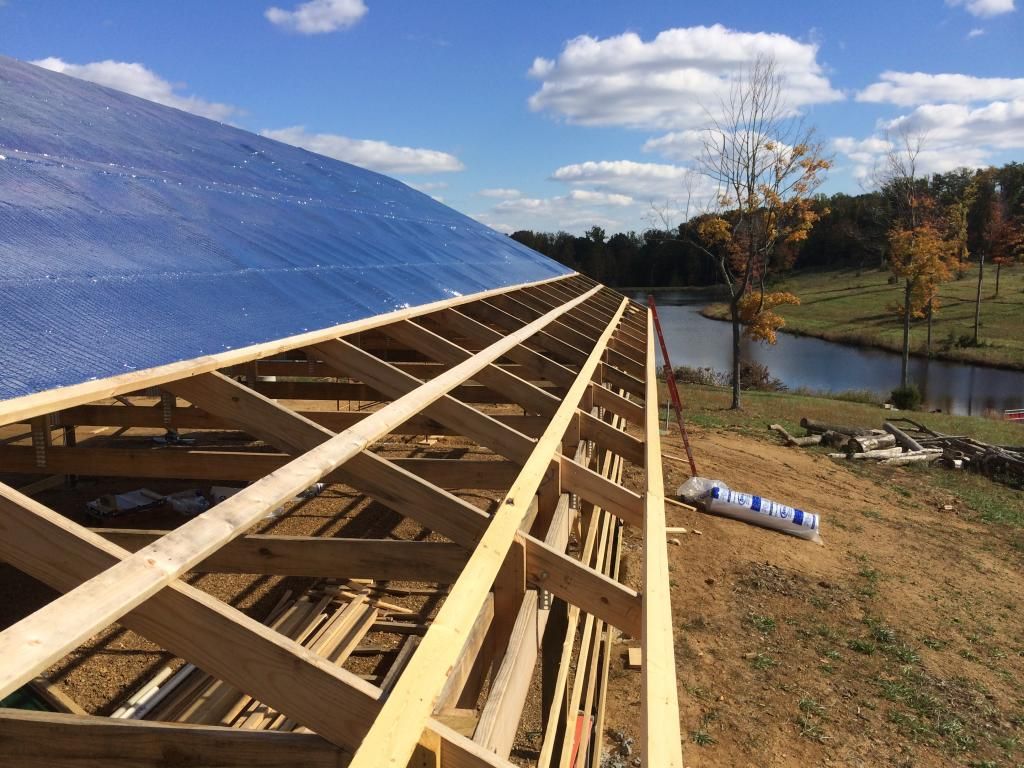
ewest, Thanks. I had 12 really good friends that showed up Saturday at 8:00 AM. we set 17 trusses and got all of the perling boards on by about 2:30. I was very pleased.
Yep I have ben helping with one. It took 4 mths . Glad its done in time for hay storage.
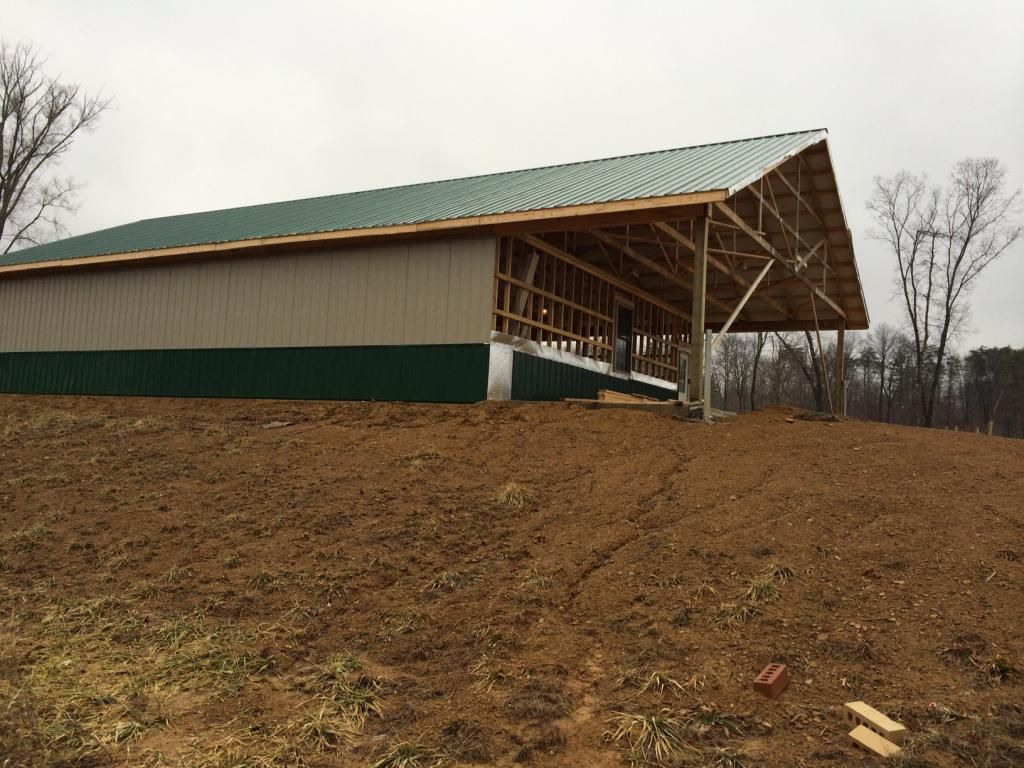
Been slow going working nights and weekends. But here are a few updates.
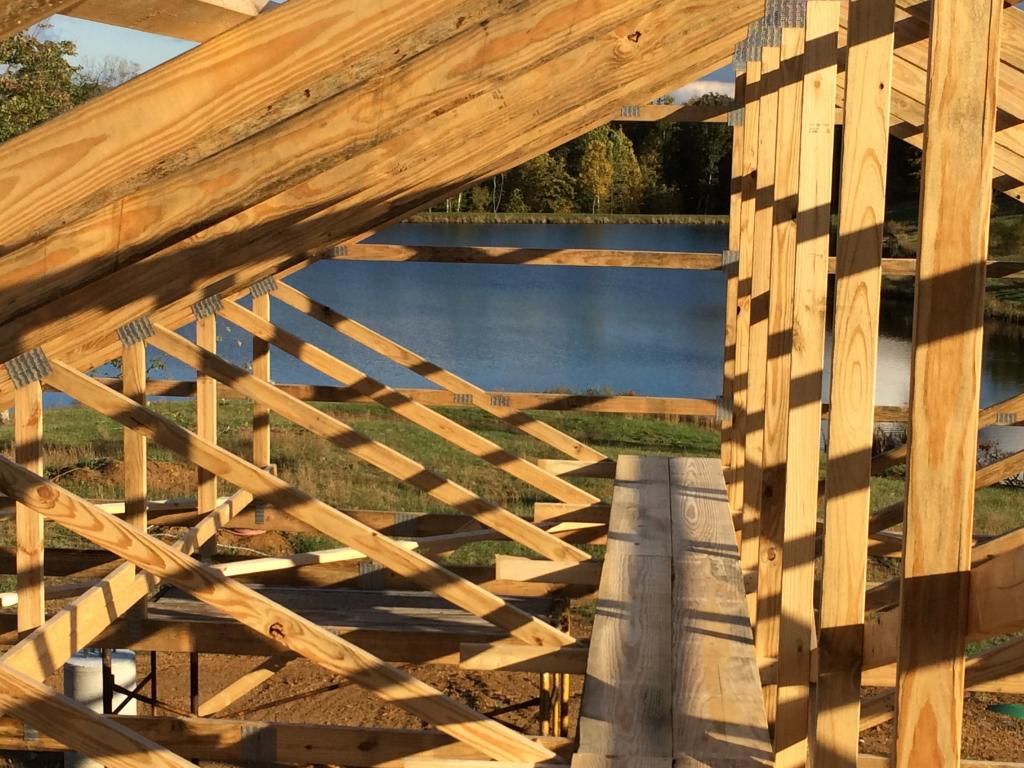
Catwalk in attic space.
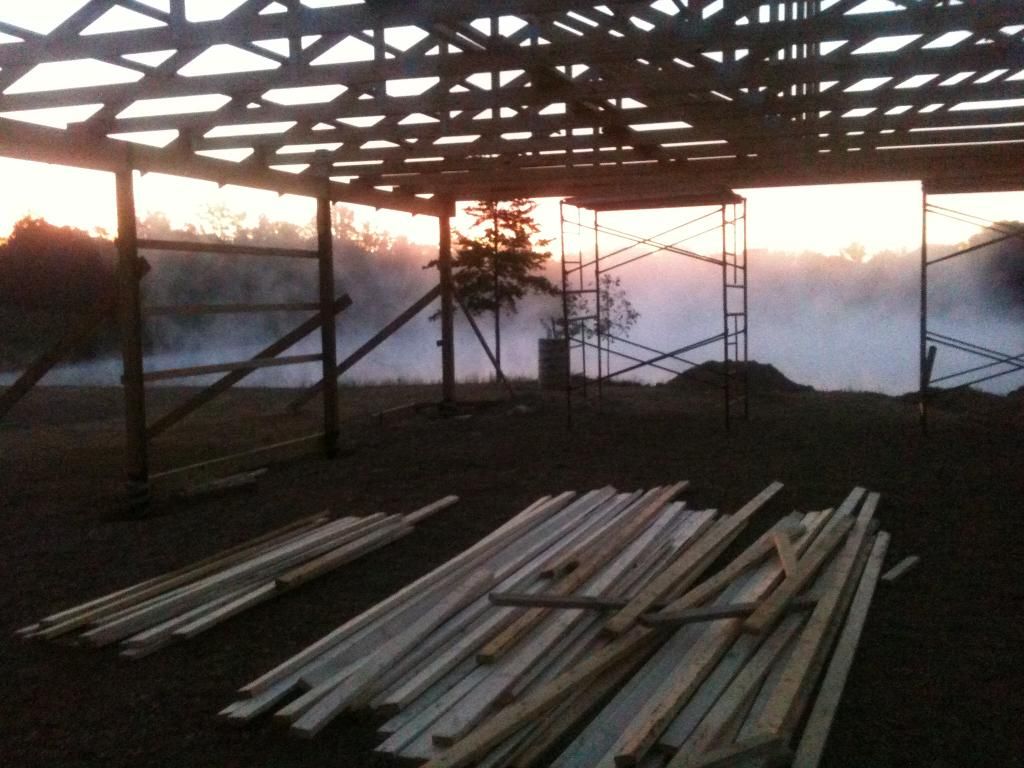
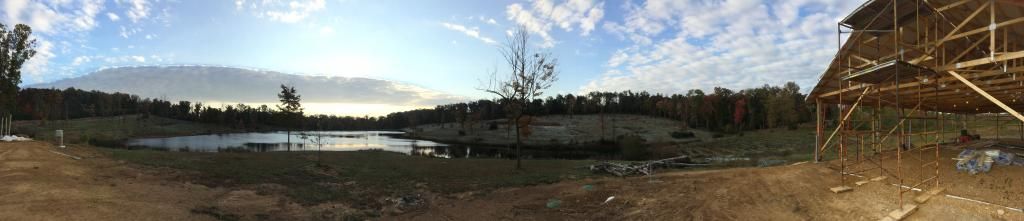
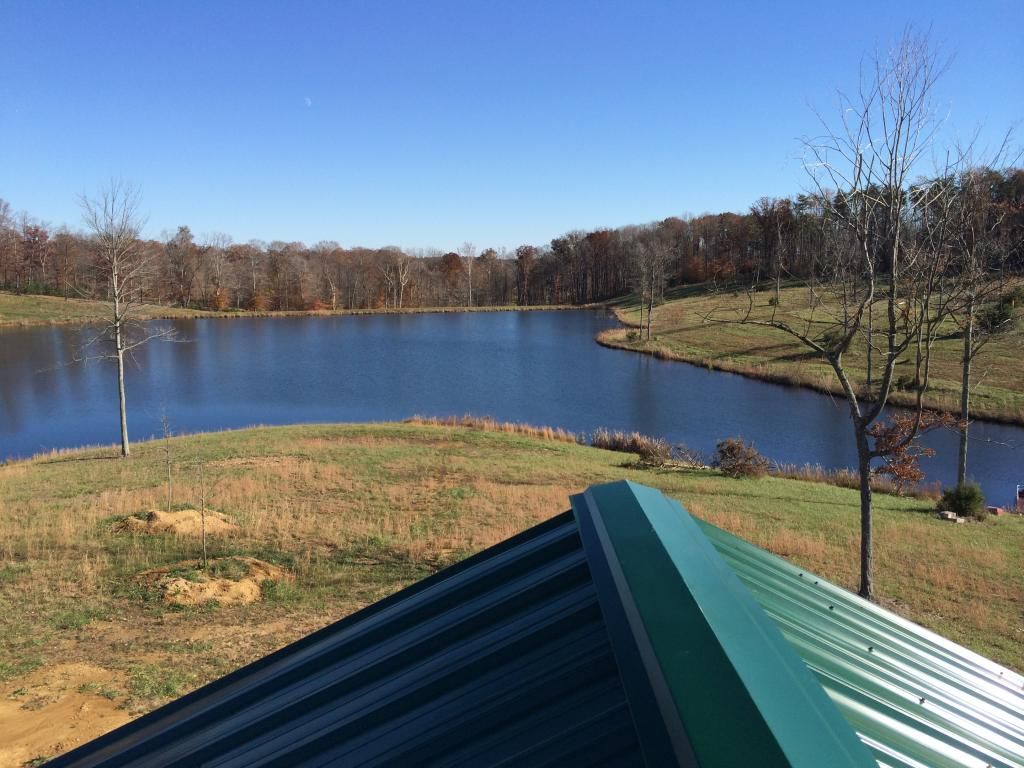
Some morning fog.
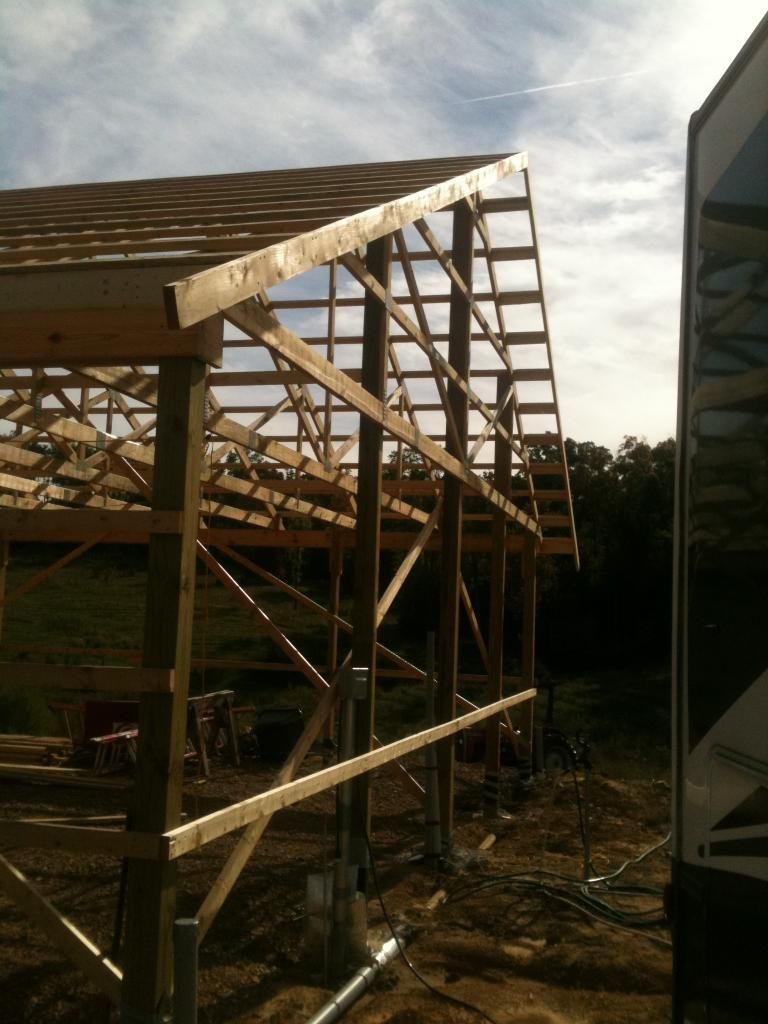
Fascia boards and gutter boards up.
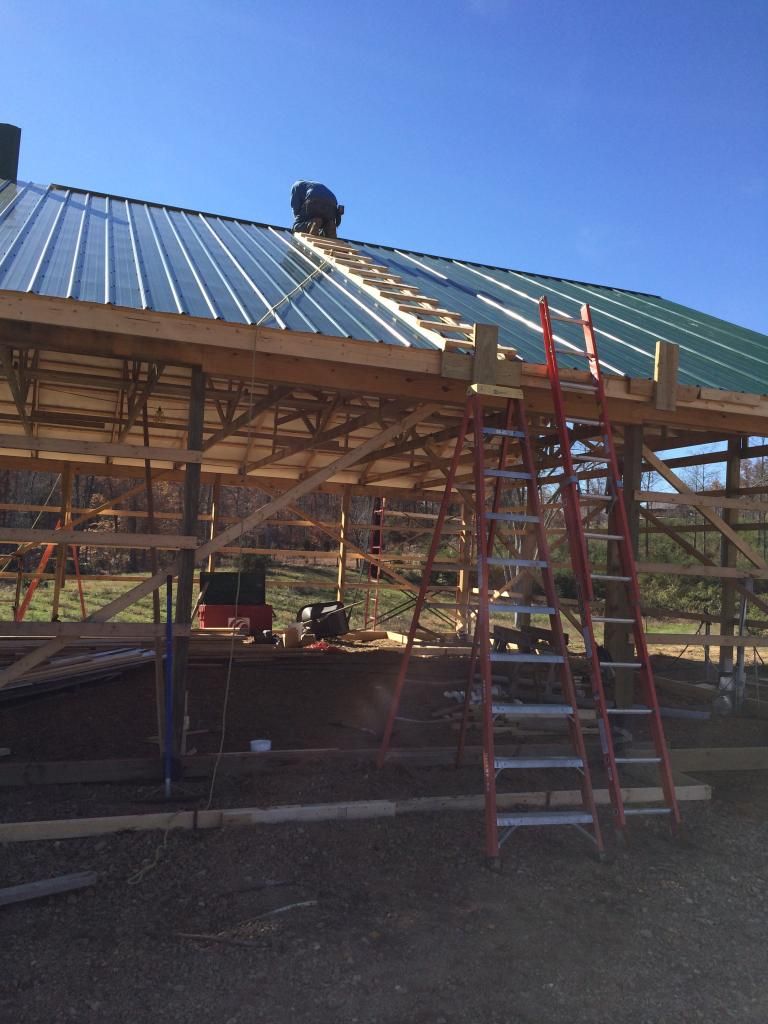
Myself up high and my brother at the bottom hanging metal.
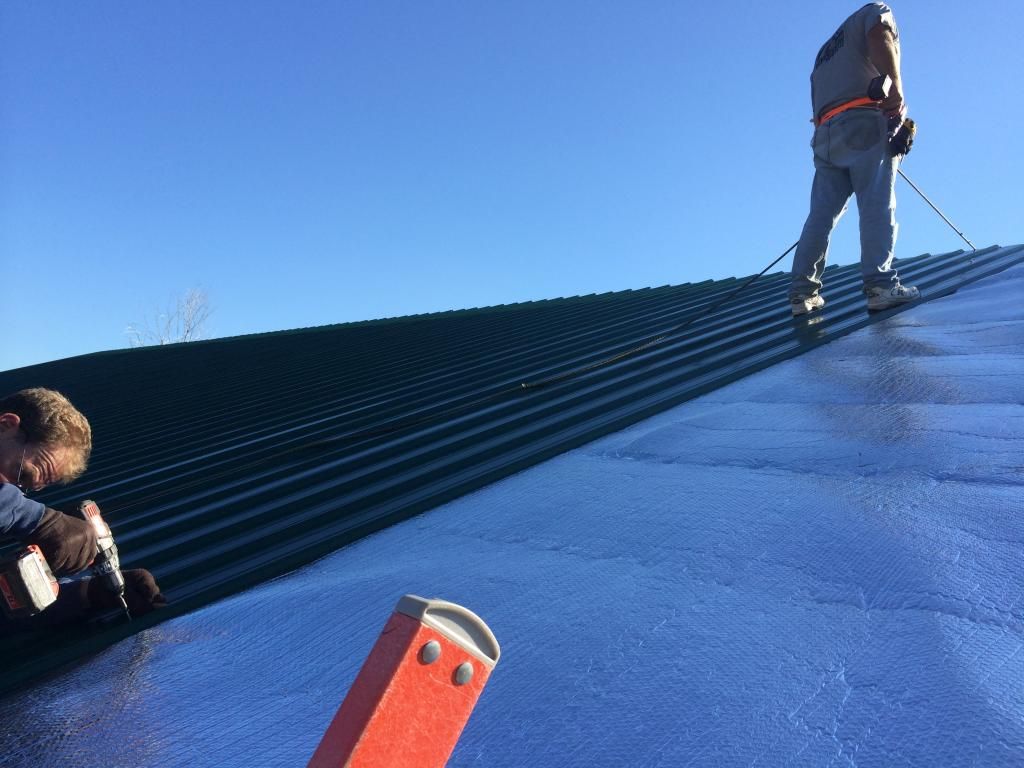
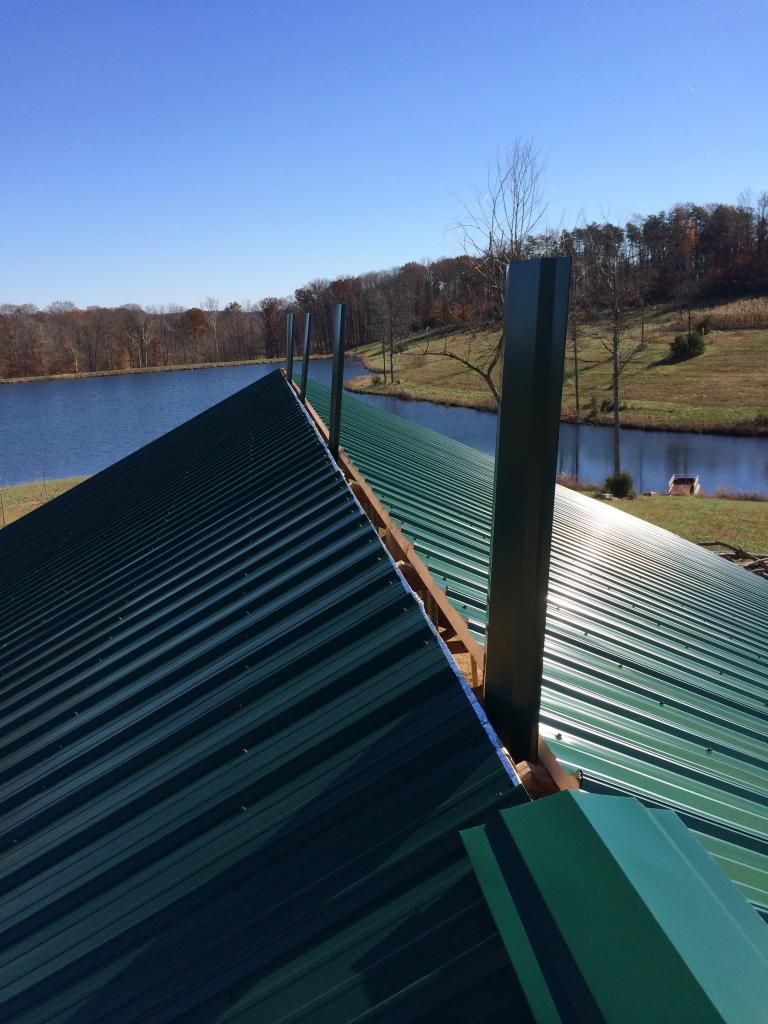
One side of the roof complete.
I'm very jealous of this...nice job and very nice to have so many friends to help you. Bet it was a fun day.
That is progress ! Looks great , keep at it but take time to smell the roses also.
Nice! One piece of advise, whether the floor will be cement, gravel or even dirt, put down some heavy plastic under the floor as a vapor barrier. It will stay nice and dry that way. Otherwise moisture comes through the floor and at certain temps it will condense on the roof and drip.
Looks great! What are the dimensions?
I need one badly...ball park figure on materials?
I'm looking at having a 30'W x 50'L x 12'H equipment shed with all-metal construction built for around $10K. Sound about right?
BTW, nice picnic table!
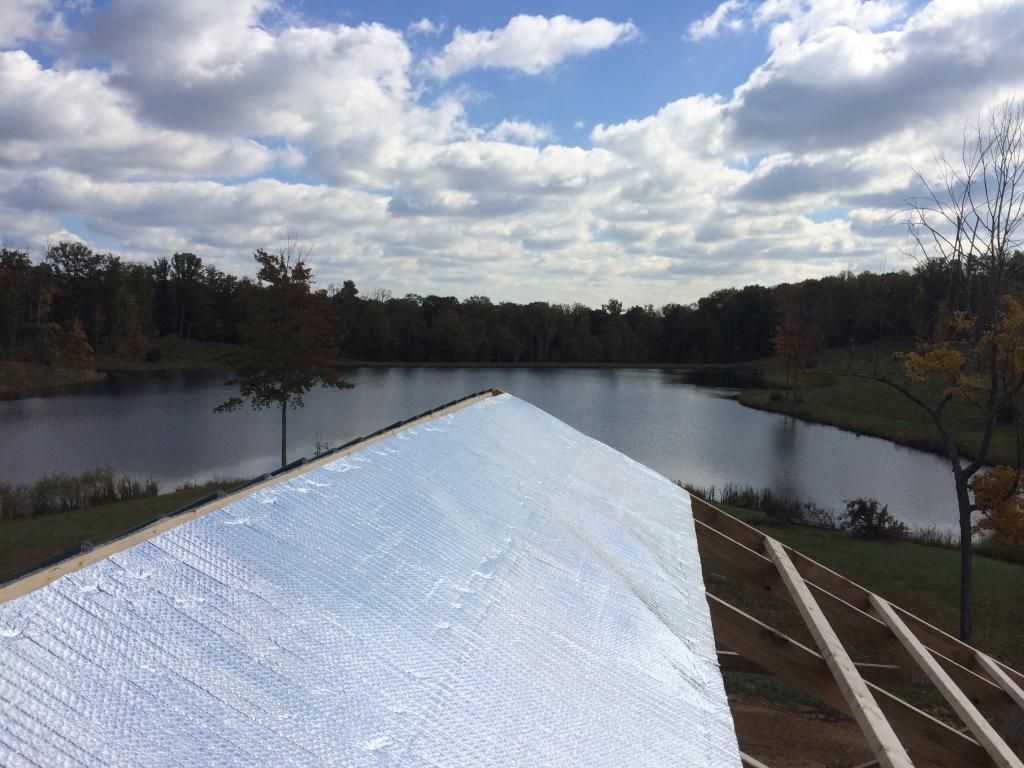
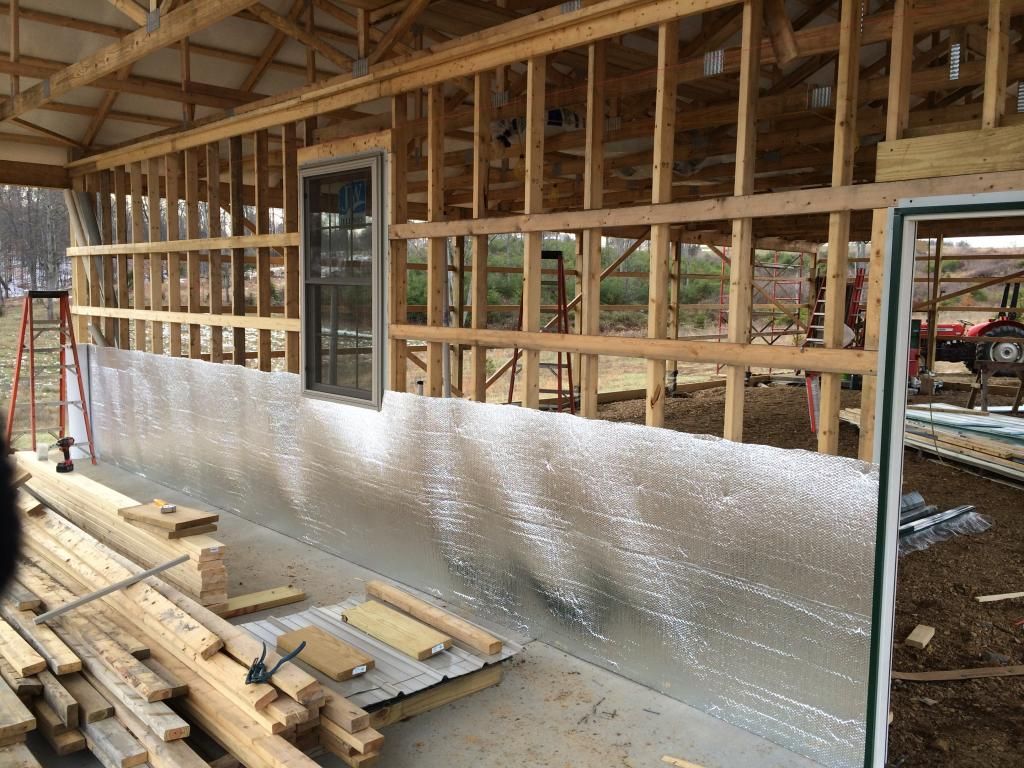
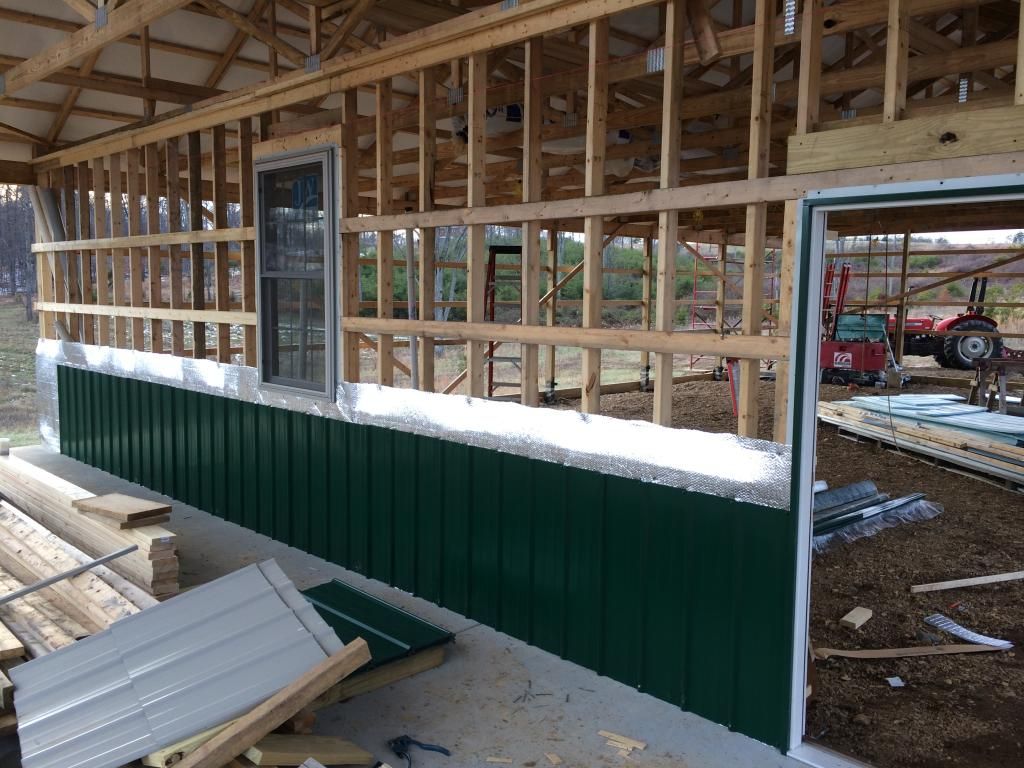
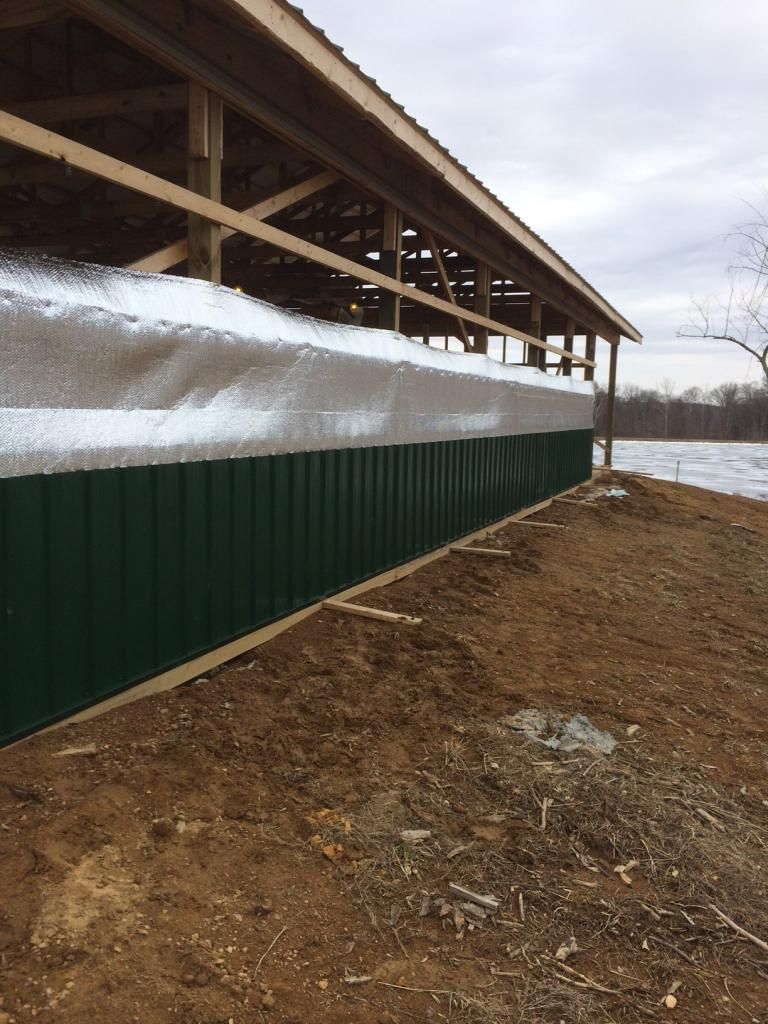
The insulation or wrap that the sheet metal is going over is a good idea. Without it metal roofs can get dripy inside under certain moisture conditions. Helps with lowering the sound level during a rain storm also.
snrub
woodster, Definate on the vapor barrier, Im actually putting 2" of high density Styrofoam over the plastic and have heat in the floor via a boiler.Thanks
Mobilus, its 36 x 66 with a 6 12 pitch and 18" overhang with a 10' ceiling height.Trusses on 4' centers. My lumber, Metal and insulation was $11,500. My Dad made that picnic table many a year ago.Thanks
snrub, I used a similar insulation in the pole barn I have now and it makes a big difference, I have found it performs better in the summer than winter. We are going to live in half of this one for a little while so I will be putting in a ceiling and inside wall with extra insulation.Thanks
And Thanks to all for the comments.Taking a couple of days break standing on that metal roof all day may calves are killing me.
Yellow Jacket your right on about the friends and it was great day.
Awesome site. I also hope to get one up maybe next summer. We've been trying to run a market farm for 5 years now w/no water, electric, or building of any kind. Last year I stored a ton and a half of butternut squash in my daughter's old bedroom. I have a very patient wife, but it's time for a building!! Concrete is the biggest expense at $110/yard.
I had my friends help put in the yard at our new house years ago. The beer bill alone would have paid a landscaper, but the experience was priceless.
bw, You might look into opening an account with one of your concrete plants. I was able to lock in for a year at $89 a yard. And I'm not a contractor. Did that same thing when we painted our first house but I,d rather spend $1000 on beer and wings than pay someone else to do it, Makes great memories my friends still bring up from 18 years ago. Thanks
I built mine in 1980's over a three year period of my own design, (33'x40') and also built my trusses and raised them my self. The inside is lined with shelves and cubby holes for tools and storage. It's one of the best thing I ever did and a very satisfying project.

John, What are you talking about??? That beautiful canoe cannot be nearly that big

!!!
That is one beautiful canoe.
Guys - look at the barn in the background.
Nice boat! The roof rack ain't too shabby either. That picture reminds me of a friend, who, along with his wife got into cycling some years ago. They had a couple of high dollar bicycles, which they would transport via a roof rack on their car. One day, after they returned from a trip to some bike trails in the Hill Country, he forgot about the bikes on the car's roof and whipped into his garage. Nothing emerged unscathed; the bikes, the car, nor the garage. A trifecta.
What barn?
The canoe is what draws my eyes.
Gully Washer I had to make these special holders to make my boat rack work, holding the rack to the gutterless car. The rack was white oak and it took a lot of fitting to conform the rack feet to the contour or the car roof, then I added rubber lining to the feet.

R&R, Sorry for kinda hijacking your thread

... I'm not as young as you but I'm looking forward to have one built approx. the same size as yours in the next couple of years.
Your craftsmanship looks awesome!!! I'd think about putting a balcony or loft up there to look at that beautiful site you have.
hang loose, Actually I started out planning a gambrel style but for the extra cost and the older I get the less I like stairs I nixed it.
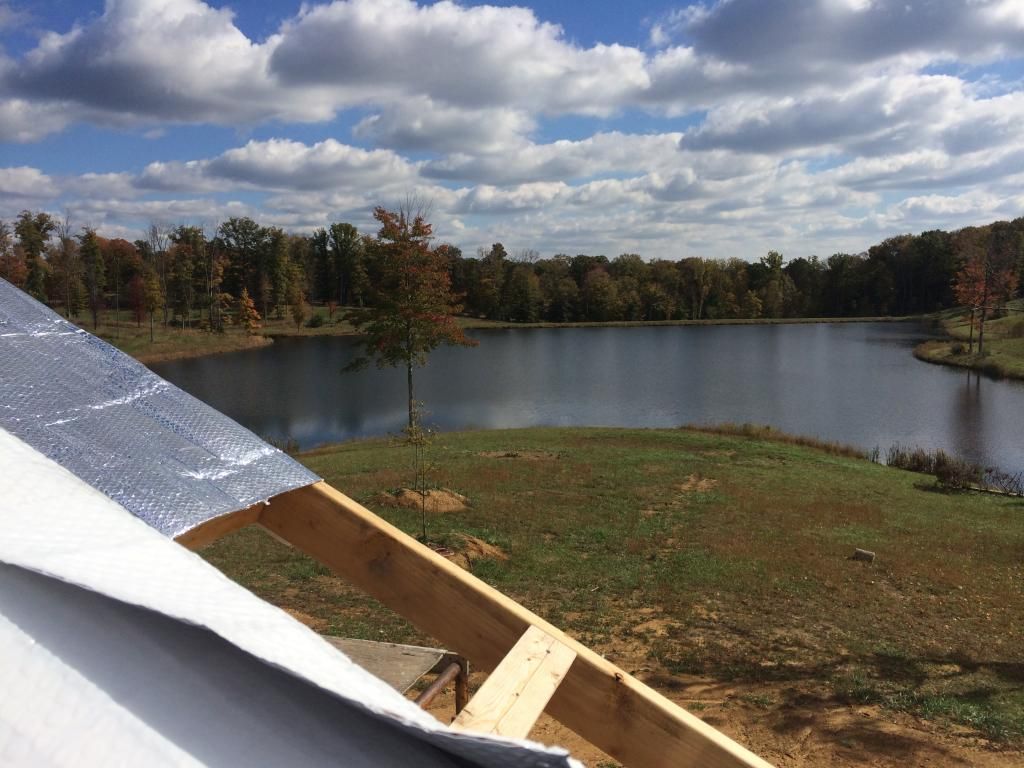
Took Friday off to get insulation on.
slow going by yourself.
Almost there.
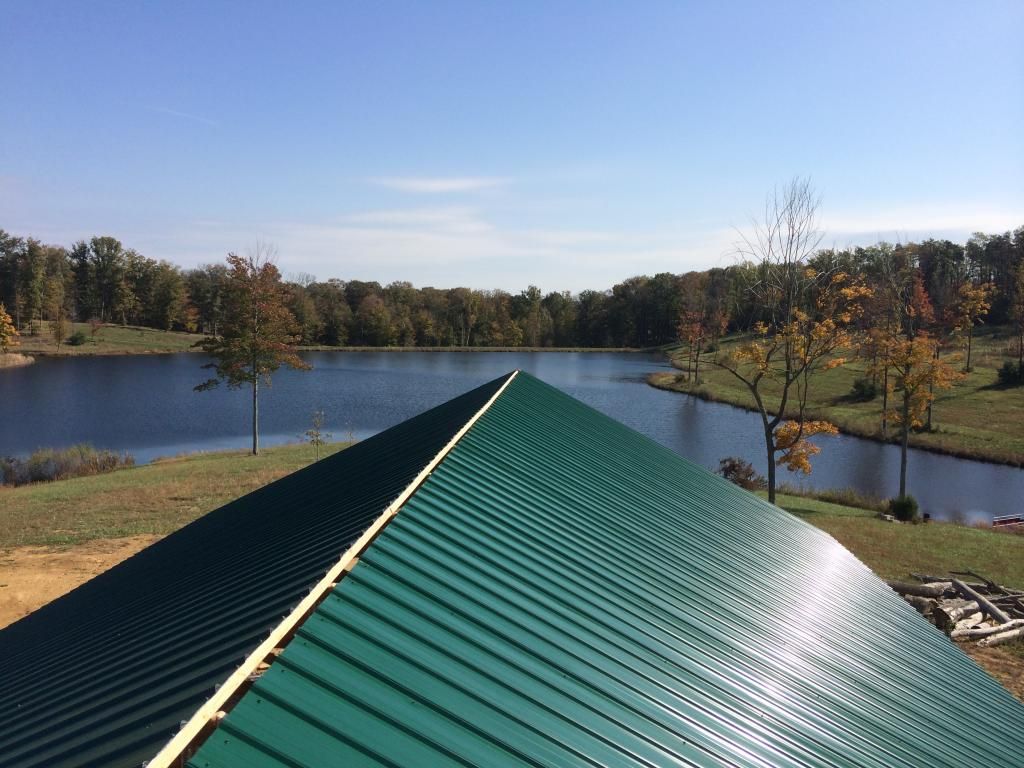
All the roof metal on and 100% screwed down. Ridge cap next.
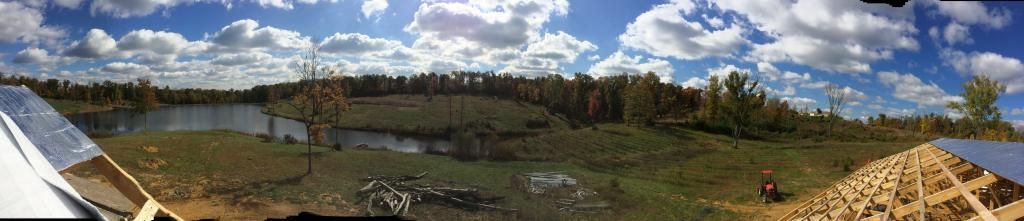
A couple of panoramic's (New I-Phone)
Gonna focus on getting some concrete poured next.
Thanks for the pics. Nice roof ! New phone takes good pics.
Gotcha you R&R.... Stairs are not easy on the legs. but a beautiful site though. Hard to believe those pics are from Indiana.....Looks like you're out in the middle of Colorado.
Great pictures!!!
Thanks WIH. Wish mine went as fast as yours.
A few updates: Ridge Cap going on.
How I had to do it. Too steep and Too slick.
Completed. Here's to NEVER EVER having to get on that Roof Again. ( I guy can wish can't he.)
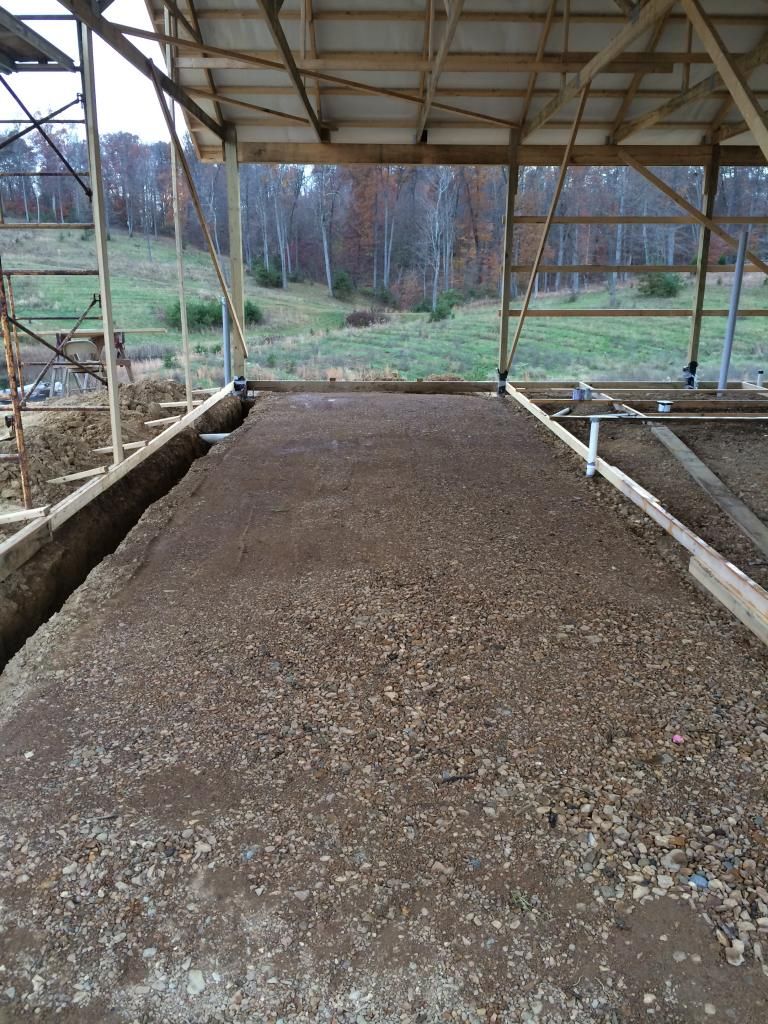
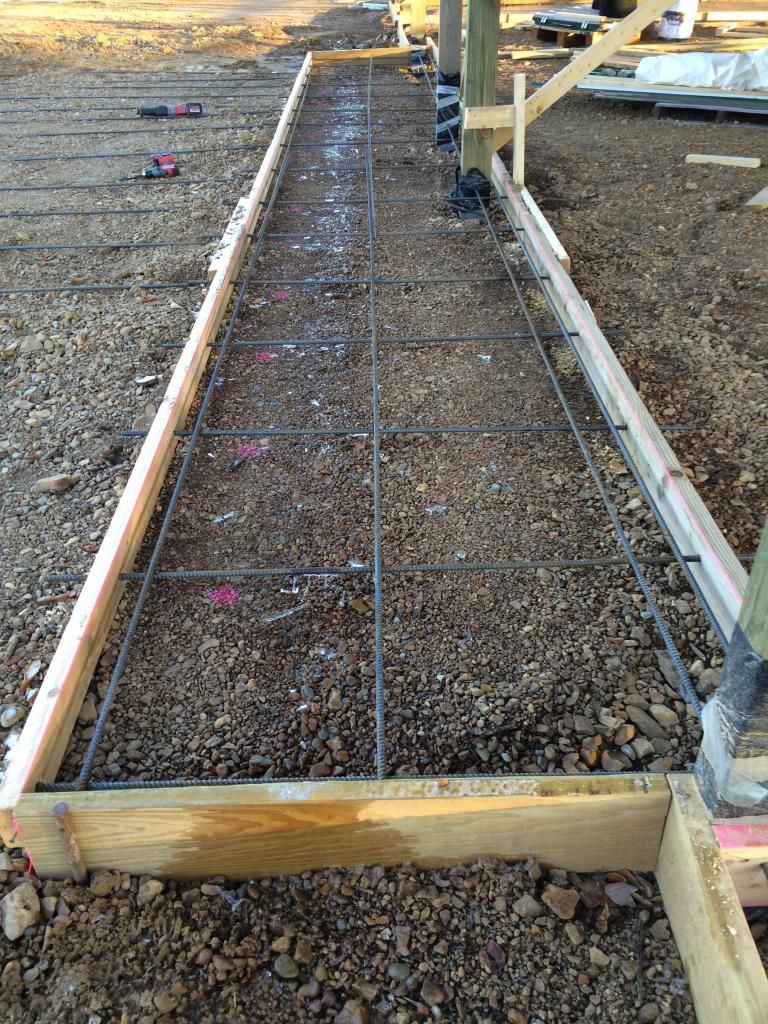
Prepping some slabs:
Thanks for the pics. Nice work ! Tell us about the floor as I note forms.
Are you planning on pouring that yourself, or are you just doing the fill and prep work?
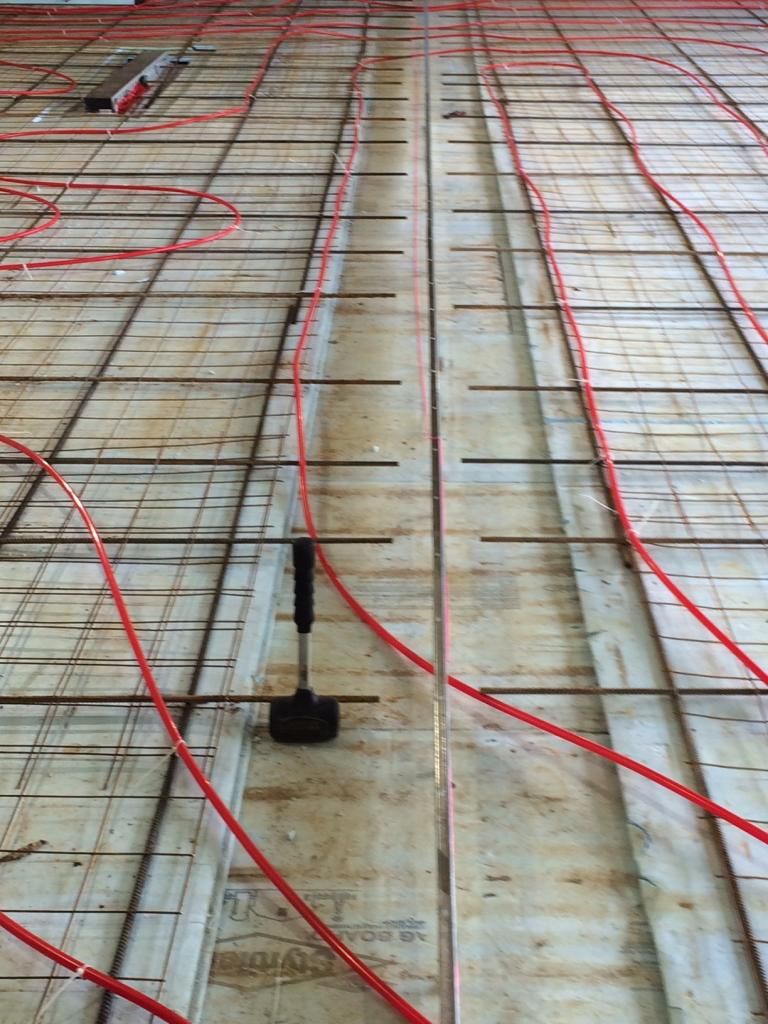
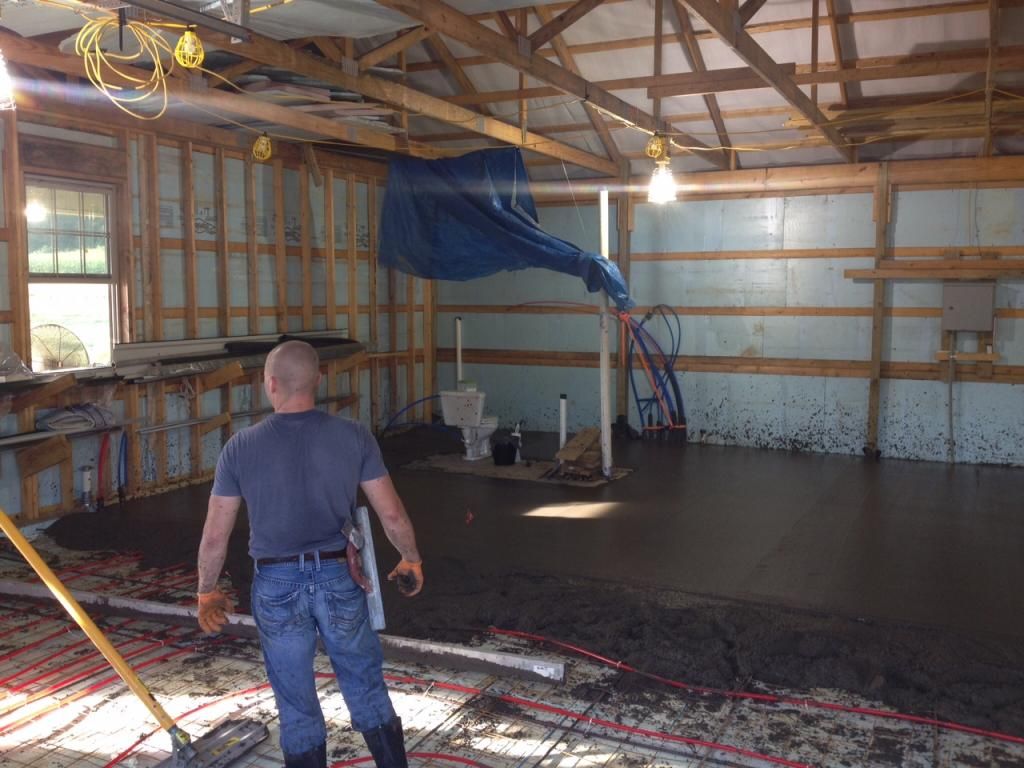
I'm doing all of the forming and prepping. and assisting a buddy on the pours. I'm separating exterior pours, Walk in cooler pour and area around toilet so as to not melt a wax ring and to keep cold slabs from migrating into the interior slab. Putting a Boiler system in heating the floors in the pole barn and upcoming house.
Cooler slab:Vapor barrier,Insulation and rebar still to come:
Bathroom toilet and under vanity area:
I thought the Amish would stop and help a neighbor out? LOL
If Anybody has any expertise on such boiler systems I'm all ears. Kinda just learning as I go. (Google It)
I don't have any experience, but when I built my shop I came very close to installing radiant (hot water) heat in the floor. What stopped me was the need to bolt various pieces of equipment down solidly to the concrete, once the shop was operational.
The thought of drilling a hole for an anchor bolt right down through one of those water lines scared me enough to decide against it.
R&R
Beautiful place....
love all the trees and the panoramic pics.
I have direct experience with in-floor heat. I personally ran the pex tubing on 12" centers in my 145' x 50' shop. I love it. I was going to use an outdoor wood stove to heat the boiler but I am very glad I decided to use propane instead. My heating bills are very reasonable.
I also bought the on-demand heater/boiler, manifold, pump, pressure tank, etc and did the install. I would not do it myself again. I would hire a professional and drink beer while he did all of that. It was like putting a puzzle together without knowing what the puzzle was supposed to look like. I did prevail but only after way too much time and way too many "F" bombs dropped.
I don't know of anyone around here that has the in-floor heat that isn't happy with it. My boiler is a Quietside. I bought it and all of the major components from some place in New York.
Sparkie is right....you better know exactly where you plan to place studwalls and plan accordingly with your pex loops. You hit a line then you are screwed. I did a 4" pour, suspepended the pex tube zip tied to the rebar 2" down from the surface and had everything planned precisely (bathroom, etc)so I could build studwalls. However, and fast foward 4 years to today, I have a need to build a mezzanine but I can't take the chance of bolting down by upright posts in fear of hitting a water line.
The Solution.......do a 6" pour and keep all of your rebar and tubing 4-5" below the surface. That's what others I know have done and that's what I should have done.....for the sake of being able to ramset nails or use anchorbolts without getting into the tubing.
At the time on was on a tight budget hence the 4" floor and doing it all myself. In hindsight, I should have found a way to do a deeper pour and/or hired someone to install the system.
My system actually has a baffle that allows me to heat water that goes to my shower and sink without robbing water that is in the closed loops that continously pumps throughout the floor.
Don't use a wood boiler!!!! You can thank me later.
My Inlaws have one and they have spent about 30,000 in equipment and 40hrs every fall to get their wood plus they have to babysit the the thing all winter. Now they are thinking about putting in a backup system for when they go on vacations.
Looking great! That is one awesome setting...I'm sure there'll be much pleasure in having it!
I did a LOT of research on floor heat. Some tidbits:
Listen to Shawn. He's covered most of them.
Use chairs to hold up the rebar. Don't try to pick it up as you go. Make the squares between the runs of rebar min. 18" so you can walk betwen the rebars without catching a foot, or so you don't step on them when pouring/screeding, etc..
Multiple zones that run parallel to each other. That way if you DO poke a hole in a run, you won't have a whole area that is without heat, just every other run for that zone.
IIRC (please correct me if I'm wrong) 300' run max per zone.
Lay out whatever you can ahead of time, or leave areas for drilling holes to bolt heavy stuff, like a 2 post lift. If you can plan ahead enough, make a template and put the anchor bolts in the wet concrete - do drilling needed.
Send Hesperus a PM. He's got a nice shop with radiant heat in the floor. He's lived with it for a while, so he might have some other caveats.
I have a natural gas, high efficiency furnace in my shop, with overhead ductwork. I would still like to have an outside wood furnace with boiler as the primary heat source, although I would utilize a heat exchanger in conjunction with the existing blower and ducting in the nat. gas furnace to distribute the wood fired heat. The natural gas burner would be set to come on at a temp just high enough to prevent freezing, should the wood fired unit be down for some reason.
I have cut wood for years and never burned a stick of it...plenty of wood here, seems a shame not to utilize it for my own use, since I'm going to cut it anyway. A hybrid system consisting of wood fired boiler as the primary, and nat. gas as the backup seems to me to offer the best of both worlds.
"Hybrid".....see how I worked that in there?? That's just to see if Yolk is paying attention.
"Hybrid".....see how I worked that in there?? That's just to see if Yolk is paying attention.
Almost missed it, Sparkie.
I was looking for "Modified", "Improved", "Gussied Up", and "Indiana Aquaculture Exports Banned by European Union".
Thanks All. Some good info for sure, some I've thought extensively about some I haven't. originally I was planning a propane boiler in conjunction with an outside wood burner. But once again the thought of cutting wood as I get older rubbed that one out.
Hope you were spared by the storms. I have quite a bit of insight that I can add. Thinking maybe a different thread for the in floor heat part would be a good idea?
Thanks Guys.
Hesperus I'll do that. I didn't get hit but I did spend most of Sunday picking up some of my 4' x 20' (well they used to be) Styrofoam sheets that Sat. Nights wind blew around. Poured concrete Sat. Morn. (Areas without heat) will post some pic's later.
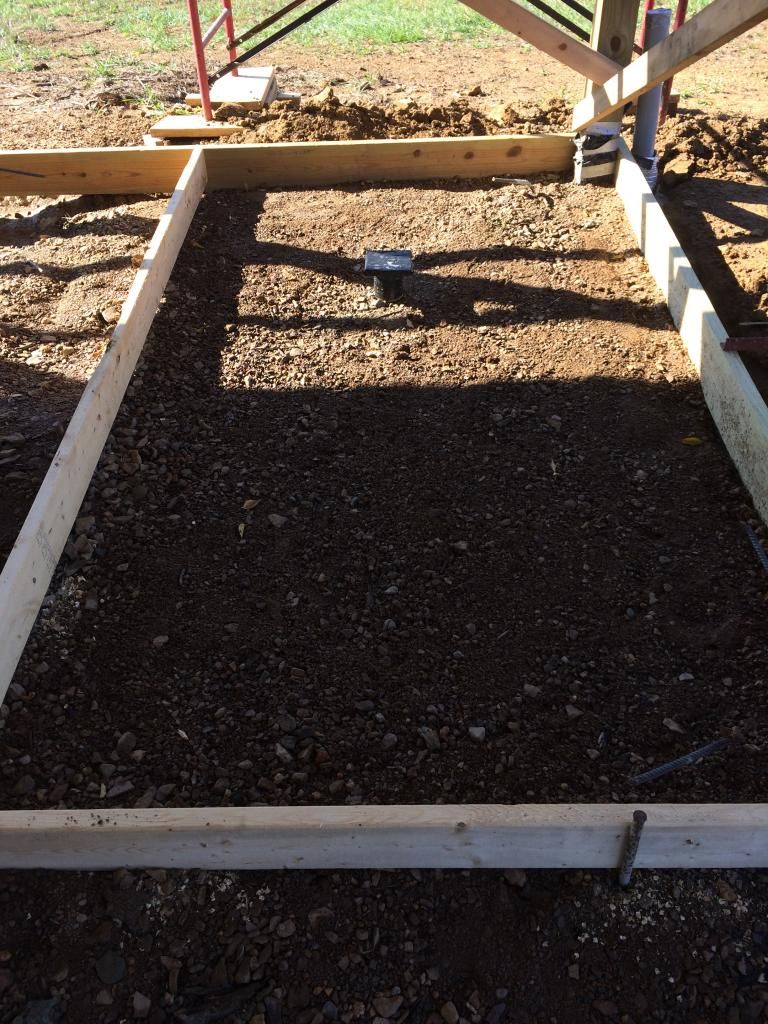
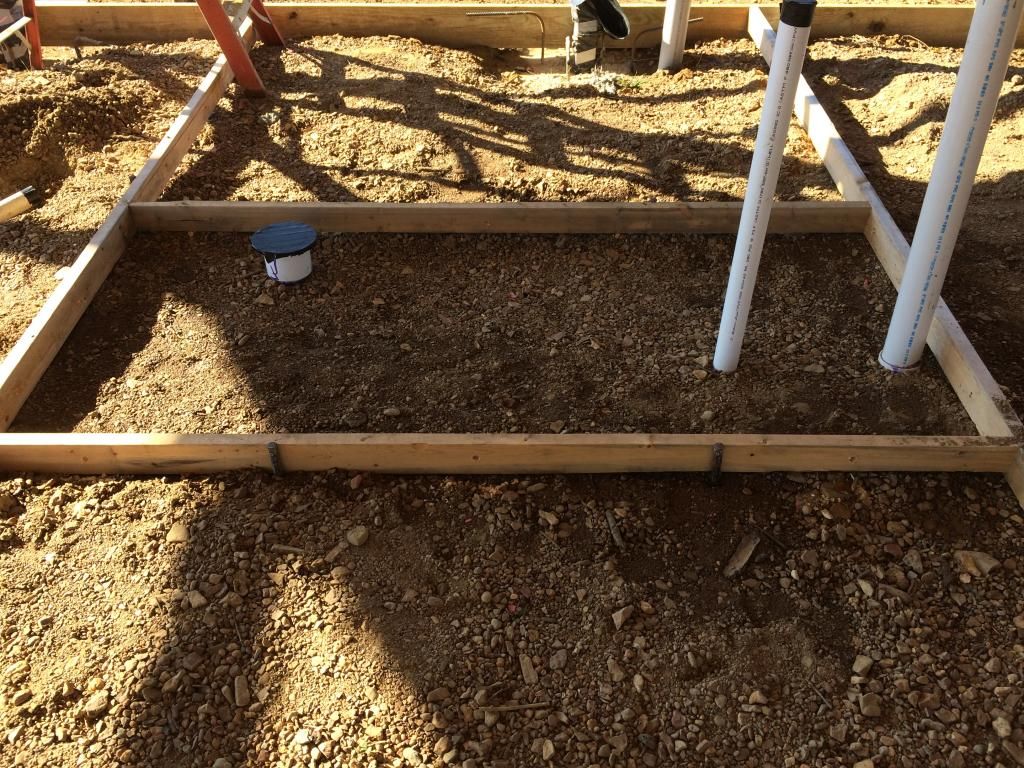
Getting slabs ready:
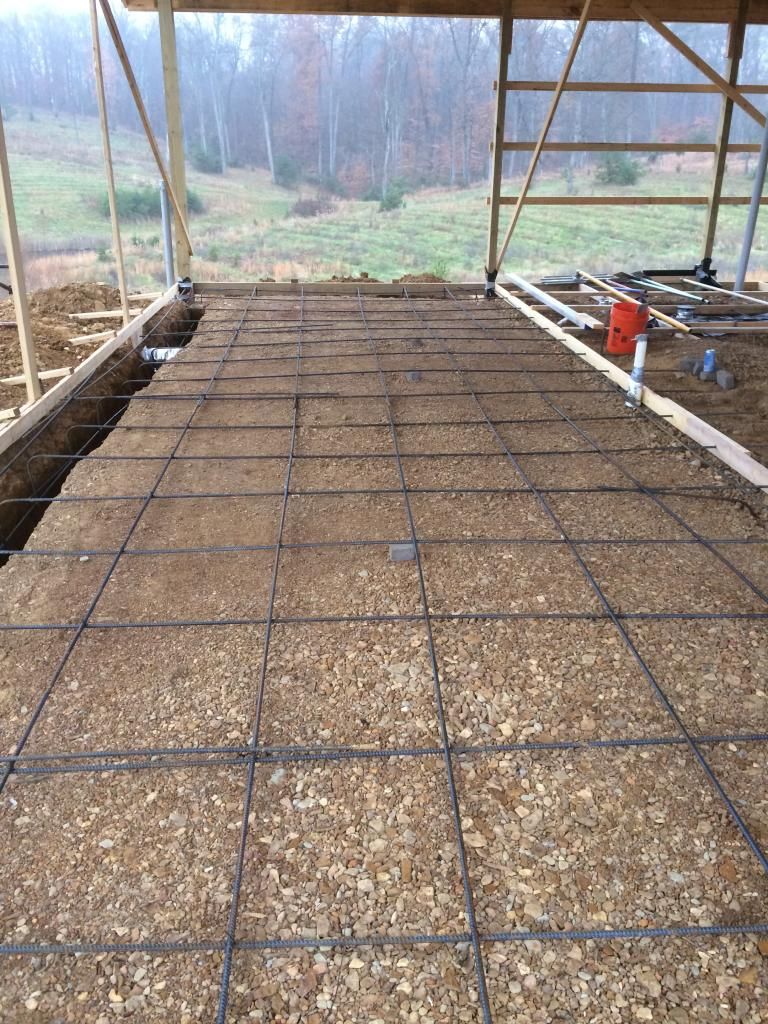
Worked into the night to get ready.
1) How did you get the rebar into the center of the slab for the pour? It looks like it is laying right on top of the insulation.
2) How easy is it to get the forms off with the rebar thru them like that?
Did you opt for a type of fibermesh in the concrete? It does help with shrinkage cracks on the surface. Was the rebar run through the forms to tie into the next pour? I don't think I've seen that done before.
esshup, We pulled it up as we poured. Not being a large area it was no big deal. I wouldn't want to do it that way all the time fore sure. The rebar is 1/2" through a 5/8" hole "Hopefully" comes off easy.
And Yes sparkplug that is to pin it to the other slabs. Most of those will have 1" Insulation between heated and non heated slabs. the others will have an expansion joint.
sprkplug, Also my concrete guy is not a fan of the fiber so we didn't use it. I hear a different opinion from a lot of different concrete guys.So who knows??????
Looks good R&R looks good!!
sprkplug, Also my concrete guy is not a fan of the fiber so we didn't use it. I hear a different opinion from a lot of different concrete guys.So who knows??????
I knew a lot of finishers who didn't like fibermesh....it is harder to work, and it leaves a "hairy" surface until it wears off. It does work however, and I wouldn't hesitate to use it if I were planning an applicable pour.
R&R
I'd use the fibers along with the rebar. I did a LOT of concrete restoration/epoxy injection work in So. Cal, and here's what the engineers said:
"The rebar in the concrete is for structural strength. The fibers are in the concrete to minimize the cracks that want to develope. Yes, the fibers are pushed as a replacement for the rebar. Don't believe it. If you want the concrete work to be crack free, use both."
Without rebar, if the concrete cracks, you loose strength in that area. The concrete that we poured, with both steel and fiber in it, didn't crack to my knowledge. We also used a plate compactor on the decomposed granite that we used for a base.
Friends here used both in their pole barn pours. 8+ years later, still no cracks.
The fibers DO make the concrete harder to finish smooth, as some of the fibers seem to poke through the concrete surface.
Scott knows his concrete!
Fibermesh is definitely NOT a replacement for steel, as the two are intended for different purposes. The fibers are there to control the enevitable cracking...supposedly, all concrete will crack eventually but the fibers in the mix hold it together and make it far less noticeable.
Thanks Tony. I'm sure there are others here that know concrete much better than I.
What really pisses me off is when you are paying a contractor do to a job, you know more about the product/process than they do, and they insist on doing it not to the highest level of workmanship (that's not really the correct word, but I don't know how to say it).
A friend basically HAD to force the contractor to put steel in the concrete because the guy said the fibers were "good enough".
Dad paid a contractor to pour a 5" slab between the house and pole barn. Concrete was poured and finished when they weren't there. The contractor didn't put any expansion joints in it, nor any expansion material between the slab and the 3 1/2 car garage, nor between the slab and the 30'x40' pole barn. First summer the concrete moved enough so the service door couldn't be used because it was wedged shut.
Common sense. Garage has a footer and is backed by the house. The garage floor isn't going to move - it's tied into the footer and house foundation. Pole barn floor has a footer poured around the perimiter, and is just about as large as the concrete slab that is being poured between the pole barn and garage. That won't move either, so what's going to happen when the slab expands and contracts??
I rented a concrete saw and cut in an expansion joint 1/2" wide, and filled it with Sika Poly Sealer. I put a foam backer half way down the slab. I never hit any steel in the concrete when cutting, and the concrete varied in thickness from 5" at the edges to 3 1/4" in the center. (No fibers in the concrete either.) The bottom of the slab looked like he never compacted the base.

The 2nd and 3rd year the concrete was in it developed cracks that will get to 3/16" wide and some of the slab is starting to settle on one side of the crack and not on the other.... This slab is probably 40'x40'. The problem with the service door is fixed, but I'll bet the concrete will be redone one of these years. It was poured in 2008 and I cut it in 2009.
O.K. rant off.
I've been on a lot of really large construction jobs and some engineers Spec. fiber and some Spec. DO NOT USE FIBER. One thing I've heard many times. There are two kinds of concrete. Cracked and Not Cracked.....YET. They always told me control joints are just controlled cracks.
One thing I've heard many times. There are two kinds of concrete. Cracked and Not Cracked.....YET. They always told me control joints are just controlled cracks.
That's it..... Concrete will crack. The trick is to get it to crack how, and where you want it to.
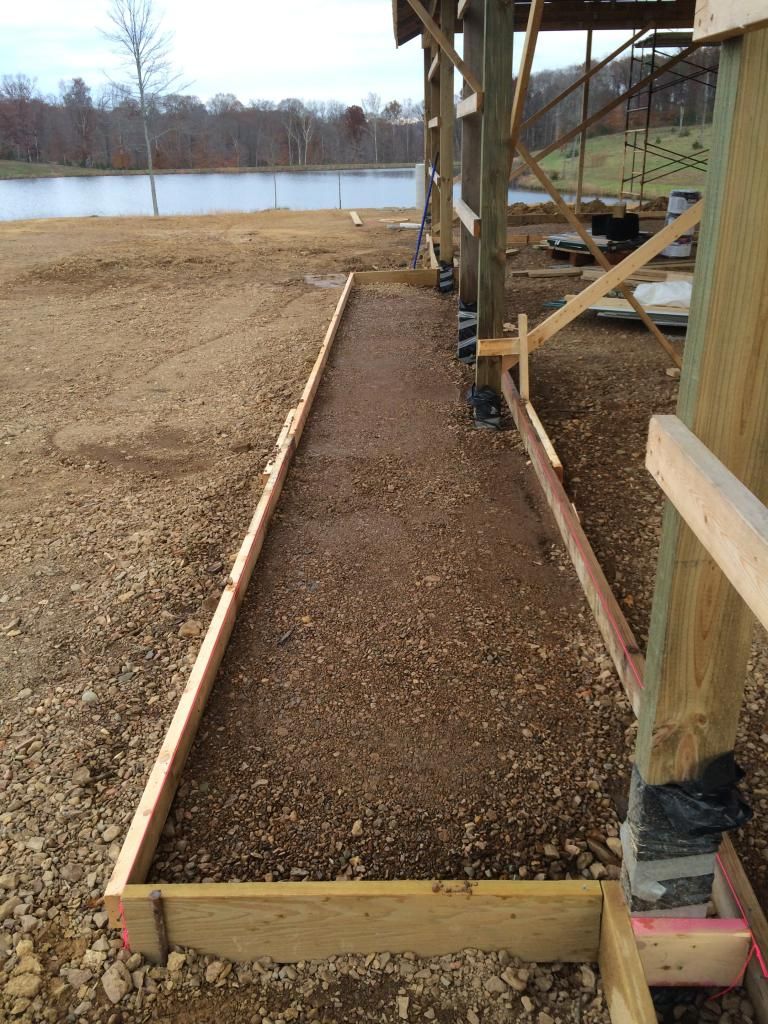
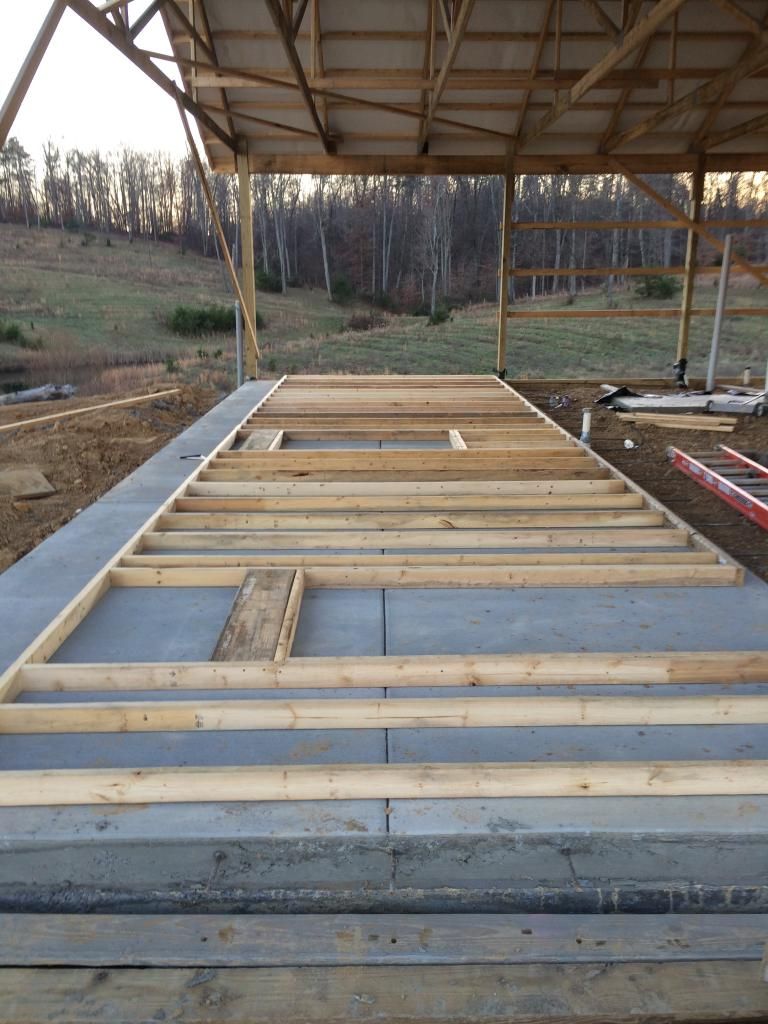
Gonna back up a little just to get things up to date and in perspective as to how far we've come.
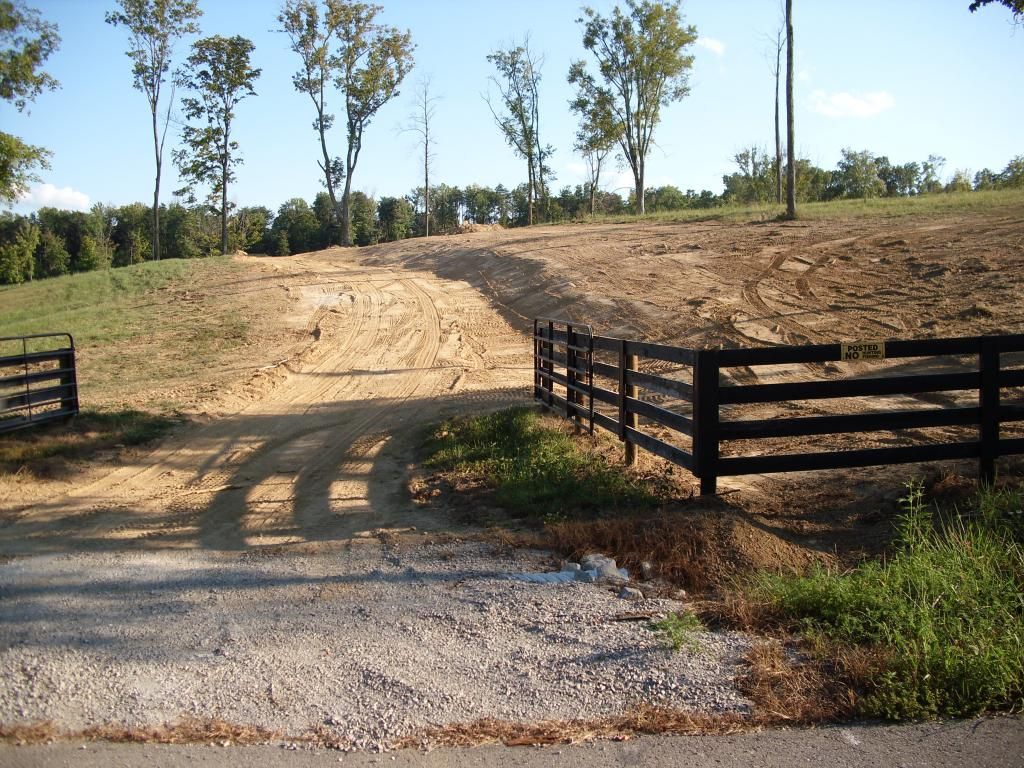
The day we looked at the property for the first time. July 2010. Called the realtor on the way home and told her we were interested in making an offer.

Moved the gate and cut in a driveway. me on a borrowed skidsteer for 3 weekends. Fun for about the first 2 hours.
Summer 2011:
Electric and water ran back to future pole barn: 2011
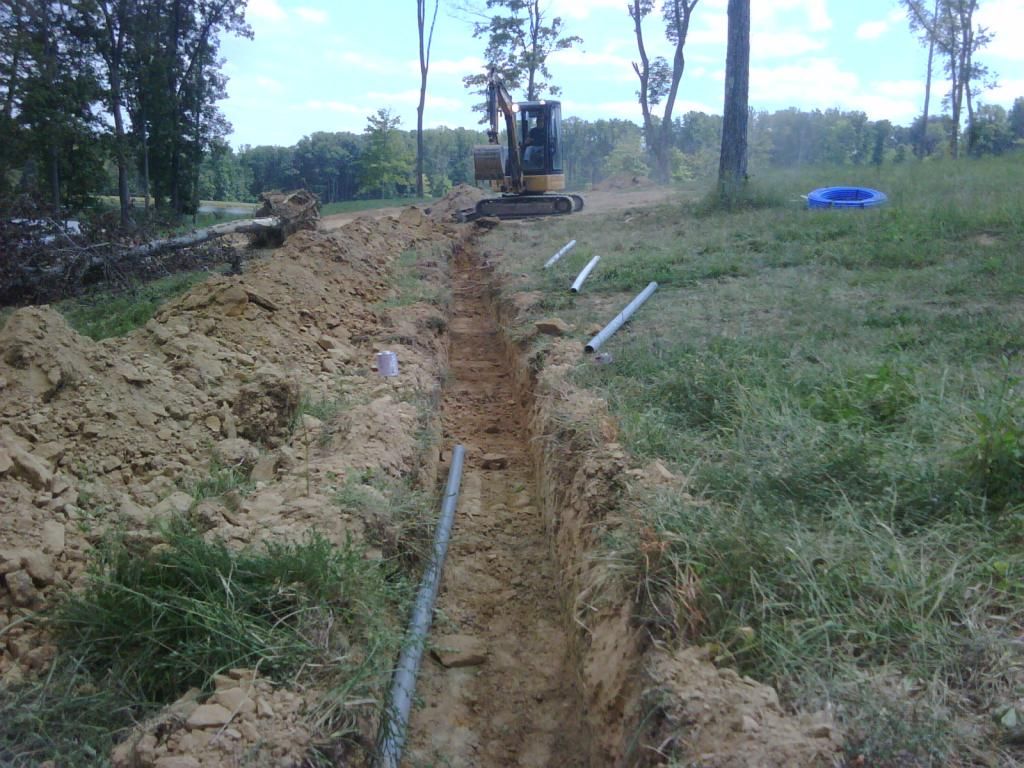
Septic Tanks put in: fall 2012.
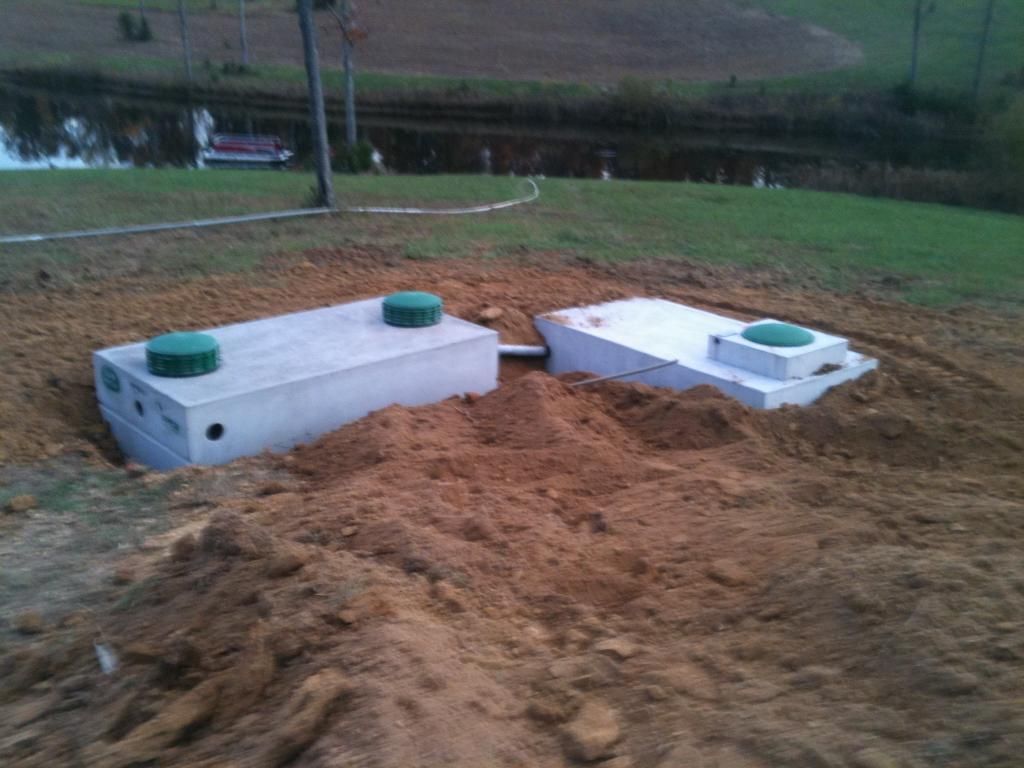
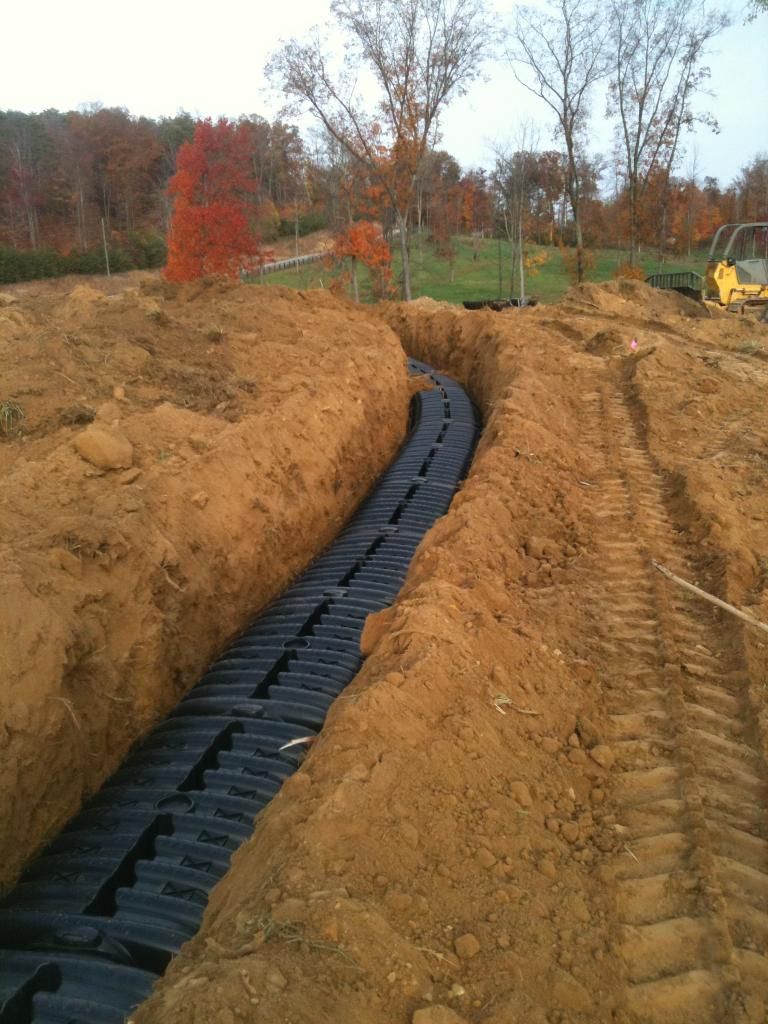
Lateral Field.(5) 100' Runs. A dose system with 2' cap. Pumped 320' 21' of head.
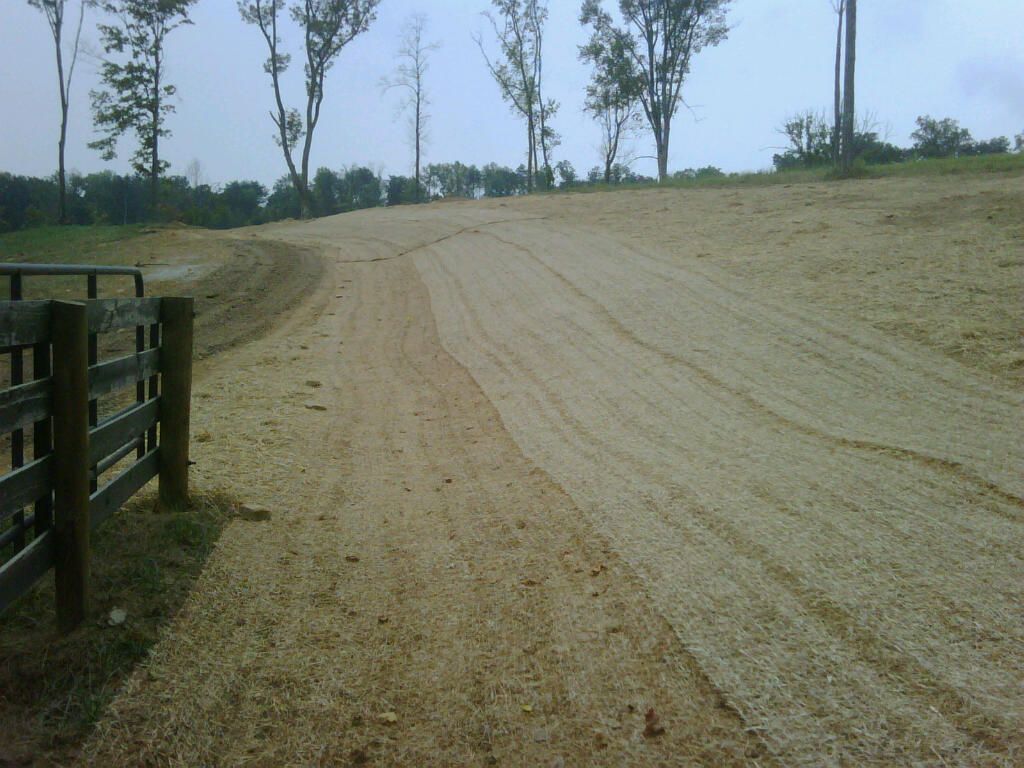
Pad for Pole barn completed as same time as septic.
Then on to planting 13,200 trees in the spring of 2013.
Which gets me back to the pole barn: Sept. 2013.
Me on that same skidsteer. 1/2 day much more fun.
http://s831.photobucket.com/user/rruttle1/media/postholedigger_zps79138497.jpg.html]

[/URL]
OK I got to get back to building a pole barn winter is a coming!!!!
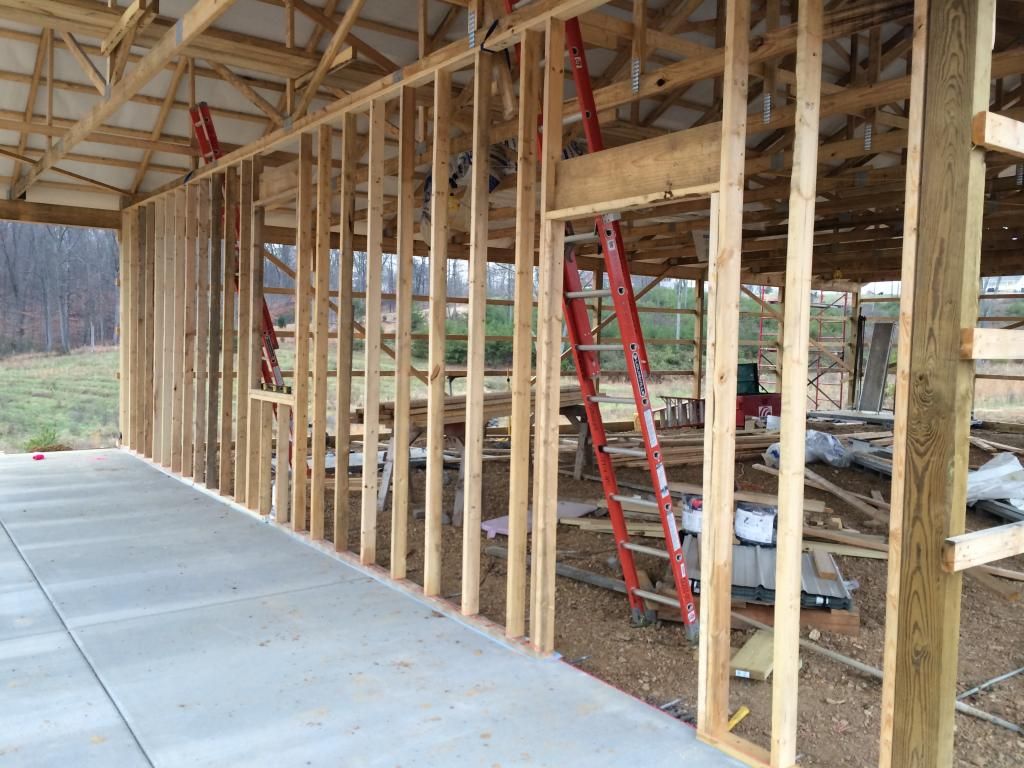
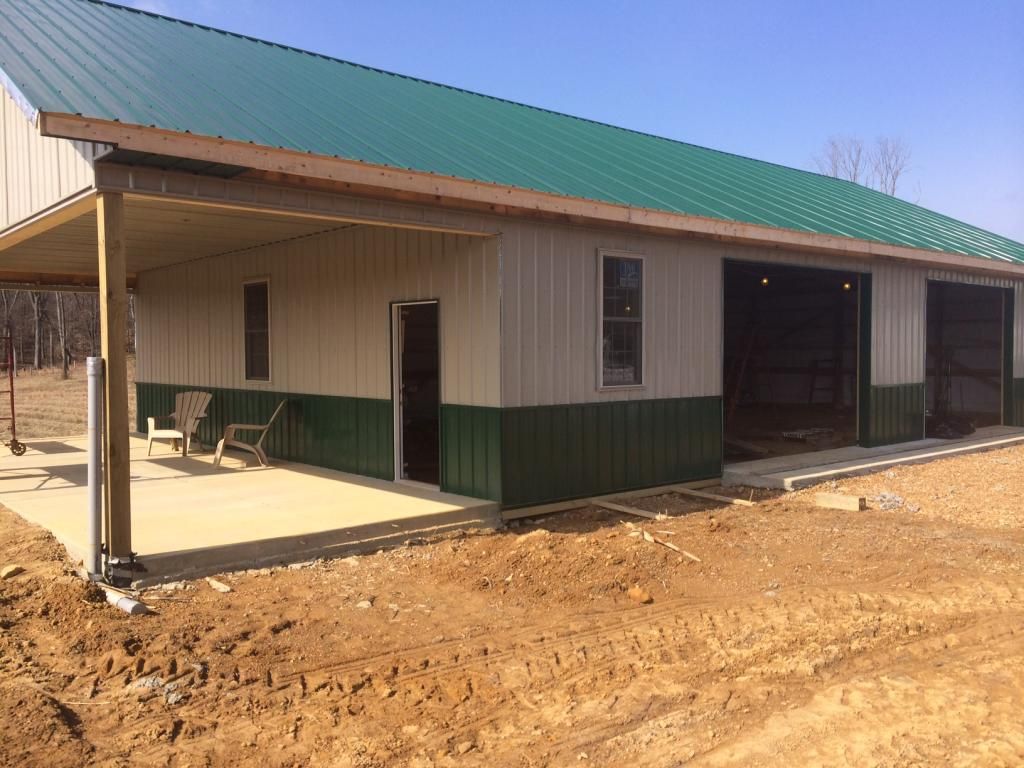
Got the end wall next to the porch built:
And stood up:
Also caught a really nice sunrise Saturday after Thanksgiving:

Gonna try and get all the side girts on the end wall tonight and do some cleaning up to get the slab ready. Next Tuesday there calling for single digit lows after SNOW,SLEET AND FREEZING RAIN!! Starting this Friday through Monday.
Looking great! Congrats on the progress!
Still "INCHING" Along:
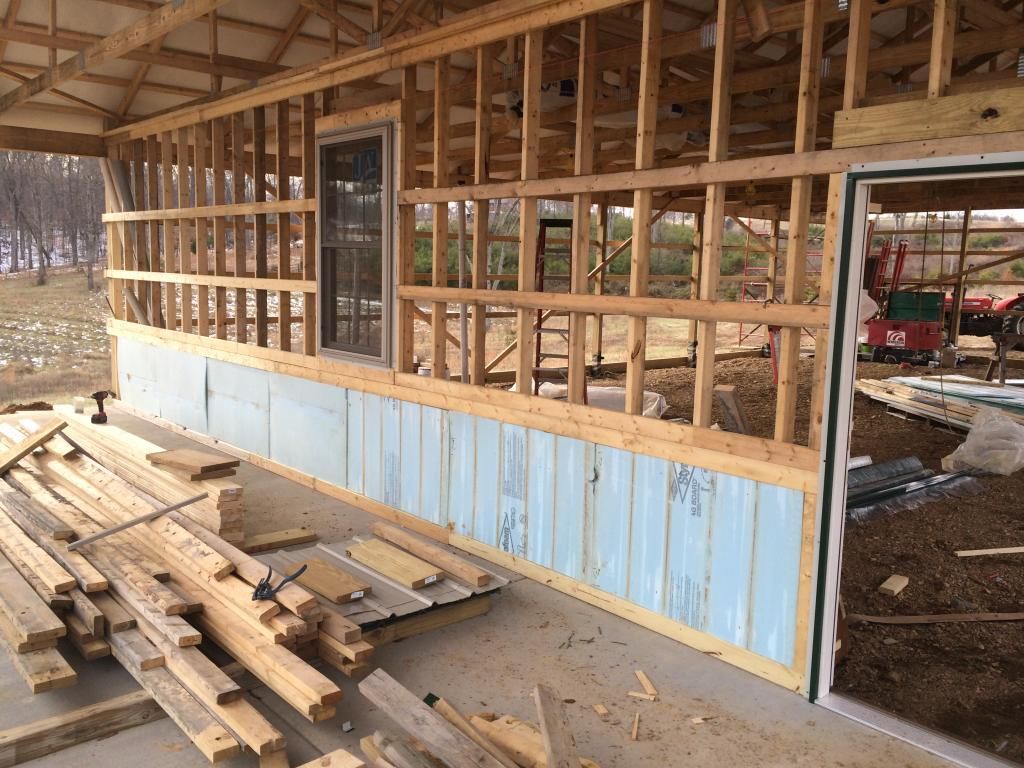
As you can see I'm not moving real fast. Hard to get anything done after work during the week. And this past weekend had about 3" of rain and some high winds. Even had a Tornado Warning Saturday Night. Crazy In December.
That wainscoting is going to look nice. What color will it be topped with?
The Top will be "Clay" colored. There is some laying in the pictures. Thanks
Very Nice R&R! I can't wait to get mine started later this year!
Well, Between the Flu taking me out for a couple of weeks and the extreme cold nothing much has happened on the pole barn. Finally got back at it yesterday.
Then again this morning. In the mud !!!!!
But got the back side done.
And Still made it home in time for the "BIG" Game..................Indiana vs Michigan.
Oh yea There is a Football game on later.
R&R,
What are the outside dimensions of your pole barn? Sorry if this has already been covered.
36' x 66' 10' ceiling height. 18" overhang. 12' of the 66 is porch.
Looking good R&R!
I can't wait till we have mud again

My big building project for this year is a 12' x 16' shed.
R&R, you have done an outstanding job on your project. Putting your walls on the slab is the correct method. The two tone siding is a nice touch but I am really impressed with your bracing and framing. You have had to had quite a bit of construction savvy under your belt. You will appreciate it much more knowing you built it right.
That is soooooo weird not seeing snow on the ground!

That's looking really nice!
How are the windows installed and sealed? My parents have a pole barn, and the windows leak around the outside frame. I'll have to figure out how to stop them from leaking before I finish the inside of the pole barn with drywall and put a roof in there. Forget about asking the guy to come back - it's been 4-5 years and he did such a bad job that I wouldn't want him working on it anyway. Too long of a list to go into.....
Scott, if you have an aluminum drip cap over the window and if the sides are completely chalked, the windows should not leak at all. R&R has done an awesome job on his building( too good to be called a pole barn) and has enough overhang that he does not need the drip caps.
Esshup, not to thread jack, but would the foam insulation in a can seal up the leaks?
R&R, try not to be in a rush to complete the project. Just enjoy the ride getting there. Looking good.
R&R, that's one fine looking building!
Thanks guys.
Cecil snow is back today. 57 Saturday.
Esshup, I'm no expert for sure, But these particular windows had a nailing flange molded into them that stuck out about an 1 1/2". couple that with the 2" back flange on the J-mold and it seems like it would be hard to leak. As ken said with my overhang I don't expect problems. But I'll probably run a bead of caulk all the way around anyway.
Thanks again for the good comments.
Dad tried the foam in a can. You can see where it oozed on the outside of the building and the sun turned it a dark brown. The leak is still there.....
I might have to take the windows out, clean all the foam away, make a small raingutter over each one and re-install, caulking them well. These don't have a flange on them, they are double pane vinyl windows that you could use in a house. 2'x4' non-opening.
Thanks R&R!
Scott, if you can loosen the vinyl J-Strip enough to get the drip cap under it, you will be good to go. Any window that is exposed needs the drip cap as the nailing flanges do not stop leaks. We had to do this on a house that was done before we bought it. It is a lot of fun working behind a jack-leg.
Ken, let me go look. I'll take a picture and post it.
Esshup the window on the porch end doesn't have siding on yet. Next time I get up there I'll take a close up of the j-mold around it if it might help.
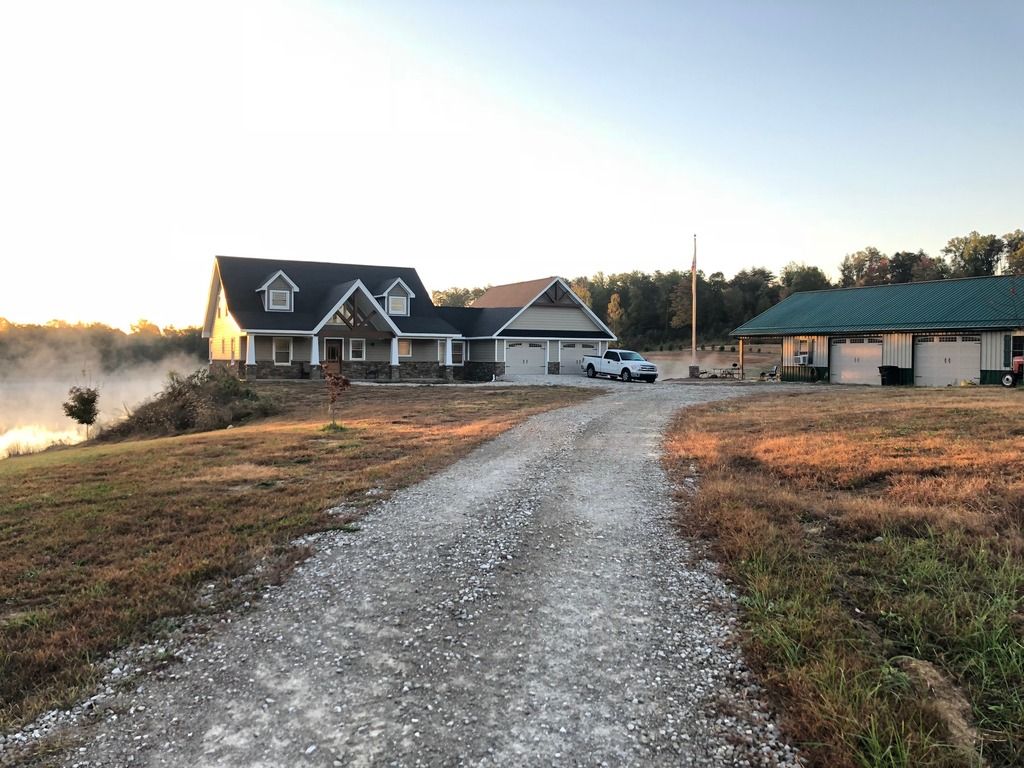
R&R what cost are we talking about getting one done like that? Looks amazing
Sb, I'm at about $14,000 right now.
Still have about 25 yards of concrete to pour and my two overhead doors to get. (about another $6,000 + or -)
Got all the metal siding on. Still have about 230' of soffit/overhang to do plus corners and misc.
Good thing its about the Journey.
esshup I just realized I didn't take a picture around my window before I covered it. My Bad.

esshup I just realized I didn't take a picture around my window before I covered it. My Bad.
No big deal. I'm going to finish the inside of Dad's pole barn this year, and I think I'm going to yank out all the windows and make sure they're installed properly and flashed before I start on the inside.
Looking good man, looking good!
Looks good.. One suggestion move the Window section of your garage doors down one section so you can see out of them..
Very nice !!! Not like many pole barns I see - more like a house.
Yes I would put that several cuts above any pole barn or shed I have.
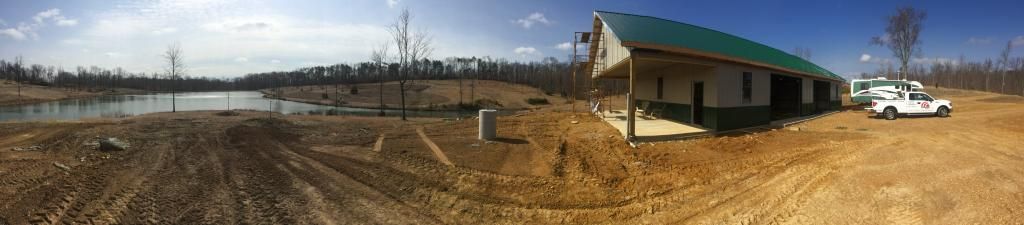
Something like that would look nice out by my pond though................... maybe some day.
Very nice. Love the color combo to. I'm thinking of how nice it would be to sit out there with a nice adult libation while overlooking the pond.
Very nice. Love the color combo to. I'm thinking of how nice it would be to sit out there with a nice adult libation while overlooking the pond.
I second that. Well done on the design of everything.
Cheers Don.
Thanks for the comments guys. Libation on the porch..........Priority.
BGK. Just didn't care for the look with the window section lower. But definite consideration when planning.
We will be living in half of this for a year or two.......or three.....Until we build the house. Hope the wife doesn't see that three part.
Not Much to add on the pole barn Progress but did take some time this past Saturday to do a little fishing.
Didn't have a scale but had a tape measure. Just shy of 15 1/2"

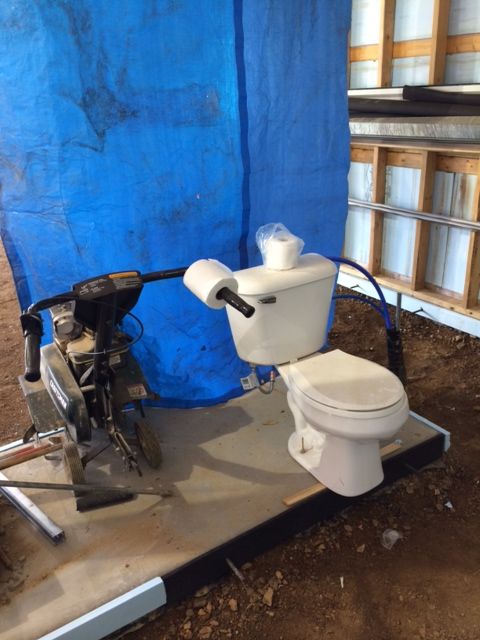
Haven't made a lot of progress in the last couple of months but we are one major step closer to having a working toilet. Very big deal in my book.
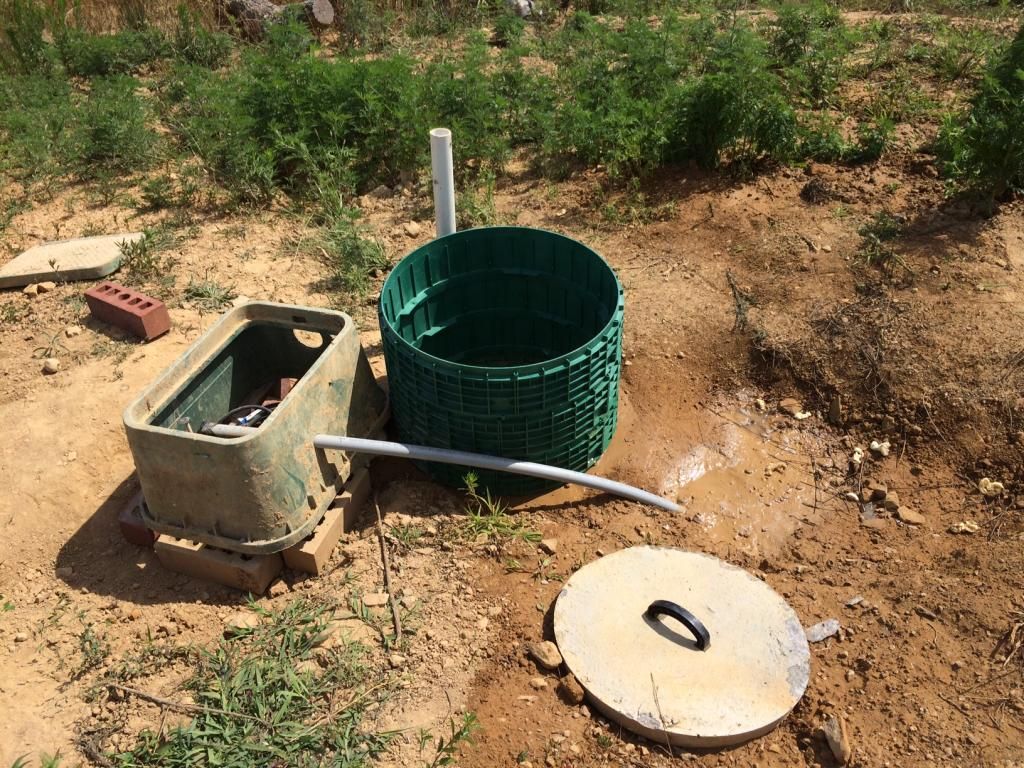
Looking down into Dose Tank
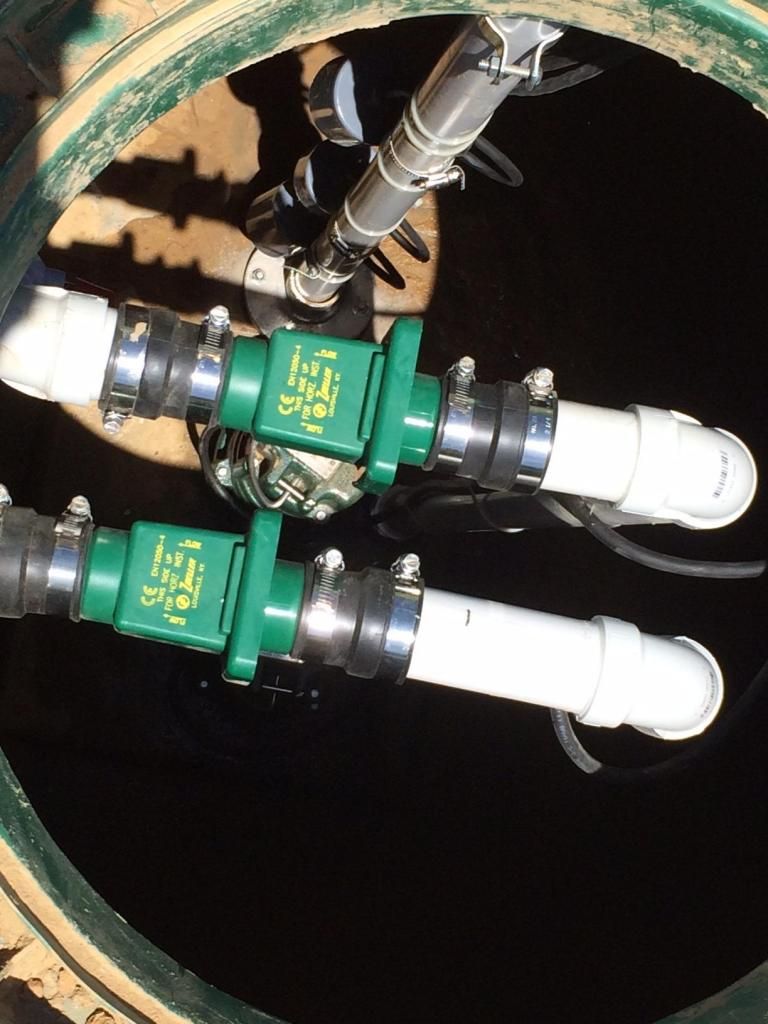
Spent part of the holiday weekend inside my dose tank. Pull some wires, Set up controls and get inspected and we are a flushing. Wait until you see the bathroom.
Without flush toilets and showers, my Wife wouldn't even go with me.
Without flush toilets and showers, my Wife wouldn't even go with me.
So you didn't put them in right?
That is the best looking shed that I have ever seen. It is nice to see someone who takes pride in his work.
In my old age, I have come to appreciate the benefits of indoor plumbing.
Thanks Ken.
I'm with you Dave. We've had the in-laws RV up there for the last year or so to use the bathroom in. But this step will keep me from hauling you know what 10 gallons at a time to a dump station.
Very nice work and great looking group as well.
Looks great and many a mans dream. Lots of hard work and christened by the kids puts a great cap on one fine project. You should be and I am sure you are, proud of what you have and what is yet to come. Just a really great place.
AHHHHHH.......The simple pleasures in life.
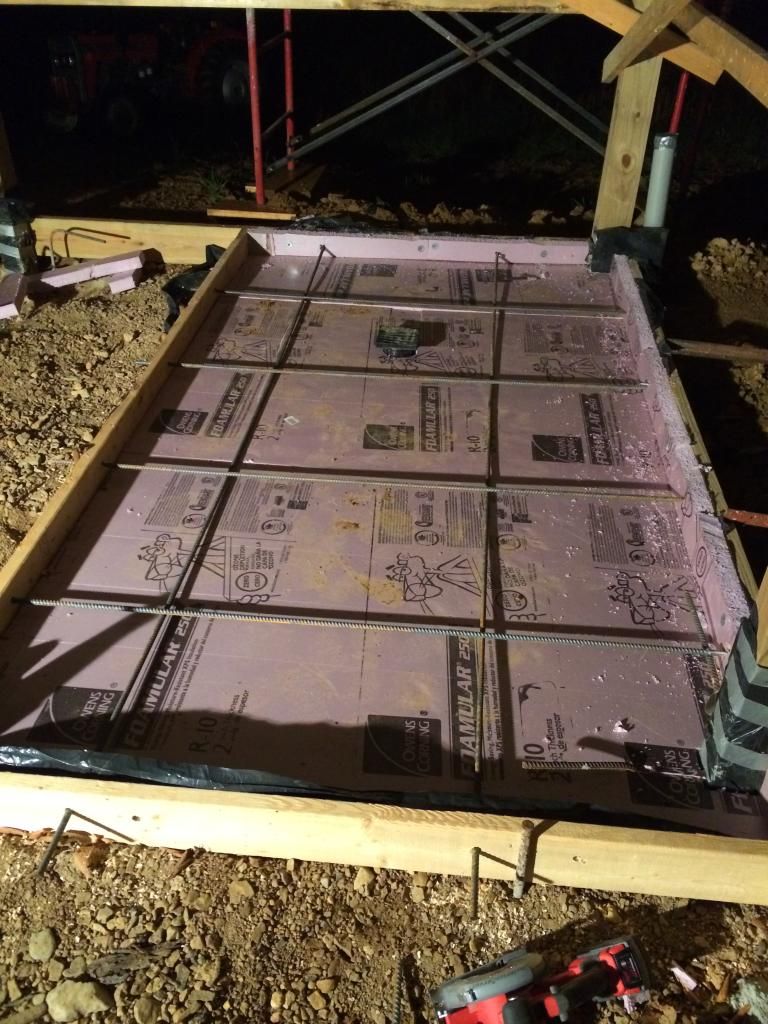
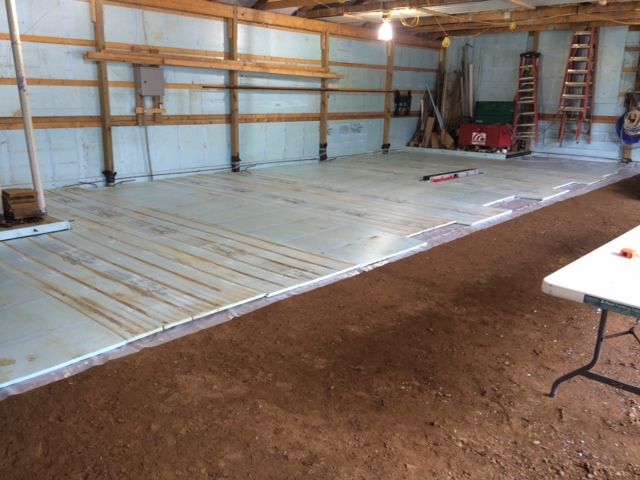
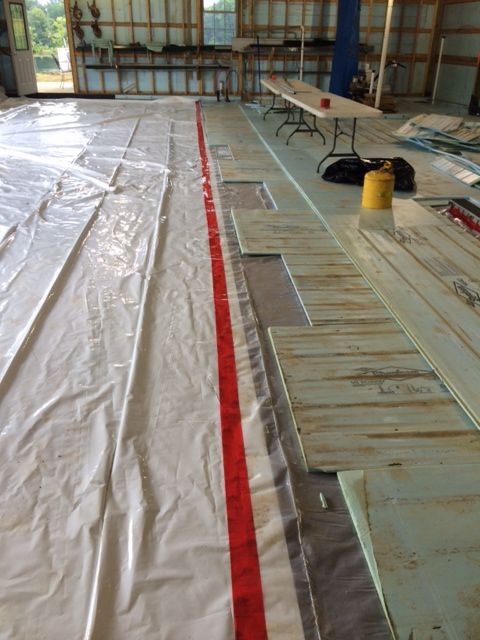
Got started prepping the floor this past weekend. Started with a 6 mil. vapor barrier.
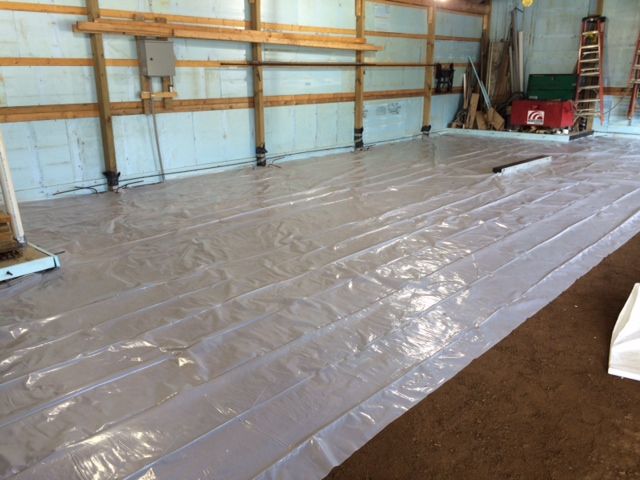
Followed by two inches of blue board insulation.
Radiant heat tubing is next?
That is one deluxe barn!
Congrats!
Thanks Zep.
Yes , esshup that and some rebar and wire mesh. need to get it ready this upcoming holiday weekend. Planning to pour Sept.6th
I'd go with rebar and not mesh. Put the rebar on hi-chairs and don't space closer together than 18". That allows the concrete guys to walk around without stepping on the rebar. Wire will be stepped on and will need to be pulled up, and its durn hard to pull it up evenly. Radiant heat tubes can be tied under the rebar to prevent them from getting stepped on during the pour.
I'd also put fibers in the concrete - it helps with surface cracks.
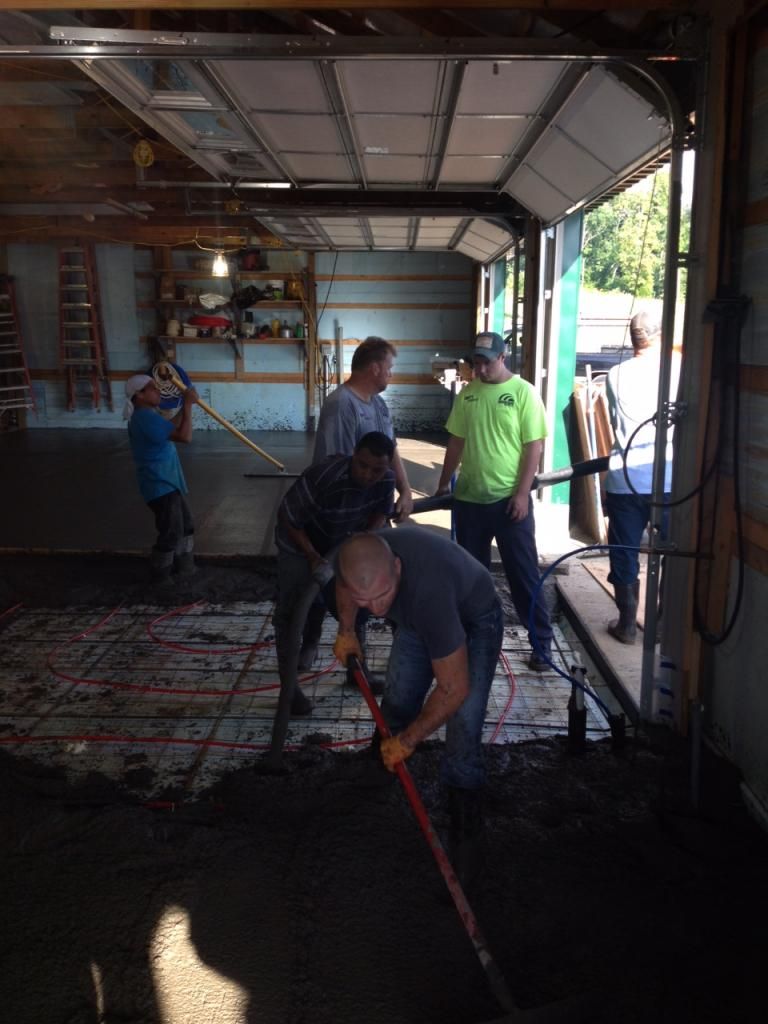
Well exactly one year to the day after the big truss setting party I've poured my slab. None to soon. Supposed to close on the sell of our house in 5 days and then we've got 30 days to get out.
Center control joint.
1st truck
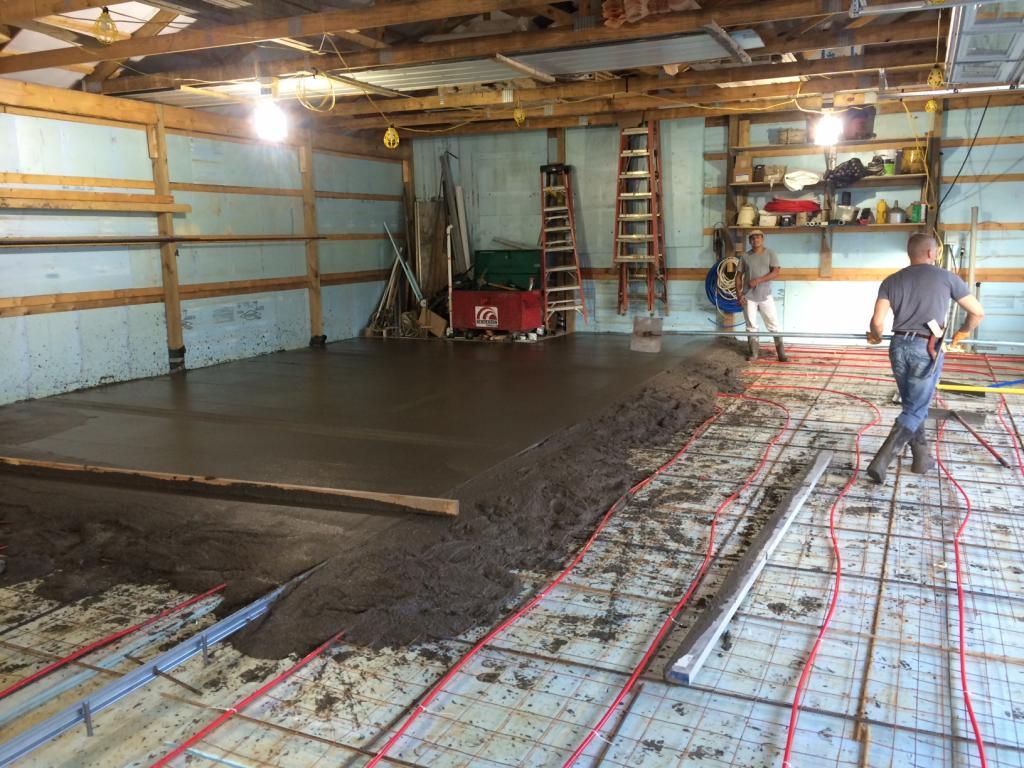
Most of the second truck
Almost done
Thank you LORD!!
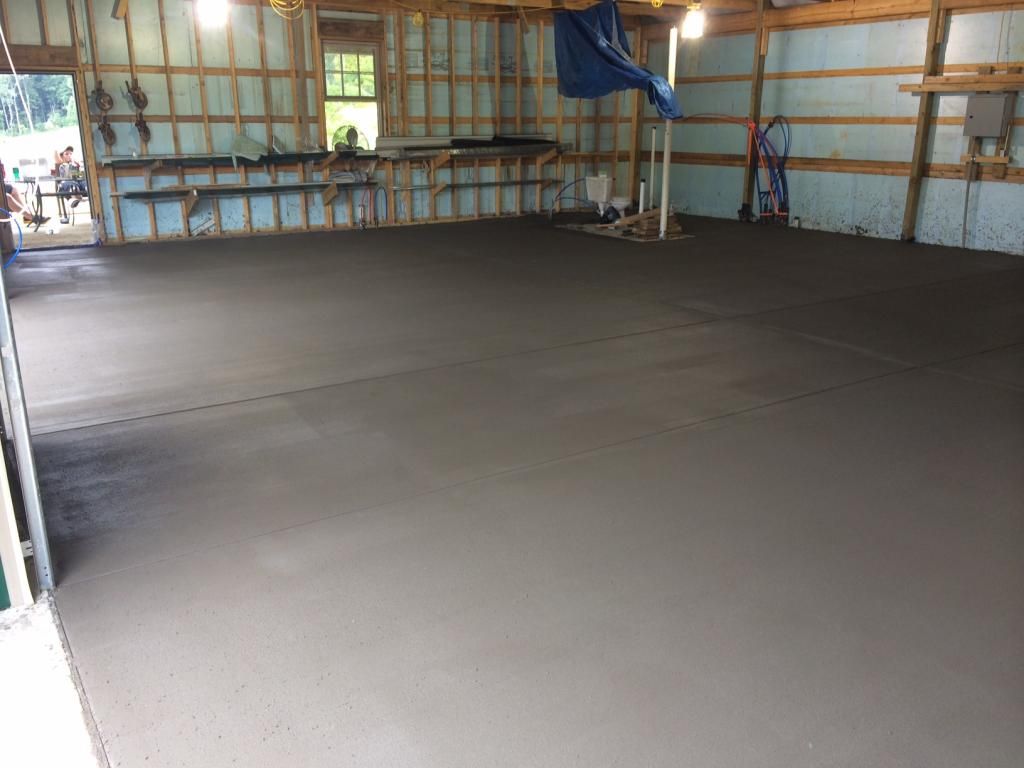
And most importantly of all.......NO LEAKS!!!!
Well done - now get moving a month will be up quick !
Happy Birthday, R&R! You have one of the prettiest places and the best looking-well built poles barns I have seen. Enjoy!
Awesome job! And Happy Birthday also! Almost let it get by me....
Thanks for the kind words and birthday wishes guys.
Closed today. The 30 day clock is tickin. But I'll be so glad to at least not be commuting back and forth trying to pack,move,haul,build,moving sale,clean ,sort,throw away,find,lose,unpack,...............y'all get the idea.
Been awhile since Ive been on and or posted. Not quite moved out of the barn into the house but getting close.
I need one of the gas powered toilet paper dispensers you got next to that toilet pic..
Been awhile since Ive been on and or posted. Not quite moved out of the barn into the house but getting close.
That there is the deluxe model of the
Pondmeister homestead package. Very, very nice, R&R.


